
To install your smart thermostat, start by gathering necessary tools and turning off the power supply. Remove your old thermostat and carefully label the wires. Choose an ideal location and install the mounting plate. Connect the wires to your new smart thermostat, then attach it to the plate. Restore power and test the system to verify it's working correctly. Connect your thermostat to your Wi-Fi network and configure your preferred settings. Finally, explore energy-saving features and set up personalized schedules. With these steps, you'll be on your way to a more efficient home, but there's more to discover about maximizing your smart thermostat's potential.
Gather Necessary Tools and Equipment

Success in any DIY project starts with proper preparation. Before you begin installing your smart thermostat, gather all the necessary tools and equipment.
You'll need a Phillips head screwdriver, a flathead screwdriver, a drill with appropriate bits, wire strippers, needle-nose pliers, and a voltage tester. Don't forget to have a level on hand to make sure your thermostat is perfectly straight.
Make certain you have the smart thermostat kit itself, which should include the thermostat unit, mounting plate, and screws. You might also need wall anchors if you're installing on drywall.
Check if your kit includes a C-wire adapter; if not, you may need to purchase one separately. Have a small container ready to store screws and other small parts during the installation process.
It's also wise to keep a notepad and pen nearby to jot down wire connections. For safety, wear protective gloves and safety glasses.
If you're working in a dimly lit area, grab a flashlight or headlamp to make sure you can see clearly. Finally, keep your smartphone or tablet charged and nearby, as you'll likely need it for setup and troubleshooting.
Turn Off Power Supply
Safety first: turning off the power supply is an essential step before you start tampering with your home's electrical systems. Locate your home's circuit breaker box and identify the switch that controls power to your heating and cooling system. It's usually labeled "HVAC," "Furnace," or "AC." Flip this switch to the "Off" position.
To double-check that the power is truly off, try adjusting your current thermostat. If it doesn't respond, you've successfully cut the power. For extra precaution, use a voltage tester on the thermostat wires.
| Safety Measure | Purpose | Importance |
|---|---|---|
| Circuit Breaker | Cut main power | Critical |
| Thermostat Test | Verify power off | Confirmatory |
| Voltage Tester | Confirm no residual current | Extra safety |
Don't skip this step, even if you're in a hurry. Working with live electrical wires can lead to shocks or short circuits, potentially damaging your new smart thermostat or home's electrical system. If you're unsure about which circuit controls your HVAC system, it's better to turn off the main power supply to your entire house. Remember, it's always better to be overly cautious when dealing with electricity.
Remove Existing Thermostat

Now that you've turned off the power supply, it's time to remove your existing thermostat.
Carefully detach the wires connected to your old thermostat, making sure to label them for easy identification later.
Once the wires are free, remove the mounting plate from the wall to complete this step.
Turn off Power Supply
Caution is paramount when beginning the removal process of your existing thermostat. Before you touch any wires or components, it's vital to turn off the power supply to your HVAC system. This step guarantees your safety and prevents potential damage to your home's electrical system.
Locate your home's circuit breaker box and identify the switch that controls your heating and cooling system. It's usually labeled "HVAC," "Furnace," or "AC." Flip this switch to the "off" position. If you're unsure which breaker controls your HVAC system, turn off the main power supply to your entire home.
To confirm that the power is indeed off, try adjusting your current thermostat. If it doesn't respond or the display is blank, you've successfully cut the power. However, if it still operates, double-check the circuit breaker or consult an electrician for assistance.
Remember these emotional drivers when working with electricity:
- Fear: Electrical shocks can be life-threatening.
- Responsibility: Protecting your family's safety is in your hands.
- Confidence: Taking proper precautions empowers you to complete the installation safely.
With the power off, you can now proceed to remove your old thermostat without risking injury or damaging your HVAC system.
Detach Wires Carefully
With the power safely turned off, it's time to remove your old thermostat. Begin by carefully removing the faceplate or cover of your existing thermostat. This usually involves gently pulling it off or unscrewing it, depending on the model.
Once exposed, you'll see the wiring connected to the thermostat's base. Before detaching any wires, take a clear photo of the current wiring configuration. This will serve as a reference later.
Next, label each wire using small adhesive labels or masking tape. Mark them according to their terminal labels (e.g., R, C, W, Y, G). If the wires aren't color-coded, this step is essential for proper reconnection.
Carefully unscrew and remove each wire from its terminal. As you detach them, wrap the exposed ends with electrical tape to prevent accidental contact. If the wires are short, use a wire stripper to expose more of the wire if needed.
Once all wires are free, unscrew the thermostat base from the wall. Be cautious not to let the wires fall back into the wall cavity. If necessary, gently pull them out and secure them with tape.
Clean the wall surface, removing any dust or debris left behind by the old thermostat.
Remove Mounting Plate
After detaching the wires, you'll need to remove the mounting plate of your old thermostat. This step is essential for creating a clean slate for your new smart thermostat installation.
Carefully examine the mounting plate to identify any screws or clips holding it in place. Most thermostats have visible screws, while others may have hidden fasteners beneath decorative covers.
Using a screwdriver that fits the screw heads, remove all securing screws. If you encounter any resistance, don't force it. Instead, double-check for additional fasteners you might've missed.
Once all screws are removed, gently pull the mounting plate away from the wall. Be cautious not to damage the drywall or paint behind it.
As you remove the old mounting plate, you might experience:
- A sense of accomplishment as you progress in your DIY project
- Excitement about the upcoming smart technology upgrade
- Curiosity about the wall condition behind the old thermostat
Inspect the wall area for any damage or irregularities that may need addressing before installing the new smart thermostat.
If you notice any issues, such as loose drywall or uneven surfaces, take the time to repair them now to guarantee a secure and level installation for your new device.
Identify and Label Wires
The next essential step in installing your smart thermostat is identifying and labeling the wires correctly. This process is vital for ensuring your new thermostat functions properly and safely.
Start by taking a photo of the existing wiring configuration for reference. Then, carefully examine each wire connected to your old thermostat.
You'll typically find color-coded wires, but don't rely solely on colors as they may not always be standard. Instead, note the letter labels on your old thermostat's terminals where each wire is connected. Common labels include "R" for power, "C" for common, "W" for heat, "Y" for cooling, and "G" for fan.
Use small adhesive labels or masking tape to mark each wire with its corresponding letter. If you're unsure about a wire's function, consult your thermostat's manual or contact a professional. Pay special attention to any unused wires; these should be labeled as well.
For multi-zone systems or heat pumps, you may encounter additional wires. In these cases, it's especially important to document the current setup meticulously.
If you're replacing a battery-operated thermostat, you mightn't find a C-wire, which is often necessary for smart thermostats. In this situation, you may need to install a C-wire adapter or consult an HVAC professional.
Install Mounting Plate
To install the mounting plate, you'll need to choose the correct wall location for your smart thermostat.
Once you've selected the spot, make certain the mounting plate is level using a bubble level.
Mark the screw hole positions accurately to prepare for the next step of securing the plate to the wall.
Choose Correct Wall Location
Selecting an ideal spot for your smart thermostat is essential for peak performance. Choose a location on an interior wall, away from direct sunlight, air vents, and drafts. This guarantees accurate temperature readings and efficient operation. Aim for a height of about 5 feet from the floor, which is typically eye level for most adults and provides easy access for adjustments.
Consider the thermostat's visibility and accessibility when deciding on its placement. You'll want it in a central area of your home, where you can easily interact with it. Avoid placing it in rarely used rooms or behind furniture, as this can affect its ability to accurately sense your home's temperature.
When choosing the correct wall location, keep these emotional factors in mind:
- Comfort: A well-placed thermostat guarantees consistent temperatures throughout your home, enhancing overall comfort.
- Energy savings: Proper placement can lead to more efficient heating and cooling, reducing your energy bills.
- Convenience: An easily accessible thermostat encourages regular use and adjustments, maximizing its smart features.
Remember to check for adequate wall space and verify there's a compatible wiring setup behind your chosen location before proceeding with the installation.
Level the Mounting Plate
Mounting plate installation forms the foundation of your smart thermostat setup. To guarantee your device functions properly and looks aesthetically pleasing, you'll need to level the mounting plate carefully.
Start by holding the plate against the wall where you've chosen to install your thermostat. Use a bubble level to check if it's straight. Place the level on top of the plate horizontally, then vertically to confirm both axes are aligned.
Once you've determined the correct position, mark the screw holes on the wall with a pencil. If you're working with drywall, use a drill to create pilot holes for the screws. For masonry walls, you'll need to use a masonry bit and insert wall anchors.
When you're ready to attach the plate, place it back against the wall, aligning it with your marks. Insert the screws and tighten them, but be careful not to over-tighten, as this can warp the plate.
Double-check the level once more after securing the plate. If it's slightly off, you can make minor adjustments by loosening the screws and shifting the plate as needed. A properly leveled mounting plate will guarantee your smart thermostat sits flush against the wall and functions effectively.
Mark Screw Hole Positions
After leveling the mounting plate, it's time to mark the screw hole positions. This step is essential for guaranteeing your smart thermostat will be securely fastened to the wall.
With the mounting plate held firmly in place, use a pencil to carefully mark the spots where you'll need to drill holes for the screws. Make sure to mark all the necessary holes, typically two or three, depending on your thermostat model.
If you're working with drywall, you'll need to use wall anchors to provide extra support. For this, mark additional holes for the anchors as indicated on the mounting plate. If you're mounting directly onto a wooden stud, you won't need anchors, but confirm you're marking the holes that align with the stud.
To make this process smoother and more enjoyable, keep these tips in mind:
- Take a deep breath and stay focused – precision is key.
- Imagine the satisfaction of a perfectly installed thermostat.
- Remember, you're one step closer to a smarter, more efficient home.
Once you've marked all the necessary holes, double-check their alignment before moving on to the next step. This attention to detail will pay off when it's time to install the mounting plate and your new smart thermostat.
Connect Wires to Smart Thermostat
The essential step of connecting wires to your smart thermostat requires careful attention to detail. Before you begin, verify you've turned off power to your HVAC system at the circuit breaker.
Take a photo of your old thermostat's wiring for reference, then carefully remove the wires.
Identify the labels on your smart thermostat's base plate and match them to the corresponding wires. Common wire colors include red (R) for power, white (W) for heat, yellow (Y) for cooling, and green (G) for the fan. If you have a C-wire (usually blue), connect it to the C terminal for constant power.
Use needle-nose pliers to straighten the wire ends if needed. Insert each wire into its designated terminal, verifying a secure connection. Gently tug on each wire to confirm it's properly seated. If your smart thermostat came with wire labels, use them for easy identification.
Double-check all connections against your reference photo and the thermostat's wiring diagram. Once you're confident everything is correctly wired, you can proceed to mount the thermostat onto the base plate.
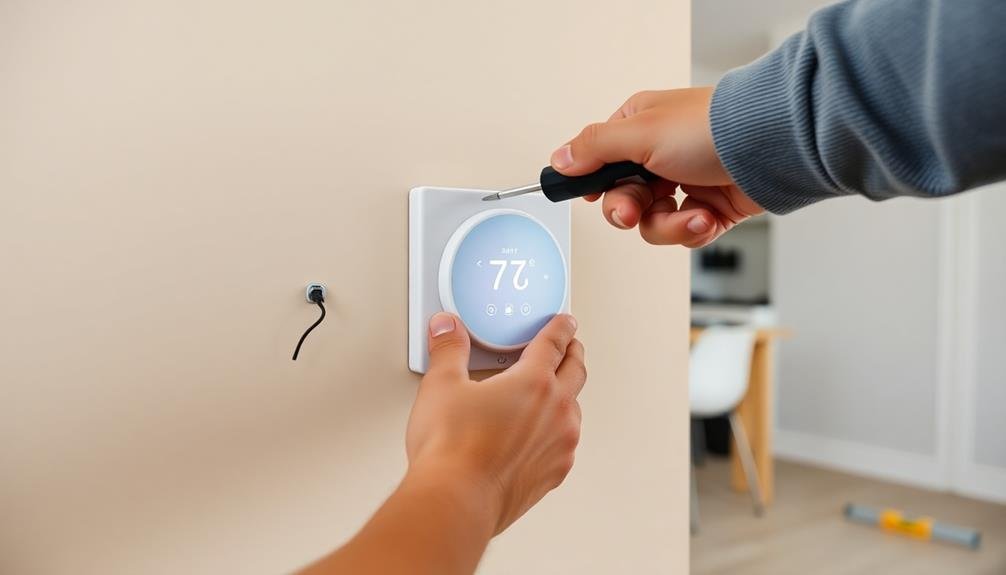
Attach Thermostat to Mounting Plate

Now it's time to attach your smart thermostat to the mounting plate.
First, align the device carefully with the base plate, ensuring all connection points match up.
Once aligned, gently push the thermostat onto the plate until you hear it snap securely into place.
Then double-check that it's properly fitted and flush against the wall.
Align With Base Plate
Alignment is vital when attaching your smart thermostat to the mounting plate. Carefully position the device, making sure that the pins on the back of the thermostat line up perfectly with the corresponding slots on the mounting plate. This step is essential for proper functionality and a secure fit.
As you align the thermostat, pay close attention to any markings or guides on both the device and the mounting plate. These indicators are designed to help you achieve the correct orientation. Once you've lined everything up, gently press the thermostat onto the mounting plate until you hear or feel a satisfying click, indicating it's securely in place.
To guarantee a successful alignment, follow these emotional cues:
- Feel the excitement as you're one step closer to a smarter home.
- Experience the satisfaction of a perfect fit when the pins slide into place.
- Embrace the confidence that comes with knowing you're doing it right.
Double-check your work by gently tugging on the thermostat to confirm it's firmly attached. If it feels loose or wobbles, remove it and realign.
Snap Into Place Securely
Snapping your smart thermostat into place is the final step in the physical installation process. With the base plate securely mounted and wires properly connected, you're ready to attach the thermostat unit itself.
Hold the thermostat carefully, aligning it with the base plate. You'll notice small tabs or hooks on the base plate that correspond to slots on the back of the thermostat.
Gently press the thermostat against the base plate, ensuring the tabs align correctly. Apply even pressure across the face of the thermostat, pushing it towards the wall. You should hear a satisfying click as the unit snaps into place. This click indicates that the thermostat is securely fastened.
Once attached, give the thermostat a gentle tug to confirm it's firmly in place. If it feels loose or wobbles, remove it and try again, making sure all tabs are properly engaged. A secure fit is essential for both proper function and safety.
With the thermostat snapped in place, you can now power on your HVAC system and begin the setup process for your new smart thermostat. Follow the manufacturer's instructions for connecting to your home's Wi-Fi network and configuring your preferred settings.
Check for Proper Fit
After snapping your smart thermostat into place, it's important to verify its proper fit. Confirm the device sits flush against the wall without any gaps or tilting. Gently press on all sides of the thermostat to confirm it's securely attached to the mounting plate.
If you notice any wobbling or movement, remove the thermostat and double-check the mounting plate's installation.
Look for any exposed wires around the edges of the thermostat. If you see any, carefully tuck them back into the wall opening to prevent interference with the device's operation.
Check that the thermostat's display is level and aligned correctly with your wall. A crooked display might indicate an improperly installed mounting plate.
To confirm your smart thermostat is properly fitted, follow these steps:
- Run your fingers along the edges to feel for any unevenness or gaps
- Gently push on each corner to test for stability and secure attachment
- Step back and examine the thermostat from different angles to spot any misalignment
If you're satisfied with the fit, you can proceed to the next step in the installation process.
However, if you notice any issues, don't hesitate to remove the thermostat and make necessary adjustments to the mounting plate or wiring.
Restore Power and Test
Restoring power to your newly installed smart thermostat is the final essential step.
Before you do this, double-check all your connections to verify they're secure. Once you're confident everything's properly connected, head to your circuit breaker box and switch the power back on for your HVAC system.
Return to your thermostat and wait for it to power up. You'll likely see the display come to life, indicating that it's receiving power. If it doesn't turn on, recheck your wiring connections and verify the circuit breaker is fully engaged.
Now it's time to test your smart thermostat. Set it to heat mode and raise the temperature a few degrees above the current room temperature. Listen for your heating system to kick in.
Then, switch to cool mode and lower the temperature below the room temperature. Your air conditioning should start running.
Don't forget to test any additional features your smart thermostat offers, such as fan control or humidity settings.
Connect to Wi-Fi Network

With your smart thermostat installed and tested, it's time to connect it to your home's Wi-Fi network. This step is essential for accessing the full potential of your device, enabling remote access and advanced features. Most smart thermostats have a user-friendly interface that guides you through the Wi-Fi setup process.
First, verify your smartphone or tablet is connected to the same Wi-Fi network you want to use for your thermostat. Then, follow the on-screen prompts on your thermostat to initiate the connection process. You'll typically need to select your network from a list and enter the password. Some models may require you to use a companion app for setup.
Once connected, your thermostat will likely check for and install any available firmware updates. This guarantees you have the latest features and security patches. After the update, you're ready to explore your thermostat's full capabilities.
To make the most of your newly connected smart thermostat:
- Set up personalized schedules to optimize energy usage
- Enable geofencing for automatic adjustments based on your location
- Integrate with other smart home devices for a truly connected experience
Remember to keep your Wi-Fi password handy and verify a stable internet connection for uninterrupted functionality.
With your smart thermostat now online, you're well on your way to enjoying enhanced comfort and energy efficiency in your home.
Configure Settings and Preferences
Now that your smart thermostat is connected to Wi-Fi, it's time to configure your settings and preferences. Start by setting your desired temperature range for heating and cooling. Most smart thermostats allow you to create schedules based on your daily routines, so input your typical wake-up, leave-home, return-home, and sleep times.
Next, explore energy-saving features like geofencing, which adjusts the temperature based on your location, or eco mode, which optimizes energy usage. If your thermostat has learning capabilities, enable them to allow it to adapt to your habits over time.
Configure any additional sensors you've installed, such as room sensors or outdoor temperature monitors. Set up notifications for extreme temperatures, filter changes, or system malfunctions.
If your thermostat supports voice control, link it to your preferred virtual assistant. Don't forget to customize the display settings, including screen brightness and information shown.
If available, set up multi-user access for family members or roommates. Finally, explore integration options with other smart home devices, such as smart lights or security systems, to create a more thorough home automation setup.
Frequently Asked Questions
Can I Install a Smart Thermostat if I Have a Heat Pump System?
Yes, you can install a smart thermostat with a heat pump system. It's compatible and can help you manage your heating and cooling more efficiently. However, you'll need to verify it's compatible with your specific heat pump model.
How Long Does the Battery in a Smart Thermostat Typically Last?
You'll find that most smart thermostat batteries last 1-2 years. However, if your device is hardwired, it'll draw power from your HVAC system, and the battery serves as a backup during outages. Remember to check periodically.
Will a Smart Thermostat Work With My Existing HVAC System?
Smart thermostats are generally compatible with most HVAC systems. You'll need to check your system's compatibility before purchasing. It's best to consult the manufacturer's guidelines or a professional to verify it'll work with your specific setup.
Can I Control Multiple Smart Thermostats From a Single App?
Yes, you can control multiple smart thermostats from a single app. Most manufacturers offer apps that allow you to manage several devices. You'll be able to adjust settings, monitor temperatures, and create schedules for all your thermostats conveniently.
Are Smart Thermostats Compatible With Voice Assistants Like Alexa or Google Home?
Yes, you can control many smart thermostats with voice assistants like Alexa or Google Home. You'll be able to adjust temperature, switch modes, and check settings using simple voice commands. It's a convenient, hands-free way to manage your home's climate.
In Summary
You've successfully installed your new smart thermostat! Now you're ready to enjoy the convenience and energy savings it offers. Don't forget to explore all its features and customize settings to fit your lifestyle. Remember to update the app regularly and check for firmware updates to guarantee peak performance. If you encounter any issues, consult the user manual or contact customer support. With your smart thermostat in place, you're on your way to a more efficient and comfortable home.


Leave a Reply