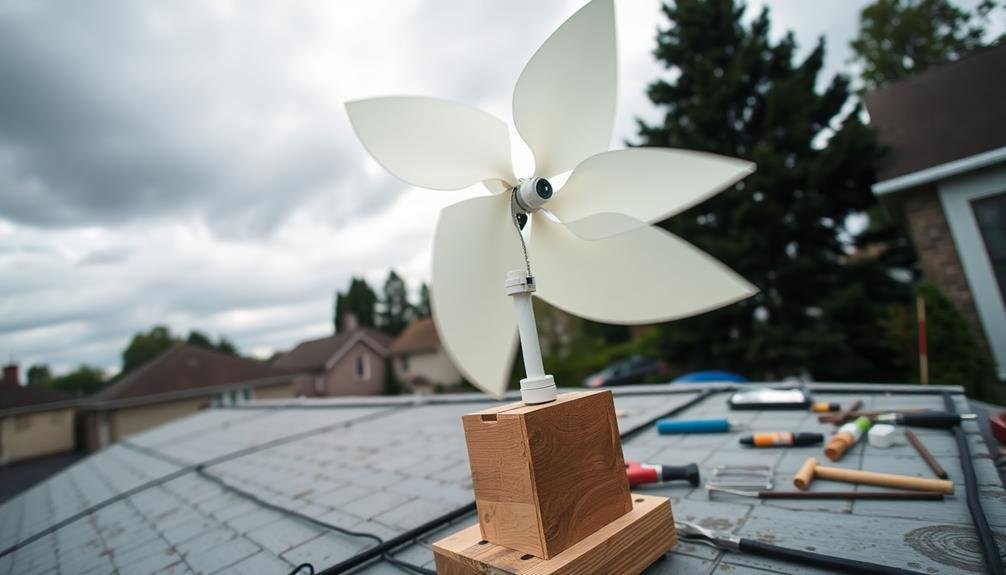
To craft your own home wind turbine, you’ll need to gather materials like PVC pipes, wooden blades, a DC motor, and copper wire. Start by designing efficient turbine blades and constructing the generator with copper coils and magnets. Build a sturdy tower, assemble the nacelle, and wire the electrical components. Install a wind vane for proper orientation, then mount the turbine securely.
Throughout the process, focus on safety and follow local regulations. Testing and troubleshooting are vital final steps to guarantee your turbine functions effectively. With careful planning and execution, you’ll soon be harnessing the power of wind for your home’s energy needs.
Recommended Products For The Article Below
Safety Equipment:
- 3M Safety Glasses, Clear Lens, Anti-Fog
- DEWALT DPG82-11C Safety Goggles
- Heavy Duty Work Gloves with Grip
Tools:
- DEWALT 20V MAX Cordless Drill/Driver Kit
- IRWIN VISE-GRIP Wire Stripper
- Weller Digital Soldering Station
- Klein Tools Digital Multimeter
Materials:
- Charlotte Pipe 2″ x 10′ PVC Schedule 40 Plain End Pipe
- Neodymium Magnets N52 Grade 1.26″x1/8″
- Magnet Wire – 3 Sizes (22, 26, 30 AWG) Enameled Copper Wire
- NSK 6203ZZ Deep Groove Ball Bearing
Electrical Components:
- Marsrock 400W Wind Charge Controller 12V/24V
- ExpertPower 12V 33Ah Deep Cycle Battery
- 8 AWG Marine Grade Primary Wire
- ANL Fuse Holder with 100A Fuse
Mounting Hardware:
- TANG Guy Wire Kit for Telescoping Poles
- Heavy Duty U-Bolts with Nuts
- Quik-Concrete 50 lb Fast-Setting Concrete Mix
- Galvanized Steel Anchor Kit
Gathering Materials and Tools

Before you begin your DIY wind turbine project, it’s essential to gather all the necessary materials and tools.
You’ll need a PVC pipe for the turbine body, wooden or plastic blades, a small DC motor, copper wire for the coils, strong magnets, bearings, a tail vane, and various nuts and bolts. Don’t forget to source a charge controller and a deep-cycle battery for storing the generated electricity.
For tools, make sure you have a drill with various bit sizes, a saw for cutting the PVC and blades, pliers, wire strippers, a soldering iron, and a multimeter. You’ll also need safety equipment like gloves and safety glasses.
Consider the size of your turbine when selecting materials. A larger turbine will require sturdier components but can generate more power.
Research local regulations regarding home wind turbines, as some areas have restrictions on height or noise levels. It’s also wise to check wind patterns in your area to determine the best location for installation.
Designing the Turbine Blades

When designing your turbine blades, you’ll need to take into account three key factors.
Start by selecting an appropriate blade material, such as wood or plastic, that’s lightweight yet durable.
Next, focus on creating an ideal shape for your blades, typically a curved or airfoil design, to maximize wind capture efficiency.
Blade Material Selection
For designing your DIY wind turbine blades, selecting the right material is crucial. You’ll want to balance durability, weight, and cost-effectiveness.
Wood is a popular choice for its availability and ease of shaping. Cedar, pine, or birch plywood are excellent options, offering strength and resistance to weather.
PVC pipe is another affordable and lightweight alternative. It’s easy to work with and resistant to corrosion, making it suitable for coastal areas. However, it may not be as durable as other materials in extreme conditions.
For a more robust option, consider aluminum or fiberglass. Aluminum is lightweight, strong, and corrosion-resistant, but it can be challenging to shape without specialized tools.
Fiberglass offers excellent strength-to-weight ratio and durability, but it’s more expensive and requires careful handling during fabrication.
Carbon fiber is the top-tier choice, boasting exceptional strength and lightness. However, it’s costly and requires advanced skills to work with.
Whatever material you choose, verify it can withstand local weather conditions and provide maximum aerodynamic performance for your turbine design.
Optimal Shape Design
Designing the ideal shape for your wind turbine blades is essential to maximize energy production. Focus on three key elements: airfoil profile, blade length, and twist angle.
Choose an airfoil profile that balances lift and drag forces, such as the NACA 4412 or S833 series. These profiles offer good performance across various wind speeds.
For blade length, longer blades generally capture more wind energy, but they’re also heavier and more expensive. A good rule of thumb is to make your blades about half the diameter of your rotor.
As for twist angle, start with a high angle at the blade root (around 20-25 degrees) and gradually decrease it towards the tip (to about 5 degrees). This twist helps maintain ideal angle of attack along the blade’s length.
Consider tapering your blades, making them wider at the root and narrower at the tip. This design improves structural integrity and efficiency.
Use computer-aided design (CAD) software or wind turbine blade calculators to fine-tune your design. Remember, even small improvements in blade shape can greatly increase your turbine’s power output.
Size and Number
The decision on blade size and number is essential for your DIY wind turbine’s performance. You’ll need to balance efficiency with practicality for your specific location and energy needs. Larger blades capture more wind energy but require sturdier support structures and may be subject to stricter local regulations. Smaller blades are easier to manage but generate less power.
Most home wind turbines use two or three blades. Two-blade designs are simpler and cheaper to construct, while three-blade systems are more efficient and run more smoothly. Consider your skill level and available resources when making this choice.
When determining blade size and number, keep these factors in mind:
- Wind speed in your area: Lower average wind speeds benefit from larger blade diameters
- Available space: Verify you have enough clearance for the blade sweep
- Local zoning laws: Check height restrictions and setback requirements
Constructing the Generator

To construct your wind turbine’s generator, you’ll start by winding copper coils around a form to create the stator.
Next, you’ll assemble the rotor by carefully arranging strong neodymium magnets on a disc or hub.
Winding the Copper Coils
Winding copper coils is a crucial step in constructing your DIY wind turbine’s generator. This process requires patience and precision to guarantee peak performance. You’ll need enameled copper wire, a coil winding jig, and a wire gauge.
Begin by securing the wire to your jig and slowly wind it, maintaining consistent tension throughout. As you wind, count the number of turns carefully. The specific number will depend on your generator’s design, but it’s typically between 100 and 200 turns per coil.
Once you’ve reached the desired number, secure the end of the wire and trim any excess. To maximize your generator’s efficiency, follow these tips:
- Keep your coils neat and tightly wound
- Use a thin coat of epoxy to hold the windings in place
- Test each coil for continuity using a multimeter
After winding all the required coils, you’ll arrange them around the stator of your generator. The exact configuration will depend on your design, but it’s usually in a circular pattern.
Ascertain each coil is properly insulated from its neighbors to prevent short circuits. With your coils wound and positioned, you’re one step closer to completing your homemade wind turbine generator.
Assembling Magnets and Rotor
Moving on to the generator’s heart, you’ll now assemble the magnets and rotor. Begin by obtaining neodymium magnets, which are essential for generating electricity. Arrange them in a circular pattern on a metal disk, alternating their polarity (north-south-north-south). Secure the magnets using strong epoxy, making certain they’re evenly spaced and flush with the disk’s surface.
Next, attach the magnet-covered disk to your turbine’s shaft. This combination forms the rotor. Verify it’s perfectly balanced to prevent vibrations during operation. You’ll need to create a sturdy mount for the rotor that allows it to spin freely while maintaining proper alignment with the stator (the stationary part containing the copper coils).
Position the rotor so that it’s centered and parallel to the stator. The gap between the magnets and coils should be as small as possible without risking contact. This proximity enhances the magnetic field’s effect on the coils.
Building the Tower

The tower serves as the backbone of your DIY wind turbine, elevating the blades to capture ideal wind speeds. You’ll need to choose a sturdy material like steel or aluminum tubing for your tower. Consider the height carefully; taller towers access stronger winds but require more extensive foundations and support.
Begin by digging a deep hole for the tower’s base. Pour concrete to create a solid foundation, embedding anchor bolts for attaching the tower. Once the concrete’s cured, assemble the tower sections on the ground. Install guy wires at regular intervals to provide additional stability.
When you’re ready to erect the tower:
- Use a winch or crane to slowly lift the assembled tower
- Guide the base onto the anchor bolts and secure it tightly
- Gradually tighten the guy wires to guarantee the tower remains plumb
Don’t forget to install a safety ladder or climbing pegs for future maintenance.
At the top of the tower, mount a sturdy platform to support your turbine’s nacelle and rotor assembly. Verify all connections are secure and weatherproof before proceeding to the next step of attaching your wind turbine components.
Assembling the Nacelle

With the tower in place, it’s time to focus on the nacelle, the housing that contains your turbine’s key components.
Begin by selecting a sturdy, weather-resistant material like fiberglass or aluminum for the nacelle’s shell. Cut and shape the material to form a streamlined enclosure that’ll house the generator, gearbox, and other essential parts.
Next, install the main shaft, which will connect the rotor hub to the generator. Verify it’s properly aligned and securely mounted using high-quality bearings. Attach the generator to the shaft, making sure it’s positioned correctly for maximum power generation. If you’re using a gearbox to increase rotational speed, install it between the main shaft and generator.
Now, focus on the yaw system, which allows the nacelle to rotate and face the wind. Install a sturdy bearing at the base of the nacelle and connect it to a tail vane or electric motor for automatic orientation.
Don’t forget to include slip rings to transfer electrical power from the rotating nacelle to the stationary tower.
Wiring the Electrical Components

Now that you’ve assembled the mechanical components, it’s time to tackle the electrical wiring. This step is essential for converting the mechanical energy from your wind turbine into usable electricity.
You’ll need to wire the generator, connect it to a charge controller, and set up a battery bank for energy storage.
Start by connecting the generator’s output wires to the charge controller. Confirm you’re using the correct gauge wire to handle the expected current. The charge controller regulates the voltage and current flowing to your batteries, preventing overcharging and extending their lifespan.
Next, wire the charge controller to your battery bank. Use heavy-duty cables and make certain all connections are secure and properly insulated. You’ll also need to install a fuse or circuit breaker between the controller and batteries for safety.
Here’s a quick checklist for wiring your wind turbine:
- Connect generator to charge controller
- Wire charge controller to battery bank
- Install safety devices (fuses, circuit breakers)
Installing the Wind Vane

After completing the electrical wiring, you’ll need to focus on optimizing your turbine’s performance by installing the wind vane. This vital component helps your turbine face the wind direction for maximum energy capture.
Start by selecting a lightweight, durable material like aluminum or plastic for your wind vane. Cut it into a streamlined shape, typically an arrow or teardrop design, about 18-24 inches long.
Attach the wind vane to a sturdy rod or pipe that’ll serve as its pivot point. Ascertain this assembly can rotate freely by using high-quality bearings. Mount the wind vane at the rear of your turbine’s nacelle, opposite the rotor blades. It’s important to balance the vane properly to prevent any bias in its movement.
Connect the wind vane to a servo motor or similar mechanism that can adjust the turbine’s orientation. This system should be linked to your turbine’s control unit.
Calibrate the wind vane carefully, making sure it accurately detects wind direction. Test its responsiveness by gently blowing air from different angles and observing the turbine’s rotation. Make any necessary adjustments to improve its sensitivity and accuracy.
Mounting the Turbine

Once you’ve assembled and tested all components, it’s time to mount your wind turbine. Choose a location that’s free from obstructions and receives consistent wind. Ideally, your turbine should be mounted at least 30 feet above the ground or 20 feet higher than surrounding structures.
Verify the mounting structure is sturdy enough to withstand strong winds and vibrations. Prepare the mounting pole by securing it firmly to the ground using concrete or guy wires. Attach the turbine to the pole using the manufacturer’s recommended mounting brackets or a custom-built adapter. Make certain all connections are tight and secure.
Before final installation, follow these essential steps:
- Double-check all electrical connections
- Lubricate moving parts as specified in the turbine’s manual
- Verify that the blades are properly balanced and aligned
Once mounted, connect the turbine to your home’s electrical system through an inverter and charge controller. It’s advisable to hire a licensed electrician for this step to guarantee compliance with local codes and safety standards.
Testing and Troubleshooting
With your wind turbine mounted and connected, it’s time to put it through its paces. Begin by conducting a visual inspection, ensuring all components are securely fastened and wires are properly connected.
Next, check the turbine’s alignment with the wind direction using a weather vane or wind sock.
Start testing on a moderately windy day. Monitor the turbine’s rotation and listen for any unusual noises. Use a multimeter to measure the voltage output at different wind speeds. If you’re not getting the expected output, check for loose connections or damaged wires.
Common issues include blade imbalance, which can cause vibrations, and insufficient wind speed to overcome the generator’s resistance. To address blade imbalance, carefully sand or trim the blades to achieve uniform weight.
For low output, consider adjusting the pitch of your blades or upgrading to a more efficient generator.
If you encounter persistent problems, consult online forums or local renewable energy experts. Keep a log of your turbine’s performance, noting wind speeds, power output, and any issues.
This data will help you optimize your system over time and identify potential maintenance needs.
Frequently Asked Questions
How Much Energy Can a DIY Wind Turbine Generate?
You’ll find that a DIY wind turbine’s energy output varies widely. It can generate anywhere from 100 watts to 1 kilowatt, depending on wind conditions, turbine size, and design efficiency. Your location and setup will greatly influence production.
What Are the Legal Requirements for Installing a Home Wind Turbine?
You’ll need to check local zoning laws, obtain necessary permits, and comply with height restrictions. You may also need to take into account noise regulations, setback requirements, and grid connection rules. Don’t forget to consult your homeowners’ association if applicable.
How Noisy Are Home Wind Turbines?
You’ll find that home wind turbines aren’t excessively noisy. They typically produce 40-50 decibels, similar to a refrigerator’s hum. However, noise levels can vary based on turbine size, wind speed, and your property’s layout.
Can I Connect My Wind Turbine to the Power Grid?
You can connect your wind turbine to the power grid, but it’s not a simple DIY task. You’ll need to work with a licensed electrician and your utility company to guarantee proper installation, safety measures, and compliance with local regulations.
What Maintenance Is Required for a Home Wind Turbine?
You’ll need to regularly inspect your wind turbine for wear and tear. Check the blades, bolts, and bearings annually. Lubricate moving parts, tighten connections, and clean debris. Replace worn components as needed to maintain peak performance.
In Summary
You’ve now built your very own wind turbine! With patience and attention to detail, you’ve created a sustainable energy source for your home. Don’t forget to regularly maintain your turbine to guarantee peak performance. As you watch it spin, generating clean electricity, you’ll feel a sense of accomplishment. You’re not just saving money on energy bills; you’re also contributing to a greener future. Keep exploring renewable energy options and inspiring others to do the same!
Leave a Reply