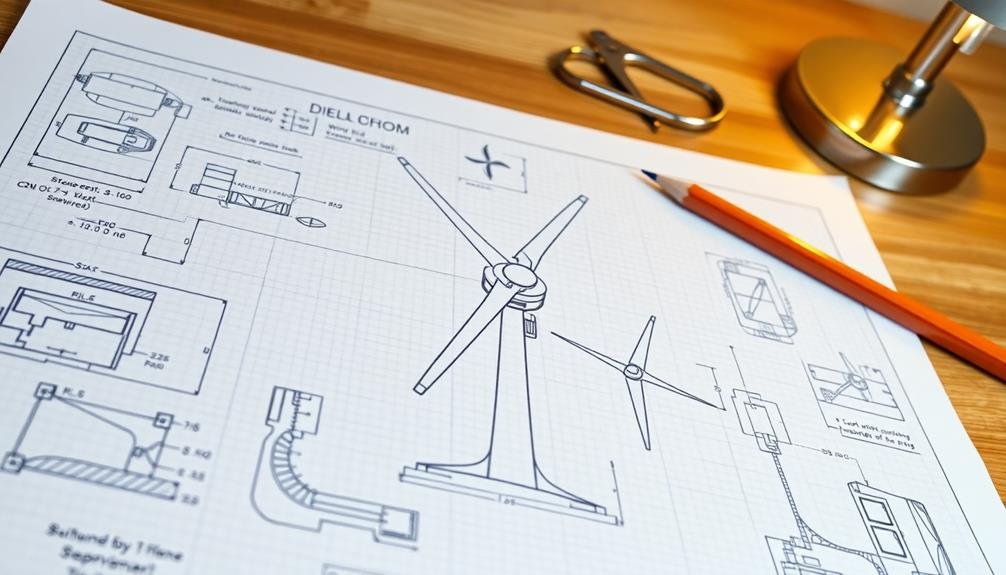
Discover five diverse DIY turbine generator blueprints for home power production. You'll find designs for a versatile vertical axis turbine, an efficient horizontal axis rooftop generator, and a portable wind turbine for on-the-go energy. For beginners, there's a micro wind turbine that's perfect for small electronics. Finally, explore a high-efficiency Savonius rotor plan for those seeking maximum performance. Each blueprint offers unique features, from lightweight materials to specific blade configurations, tailored to different skill levels and power needs. Whether you're a novice or an experienced builder, you'll find a project that suits your home power generation goals. Dive deeper to reveal the full potential of these innovative designs.
Vertical Axis Wind Turbine Design

For a vertical axis wind turbine design, you'll want to focus on the rotor's unique configuration. Unlike horizontal axis turbines, vertical designs can capture wind from any direction without needing to reorient.
Start by choosing between Darrieus and Savonius rotor types. Darrieus rotors use lift forces and are more efficient, while Savonius rotors rely on drag and are simpler to construct.
Next, determine your turbine's size based on your power needs and available space. Calculate the swept area and blade length accordingly.
Select lightweight, durable materials like fiberglass or aluminum for the blades. Design a sturdy central shaft to support the rotor and transfer torque to the generator.
Include a robust base structure to anchor the turbine and house the generator. Incorporate bearings at the top and bottom of the shaft to reduce friction.
Don't forget to add a braking system for safety during high winds. Design the electrical components, including the generator, charge controller, and inverter, to match your power requirements.
Horizontal Axis Rooftop Generator

Efficiency is key when designing a horizontal axis rooftop generator. You'll want to focus on maximizing power output while minimizing noise and vibration.
Start by selecting a lightweight yet durable material for the blades, such as fiberglass or carbon fiber. Aim for a blade length of 3-5 feet, which balances power generation with rooftop space constraints.
Position your generator to face the prevailing wind direction and make certain it's elevated above nearby obstructions. Install a tail fin to keep the turbine aligned with the wind. Choose a direct-drive generator to reduce maintenance needs and improve efficiency.
You'll need to incorporate a robust braking system for safety during high winds. Consider using a microinverter to convert DC power to AC at the turbine itself, reducing power loss in transmission. Install a charge controller to regulate battery charging and prevent overcharging.
Don't forget to include lightning protection and proper grounding. Lastly, check local regulations and obtain necessary permits before installation.
Regular maintenance, including blade cleaning and bearing lubrication, will guarantee peak performance and longevity of your rooftop generator.
Portable Wind Turbine Blueprint

While rooftop generators offer steady power for homes, a portable wind turbine provides flexibility for various outdoor activities. This blueprint outlines a compact, lightweight design you can easily transport and set up in different locations.
You'll need lightweight materials like carbon fiber or aluminum for the blades and frame. The turbine should have 3-5 blades, each about 2 feet long, to balance efficiency and portability. A collapsible tower, typically 10-15 feet tall when extended, allows for easy setup and takedown.
The generator itself should be a small permanent magnet alternator, capable of producing 100-300 watts in moderate winds. Include a charge controller to regulate power output and protect your batteries.
For storage, use a lightweight lithium-ion battery pack. Your portable turbine should also feature a manual brake system for safety and a built-in wind speed sensor to prevent damage in high winds.
Design the base with adjustable legs for stability on uneven terrain. Finally, include a weatherproof carrying case to protect your turbine during transport and storage.
Micro Wind Turbine for Beginners

Ever wanted to harness wind power on a small scale? A micro wind turbine is perfect for beginners looking to dip their toes into renewable energy.
These compact devices can generate enough power for small electronics or battery charging, making them ideal for camping trips or emergency preparedness.
To build your own micro wind turbine, you'll need:
- A small DC motor (typically 12V)
- Lightweight blades (often made from PVC pipe)
- A simple charge controller
- A deep cycle battery for storage
Start by selecting a motor with a low starting torque. Attach your handcrafted blades to the motor's shaft, ensuring they're balanced for smooth rotation.
Mount the assembly on a sturdy pole, positioning it where it'll catch the most wind. Connect the motor to your charge controller, which regulates the power flow to your battery.
High-Efficiency Savonius Rotor Plan

Designing a high-efficiency Savonius rotor can considerably boost your wind turbine's power output. This vertical-axis design is known for its reliability and ability to operate in turbulent wind conditions.
To create an enhanced Savonius rotor, you'll need to focus on the shape and dimensions of the blades. Start with two half-cylinder blades, each with a diameter of about 30% of the rotor's overall height. Position them so they overlap slightly, creating an S-shape when viewed from above. This overlap should be about 20-30% of the blade diameter.
To improve efficiency, add end plates at the top and bottom of the rotor, extending slightly beyond the blade diameter. For maximum performance, consider a two-stage design with the upper and lower blade sets offset by 90 degrees. This arrangement helps smooth out torque fluctuations.
Use lightweight yet durable materials like fiberglass or aluminum for the blades to reduce inertia and improve start-up in low wind speeds.
When mounting your Savonius rotor, verify it's properly balanced and aligned vertically. Connect it to a suitable generator, matching the rotor's RPM to the generator's peak operating speed for best results.
Frequently Asked Questions
How Do Local Zoning Laws Affect Home Wind Turbine Installations?
You'll need to check your local zoning laws carefully. They often regulate turbine height, noise levels, and setbacks from property lines. Some areas may require permits or have strict restrictions. Always consult officials before installation.
What Maintenance Is Required for DIY Wind Turbines?
You'll need to regularly inspect your DIY wind turbine's blades, bearings, and generator. Lubricate moving parts, tighten bolts, and check for wear. Clean the blades and monitor electrical connections. Repaint surfaces to prevent corrosion. Replace worn components as needed.
Can I Connect My Homemade Wind Turbine to the Power Grid?
You can connect your homemade wind turbine to the power grid, but it's not simple. You'll need to meet strict safety standards, install proper inverters, and get approval from your utility company. It's often a complex and expensive process.
How Do I Calculate the Potential Energy Output for My Location?
To calculate potential energy output for your location, you'll need to assess average wind speeds, turbine efficiency, and rotor size. Use online wind maps and calculators to estimate. Don't forget to factor in seasonal variations and obstacles.
Are There Any Tax Incentives for Installing a Home Wind Turbine?
You'll find various tax incentives for home wind turbines. Check with your local and state governments for specific programs. Federal tax credits are also available. Don't forget to research utility company rebates and net metering options too.
In Summary
You've now got five DIY turbine generator blueprints to explore for home power. Whether you're a beginner or an experienced builder, there's a project that'll suit your skills. Remember to prioritize safety and follow local regulations when constructing and installing your turbine. With some effort and ingenuity, you'll be harnessing wind power and reducing your energy bills in no time. Start small, learn as you go, and enjoy the journey to energy independence!


Leave a Reply