When installing radiant barrier insulation, start by choosing a high-quality barrier with low emissivity. Gather all necessary tools and prepare your workspace thoroughly. Measure carefully and cut accurately, allowing for overlap. Install the barrier in your attic or walls, maintaining proper spacing for ventilation. Seal all gaps and seams meticulously to enhance effectiveness. Handle the material gently to avoid damage. Consider hiring professionals for complex installations. Regularly inspect and maintain your radiant barrier to guarantee long-lasting performance. Remember to follow local building codes and safety guidelines. These pro tips will help you achieve peak energy efficiency and comfort in your home.
Choose the Right Radiant Barrier

Selecting the right radiant barrier is crucial for effective insulation. You'll need to evaluate several factors to make the best choice for your project.
First, look at the barrier's emissivity rating—the lower the number, the better its performance. Aim for a rating of 0.1 or less for ideal results.
Next, contemplate the material. Aluminum foil is a common and effective option, but you can also find barriers made of metalized polyester or other reflective materials. Verify the barrier you choose is perforated to allow moisture to escape, preventing potential mold issues.
Thickness matters too. While thicker isn't always better, a barrier of at least 5 mils (0.005 inches) will be more durable and easier to handle during installation.
Double-sided barriers offer better performance but may cost more.
Check the barrier's fire rating, especially if you're installing it in an attic. Look for a Class A or Class 1 fire rating to guarantee safety compliance.
Gather Necessary Tools and Materials
Before diving into the installation process, you'll need to gather all the necessary tools and materials. Start with the radiant barrier itself, ensuring you've purchased enough to cover your intended area with some extra for overlap.
You'll also need a staple gun and plenty of staples, as well as a utility knife for cutting the barrier to size.
Safety should be your top priority, so don't forget protective gear. Grab a pair of safety goggles, work gloves, and a dust mask to shield yourself from particles.
A sturdy ladder is essential for reaching higher areas, and you might want to take into account knee pads for comfort during installation.
For precise measurements, you'll need a tape measure and a straight edge. A pencil or marker will help you mark cutting lines.
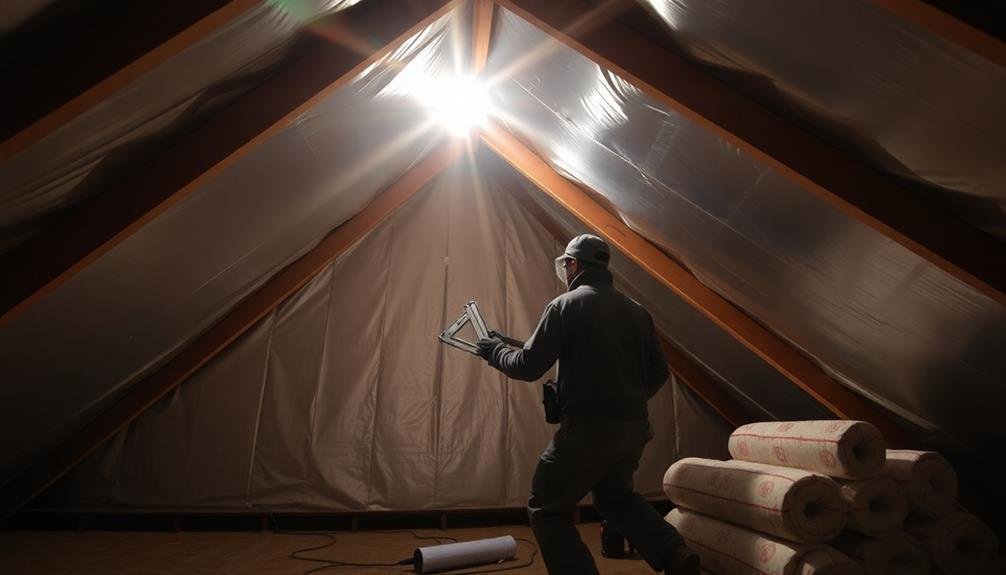
If you're working in a poorly lit attic, bring a portable work light to improve visibility. Don't forget basic tools like scissors, a hammer, and a pry bar for removing any obstructions.
Prepare the Installation Area

The installation area prep work is essential for a successful radiant barrier installation. Start by clearing the attic or crawl space of any debris, old insulation, or stored items. You'll need a clean, unobstructed surface to work with.
Next, inspect the area for any signs of moisture, mold, or pest infestations. Address these issues before proceeding, as they can compromise the effectiveness of your radiant barrier.
Ensure proper ventilation by checking that all vents are unblocked and functioning correctly. You'll want to maintain adequate airflow to prevent moisture buildup.
Measure the space between rafters or trusses to determine the width of radiant barrier you'll need to cut. If you're working in an attic, lay down sturdy boards across the joists to create a safe walking surface.
Check for any exposed electrical wiring or junction boxes. Make sure these are properly secured and in good condition. If you spot any issues, it's best to have an electrician address them before you begin.
Measure and Cut Accurately
You'll save time and materials by taking precise measurements before cutting your radiant barrier insulation.
Verify you're using the right cutting tools, such as sharp scissors or a utility knife, for clean and accurate cuts.
Don't forget to account for overlap margins when measuring, typically 2-3 inches on each side, to guarantee proper coverage and sealing.
Precise Measurements Prevent Waste
When it comes to installing radiant barrier insulation, accurate measurements are essential for minimizing waste and ensuring a proper fit. You'll want to measure each area carefully, accounting for any obstacles or irregularities in your attic space. Don't forget to measure twice and cut once to avoid costly mistakes.
To streamline your measuring process, create a detailed diagram of your attic layout. Include dimensions for each section, noting any areas that require special attention. This will help you calculate the exact amount of material needed and plan your cuts efficiently.
Here's a quick reference guide for common attic measurements:
| Area | What to Measure | Tips |
|---|---|---|
| Rafters | Length, spacing | Account for overlaps |
| Gables | Height, width | Include angles |
| Vents | Size, location | Leave clearance |
| Chimney | Circumference | Allow for fire safety |
| Attic floor | Square footage | Consider obstructions |
Use Appropriate Cutting Tools
Choosing the right cutting tools is essential for precise and efficient radiant barrier installation. You'll need sharp scissors or utility knives to cut the radiant barrier material accurately. Invest in high-quality scissors with long, sharp blades that can easily slice through the foil-faced material without tearing or leaving jagged edges.
For straight cuts, use a sturdy straight edge or T-square as a guide. This will help you maintain clean, precise lines when cutting large sheets. If you're working with rolled radiant barrier, consider using a razor blade cutter designed for cutting rolls of material. These tools often come with built-in measuring guides, making it easier to cut consistent lengths.
When cutting around obstacles or creating custom shapes, tin snips can be invaluable. They offer more control and precision than scissors, especially for tight curves or intricate cuts.
For larger projects, you might want to use a circular saw with a fine-toothed blade, but be cautious to avoid damaging the radiant barrier's reflective surface. Always wear protective gloves and eyewear when using cutting tools, and work on a stable, flat surface to guarantee safety and accuracy.
Allow for Overlap Margins
Accurate measuring and cutting of radiant barrier insulation is vital for effective installation. When you're working with radiant barrier material, it's important to allow for overlap margins. This guarantees a continuous barrier against heat transfer and prevents gaps that could compromise the insulation's effectiveness.
To properly allow for overlap margins:
- Measure the area you're covering and add an extra 2-3 inches on each side for overlap.
- Mark your measurements clearly on the radiant barrier material.
- Use a straight edge or chalk line to create precise cutting guidelines.
- Double-check your measurements before making any cuts.
When cutting, maintain a steady hand and follow your guidelines closely. Remember, it's better to cut slightly larger than needed, as you can always trim excess later.
Overlap seams by at least 2 inches to create a seamless barrier. For areas around obstacles like vents or light fixtures, cut the material slightly larger and fold it around the edges for a snug fit.
Install in Attic or Walls

When installing radiant barrier insulation, you'll need to decide between attic and wall placement, each with its own techniques.
In attics, you'll typically staple the barrier to rafters or trusses, while wall installations require careful integration with existing insulation.
Remember to maintain proper spacing and ventilation, especially in attic applications, to prevent moisture buildup and guarantee maximum effectiveness.
Attic vs. Wall Installation
For radiant barrier insulation, the installation location considerably impacts its effectiveness. When deciding between attic and wall installation, consider your specific needs and climate conditions. Attic installation is generally more common and often more effective, especially in hot climates where heat primarily enters through the roof.
In attic installations, you'll typically staple the radiant barrier to the underside of the roof rafters, creating an air gap between the barrier and the roof deck. This setup effectively reflects heat away from your living space.
Wall installations, on the other hand, are less common but can be beneficial in certain situations, such as when you're building a new home or renovating existing walls.
Here are key differences between attic and wall installations:
- Attic installations are easier to retrofit in existing homes
- Wall installations may provide better overall insulation when combined with other materials
- Attic barriers are more effective at reducing cooling costs in hot climates
- Wall barriers can help with both heating and cooling efficiency
Choose the installation location that best suits your home's structure, climate, and energy-saving goals.
Remember that proper installation is essential for maximizing the radiant barrier's performance, regardless of its placement.
Proper Placement Techniques
Proper placement of radiant barrier insulation is vital for maximizing its effectiveness. When installing in the attic, you'll want to position the barrier just below the roof deck, leaving an air gap of about 3/4 inch between the barrier and the roof. This allows for proper ventilation and prevents moisture buildup. Secure the barrier using staples or adhesive tape, making sure it's taut and free of wrinkles.
For wall installations, you'll need to place the radiant barrier between the studs, facing the interior of the home. Make certain to leave a small air gap on both sides of the barrier for ideal performance. Use furring strips to create this space if necessary.
When cutting the barrier to fit around obstacles like electrical boxes or windows, be precise to avoid gaps that could reduce efficiency.
In both attic and wall installations, it's essential to overlap seams by at least 2 inches and seal them with foil tape. This creates a continuous barrier against radiant heat.
Remember to cover all exposed areas, including gable ends and knee walls in the attic, to guarantee all-encompassing protection throughout your home.
Space and Ventilation Considerations
Attics and walls present unique challenges when installing radiant barrier insulation. In attics, you'll need to maintain proper ventilation to prevent moisture buildup and guarantee the insulation's effectiveness. Leave a 3-4 inch gap between the radiant barrier and the roof deck to allow for airflow.
For walls, consider the existing insulation and vapor barriers before installation.
When deciding where to install radiant barrier insulation, keep these points in mind:
- Attics: Most effective in hot climates, reducing heat gain in summer
- Walls: Can be beneficial in both hot and cold climates
- Crawl spaces: Helps control moisture and temperature
- Floors: Useful in homes with radiant floor heating systems
For attic installations, you can staple the radiant barrier to the rafters or lay it over existing insulation. In walls, install the barrier between studs, facing the interior of the home.
Remember to seal any gaps or seams with foil tape to maximize effectiveness.
Proper spacing is essential for peak performance. Don't compress the radiant barrier or allow it to come into direct contact with electrical wiring or fixtures.
Ensure Proper Ventilation
Maintaining adequate airflow is essential when installing radiant barrier insulation. You'll need to verify proper ventilation to prevent moisture buildup and maintain the insulation's effectiveness.
Start by inspecting your attic's existing ventilation system, including soffit vents, ridge vents, and gable vents. Make sure they're clear of obstructions and functioning correctly.
When installing the radiant barrier, leave a gap of at least 1 inch between the insulation and the roof decking. This space allows air to flow freely, preventing condensation and heat buildup. If you're using foil-faced insulation, install it with the reflective side facing the open attic space.
Don't forget to maintain proper ventilation in living spaces below the attic. Use exhaust fans in bathrooms and kitchens to remove excess moisture. Consider installing a whole-house fan to improve overall air circulation.
If you're unsure about your home's ventilation needs, consult a professional. They can assess your specific situation and recommend appropriate solutions.
Seal Gaps and Seams

To effectively seal gaps and seams in your radiant barrier installation, you'll need to use specialized tape designed for this purpose.
Overlap barrier sections by at least 2 inches to create a continuous layer, and secure the edges with the tape.
Don't forget to apply caulk strategically around penetrations and joints to guarantee a complete seal against air and moisture infiltration.
Use Specialized Tape
One essential step in installing radiant barrier insulation is sealing all gaps and seams with specialized tape. This guarantees maximum effectiveness by preventing air leakage and maintaining a continuous barrier.
When choosing tape, opt for products specifically designed for radiant barriers, as they're formulated to withstand high temperatures and adhere well to foil surfaces.
Before applying tape, make sure the surface is clean and dry. Cut the tape to the appropriate length, then carefully press it along the seam or gap, smoothing out any bubbles or wrinkles as you go. Pay extra attention to corners and joints, where leaks are most likely to occur.
Here are some key points to remember when using specialized tape:
- Use a tape that's at least 2 inches wide for better coverage
- Apply tape to both horizontal and vertical seams
- Overlap tape edges by at least 1/2 inch for a secure seal
- Replace any damaged or loose tape immediately
Overlap Barrier Sections
Proper overlapping of radiant barrier sections is essential for creating an uninterrupted thermal shield. When installing radiant barrier insulation, you'll need to confirm that each section overlaps the adjacent one by at least 2 to 4 inches. This overlap prevents gaps that could compromise the barrier's effectiveness.
Start at one end of the attic or crawl space and work your way across, overlapping each new section as you go. Pay special attention to corners and joints where two walls meet, as these areas are prone to gaps. Use a straight edge or chalk line to maintain consistent overlap throughout the installation.
Don't forget to overlap sections at the seams where the barrier meets the roof decking or floor joists. These areas are critical for maintaining a continuous thermal barrier. If you're working with perforated radiant barrier, be sure to align the perforations to maintain proper vapor permeability.
When overlapping, smooth out any wrinkles or bubbles to confirm a tight fit. Use staples or adhesive tape to secure the overlapped sections, preventing them from shifting over time.
Apply Caulk Strategically
Sealing gaps and seams is essential for maximizing the effectiveness of your radiant barrier installation. Apply caulk strategically to prevent air leakage and guarantee peak performance. Use a high-quality, flexible caulk that's compatible with your radiant barrier material. Focus on areas where the barrier meets walls, rafters, or other structural elements.
Start by cleaning the surfaces you'll be caulking to promote proper adhesion. Apply a continuous bead of caulk along seams and joints, paying extra attention to corners and penetrations. Smooth the caulk with your finger or a caulking tool to create a tight seal.
Don't forget to caulk around electrical outlets, light fixtures, and any other openings in the barrier.
Key areas to apply caulk include:
- Edges where the radiant barrier meets walls or rafters
- Seams between overlapping barrier sections
- Around penetrations for pipes, vents, or wiring
- Along the perimeter of attic access doors or hatches
Allow the caulk to dry completely before continuing with your installation. By taking the time to seal gaps and seams properly, you'll greatly improve your radiant barrier's ability to reflect heat and reduce energy costs.
Handle With Care
When dealing with radiant barrier insulation, you'll need to tread carefully. The material is delicate and can easily tear or crease, compromising its effectiveness. Always wear gloves to protect both your hands and the insulation from oils and dirt. As you handle the rolls or sheets, support them evenly to prevent sagging or stretching.
Be mindful of sharp edges in your attic or crawl space that could puncture the barrier. Take extra care around nails, screws, or rough wood surfaces. If you're working with foil-faced insulation, avoid folding or creasing it, as this can create thermal bridges that reduce its efficiency.
When cutting the material, use sharp scissors or a utility knife with a fresh blade to guarantee clean, straight edges. Don't step on or place heavy objects on the insulation during installation. If you need to walk in the area, use planks or boards to distribute your weight evenly.
Remember that proper installation is essential for peak performance. If you're unsure about handling the material correctly, consider consulting a professional to make certain your radiant barrier is installed effectively and safely.
Consider Professional Help

While DIY installation can be rewarding, it's not for everyone. Installing radiant barrier insulation can be challenging, especially if you're not experienced with home improvement projects. You might want to contemplate hiring a professional for this task, particularly if you're dealing with a large or complex space.
Professional installers bring expertise and efficiency to the job. They're familiar with local building codes, have the right tools, and can quickly identify and address potential issues.
Here are some reasons to contemplate professional help:
- Safety: Professionals are trained to work safely in attics and other confined spaces
- Time-saving: They can complete the job faster than most DIYers
- Proper installation: Experts guarantee the barrier is installed correctly for maximum effectiveness
- Warranty: Many professionals offer warranties on their work
If you decide to hire a pro, do your research. Get multiple quotes, check references, and guarantee they're licensed and insured. Ask about their experience with radiant barrier installation specifically.
Maintain and Inspect Regularly
Regular maintenance and inspection are essential for ensuring your radiant barrier insulation continues to perform at its best. You should schedule annual checks to identify any potential issues early on. During these inspections, look for signs of damage, such as tears, punctures, or moisture accumulation. If you notice any problems, address them promptly to prevent further deterioration.
Keep your radiant barrier clean by gently removing dust and debris with a soft brush or vacuum. Avoid using water or cleaning solutions, as they may compromise the barrier's effectiveness. Pay special attention to areas around vents, pipes, and other penetrations, as these are common spots for air leaks and damage.
Here's a quick reference guide for maintaining your radiant barrier insulation:
| Frequency | Task | Importance |
|---|---|---|
| Annually | Visual inspection | High |
| Quarterly | Dust removal | Medium |
| Monthly | Check for leaks | High |
| After storms | Damage assessment | High |
| As needed | Repair small tears | Medium |
Frequently Asked Questions
Can Radiant Barrier Insulation Be Installed Over Existing Insulation?
Yes, you can install radiant barrier insulation over existing insulation. It's a great way to enhance your home's energy efficiency. Just verify there's proper ventilation and the existing insulation is in good condition before proceeding with the installation.
How Does Radiant Barrier Insulation Affect Wi-Fi and Cell Phone Signals?
You'll notice radiant barrier insulation can interfere with Wi-Fi and cell phone signals. It's made of reflective material that blocks electromagnetic waves. If you're concerned, consider strategic placement or using signal boosters in affected areas.
Is Radiant Barrier Insulation Effective in All Climates?
You'll find radiant barrier insulation most effective in hot climates with intense sun exposure. It's less beneficial in cooler regions. While it can help in all climates, you'll see the best results in areas with hot summers.
Can Radiant Barrier Insulation Be Painted or Covered With Other Materials?
You shouldn't paint or cover radiant barrier insulation. It needs to reflect heat, and any coating will reduce its effectiveness. If you must cover it, use a breathable material that won't trap moisture or interfere with its reflective properties.
Does Radiant Barrier Insulation Pose Any Health Risks or Off-Gas Harmful Chemicals?
You'll be glad to know that radiant barrier insulation doesn't pose significant health risks. It's generally safe and doesn't off-gas harmful chemicals. However, be cautious during installation to avoid inhaling dust particles from foil-faced materials.
In Summary
You've now got the know-how to tackle radiant barrier installation like a pro. Remember to choose the right materials, prep thoroughly, and measure carefully. Don't forget to seal gaps and handle the barrier with care. If you're unsure, there's no shame in calling a professional. Once installed, keep an eye on your radiant barrier with regular inspections. With these tips, you'll enjoy improved energy efficiency and comfort in your home.

Leave a Reply