You can harness wind power to generate and store electricity for your home, reducing grid reliance and energy costs. Start by evaluating your property's wind potential and choosing the right turbine. Essential components include batteries, inverters, and charge controllers. Lead-acid and lithium-ion batteries are popular options, each with pros and cons. Proper installation, including equipment placement and wiring, is vital for peak performance. Regular maintenance and monitoring will keep your system running smoothly. While initial costs can be significant, tax incentives and energy savings can lead to a positive return on investment. Exploring the details will help you make informed decisions about your DIY wind power project.
Understanding Wind Power Basics

Before diving into DIY wind power projects, it's vital to grasp the fundamentals of how wind energy works. Wind power harnesses the kinetic energy of moving air to generate electricity. As wind blows over turbine blades, it causes them to spin, driving a generator that produces electrical current.
You'll need to understand key factors that influence wind power efficiency. Wind speed is important; turbines typically require a minimum speed of 7-10 mph to start generating electricity. The power output increases exponentially with wind speed, so even small increases can greatly boost energy production.
Turbine height also matters. Wind speeds are generally higher and more consistent at greater heights, away from ground-level obstructions. The size of the turbine blades affects power generation too; longer blades capture more wind energy.
You should also consider your location's wind resource. Coastal areas, hilltops, and open plains tend to have stronger, more reliable winds. Local weather patterns and seasonal variations will impact your system's performance.
Understanding these basics will help you design an effective DIY wind power setup tailored to your specific needs and environment.
Assessing Your Property's Wind Potential

Evaluating your property's wind potential is an essential step before commencing any DIY wind power project. To assess your site's suitability, you'll need to take into account several factors.
First, examine your local wind patterns. Check nearby weather stations or install an anemometer to measure wind speeds over time. Ideally, you want average wind speeds of at least 10 mph for efficient power generation.
Next, survey your property's topography. Wind speeds increase with height, so look for elevated areas or take into account taller towers. Avoid obstructions like buildings, trees, or hills that can create turbulence. The best locations are open fields, hilltops, or coastal areas.
Take into account zoning laws and local regulations. Some areas have height restrictions or noise limitations that may affect your turbine placement. Also, factor in your neighbors' views and potential concerns.
Assess your energy needs and available space. Determine how much electricity you want to generate and whether your property can accommodate the necessary equipment.
Don't forget to account for the distance between the turbine and your home, as longer cable runs can reduce efficiency.
Choosing the Right Wind Turbine

Once you've determined your property's wind potential, it's time to select the right wind turbine for your needs. Consider factors like power output, cut-in speed, and rotor diameter when making your choice. Horizontal-axis wind turbines (HAWTs) are the most common for residential use, while vertical-axis wind turbines (VAWTs) work well in urban settings with turbulent winds.
Look for turbines with a power output that matches your energy requirements. Smaller systems typically range from 1 to 10 kilowatts. Pay attention to the cut-in speed, which is the minimum wind speed needed for the turbine to start generating electricity. Lower cut-in speeds are better for areas with variable wind conditions.
Here's a comparison of some popular residential wind turbine models:
| Model | Power Output | Cut-in Speed | Rotor Diameter | Noise Level |
|---|---|---|---|---|
| WindSpire 1.2 | 1.2 kW | 3.5 m/s | 1.2 m | 25 dB |
| Skystream 3.7 | 2.4 kW | 3.5 m/s | 3.7 m | 41 dB |
| Bergey Excel 6 | 6.0 kW | 2.5 m/s | 6.2 m | 45 dB |
| XZERES 442 | 10.0 kW | 3.0 m/s | 7.2 m | 50 dB |
| Endurance E-3120 | 50.0 kW | 3.5 m/s | 19.2 m | 55 dB |
Choose a turbine that balances power output with your available space and local regulations.
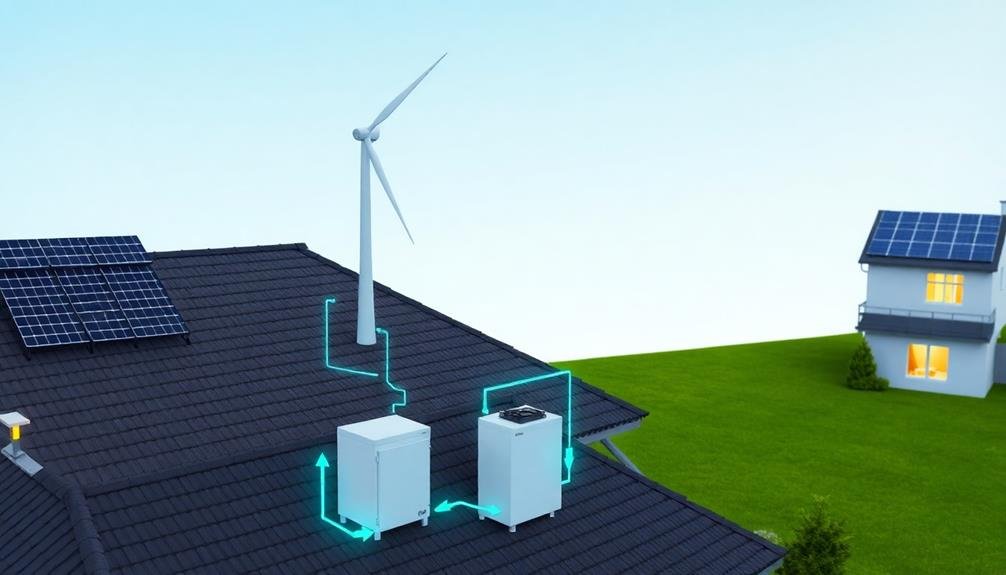
Essential Components for Energy Storage

When planning your DIY wind power system, you'll need to contemplate energy storage components.
You'll want to explore different battery types and capacities to match your power needs and budget.
Additionally, you'll need to select appropriate inverters and charge controllers to manage the flow of electricity between your wind turbine, batteries, and household appliances.
Battery Types and Capacities
For a successful DIY wind power system, choosing the right batteries is essential. You'll need to take into account various battery types and capacities to guarantee efficient energy storage and distribution.
Lead-acid batteries are common due to their affordability and reliability, but they require regular maintenance. Lithium-ion batteries, though more expensive, offer higher energy density and longer lifespans.
When selecting batteries, take into account these factors:
- Capacity: Measured in amp-hours (Ah), determine how much energy you need to store based on your power consumption.
- Depth of discharge (DoD): Choose batteries that can handle deep discharges without damage.
- Cycle life: Look for batteries that can withstand numerous charge-discharge cycles.
For most DIY wind power systems, deep-cycle batteries are ideal. They're designed to provide steady power over long periods and can withstand repeated discharges.
Calculate your energy needs and choose a battery bank with sufficient capacity to meet your requirements. Don't forget to factor in days with little wind when sizing your battery system.
Properly sized and maintained batteries will guarantee your DIY wind power setup provides reliable, sustainable energy for years to come.
Inverters and Charge Controllers
Complementing your battery bank, inverters and charge controllers are essential components in your DIY wind power system. Inverters convert the DC power stored in your batteries into AC power that your household appliances can use.
You'll need to choose between pure sine wave and modified sine wave inverters, with the former providing cleaner power for sensitive electronics.
Charge controllers regulate the flow of electricity from your wind turbine to your batteries, preventing overcharging and extending battery life. MPPT (Maximum Power Point Tracking) controllers are more efficient than PWM (Pulse Width Modulation) controllers, especially in variable wind conditions.
When selecting a charge controller, verify it's compatible with your wind turbine's voltage and amperage output. For peak performance, size your inverter to match your expected power consumption and your charge controller to handle your turbine's maximum output.
Don't forget to take into account future expansion when making your choices. Install these components in a dry, well-ventilated area, and use proper wiring and fusing to guarantee safety.
Regular maintenance of your inverter and charge controller will help keep your DIY wind power system running smoothly for years to come.
Battery Types for Wind Power

Batteries play an essential role in storing energy generated by wind turbines. When choosing batteries for your DIY wind power system, you'll need to take into account factors like capacity, lifespan, and maintenance requirements.
Lead-acid batteries are a popular choice due to their affordability and reliability. However, lithium-ion batteries are gaining traction for their higher energy density and longer lifespan.
For off-grid systems, deep-cycle batteries are ideal as they're designed to withstand frequent charging and discharging cycles. You'll want to size your battery bank based on your energy needs and the amount of power your wind turbine generates.
Remember, it's vital to maintain your batteries properly to extend their life and guarantee peak performance.
Here are three key battery types to evaluate for your wind power system:
- Flooded lead-acid batteries: Affordable and widely available, but require regular maintenance
- Sealed lead-acid batteries: Maintenance-free and spill-proof, but more expensive than flooded types
- Lithium-ion batteries: High energy density and long lifespan, but come with a higher upfront cost
Choose the battery type that best fits your budget, maintenance preferences, and energy storage needs.
Inverter Selection and Installation

After selecting the right batteries for your wind power system, you'll need to focus on choosing and installing an inverter. An inverter is essential as it converts the DC power from your batteries into AC power that your household appliances can use.
When selecting an inverter, consider its power rating, which should match or exceed your system's capacity. Look for pure sine wave inverters, as they provide cleaner power suitable for sensitive electronics. Choose between grid-tied and off-grid inverters based on your setup. Grid-tied inverters allow you to feed excess power back to the grid, while off-grid inverters work independently.
For installation, mount the inverter in a cool, dry location near your batteries to minimize voltage drop. Guarantee proper ventilation to prevent overheating.
Connect the inverter to your batteries using appropriately sized cables, and install a disconnect switch for safety. If you're connecting to the grid, you'll need to install additional safety equipment like a transfer switch.
Always follow the manufacturer's instructions and local electrical codes when installing your inverter. If you're not comfortable with electrical work, it's best to hire a professional to guarantee a safe and compliant installation.
Designing Your Storage System

When designing your wind power storage system, you'll need to determine your capacity and power requirements based on your energy consumption and desired backup time.
You'll want to choose between different battery types, such as lead-acid or lithium-ion, each with its own advantages and drawbacks.
Consider various battery configurations, like series or parallel connections, to achieve the voltage and capacity needed for your specific wind power setup.
Capacity and Power Requirements
To properly design your storage system for DIY wind power, you'll need to carefully consider capacity and power requirements. Start by calculating your daily energy consumption in kilowatt-hours (kWh) and estimating how many days of autonomy you want your system to provide. This will help determine the total storage capacity needed.
Next, assess your power requirements by identifying the maximum load your system will need to handle at any given time. This includes considering peak usage periods and any high-power appliances you'll be running simultaneously. Your inverter and battery bank must be capable of meeting these demands.
When selecting batteries, consider factors such as:
- Depth of discharge (DoD) and cycle life
- Charging and discharging efficiency
- Temperature sensitivity and maintenance requirements
Choose between lead-acid, lithium-ion, or other battery technologies based on your specific needs and budget. Remember to factor in the charging capabilities of your wind turbine and any additional power sources, such as solar panels.
Lastly, don't forget to account for future energy needs and potential system expansion. It's often wise to slightly oversize your storage capacity to accommodate increased consumption or unexpected circumstances.
Battery Types and Configurations
Selecting the right battery type and configuration is vital for your DIY wind power system's success. You'll need to choose between lead-acid, lithium-ion, or flow batteries, each with its own pros and cons. Lead-acid batteries are affordable but have a shorter lifespan, while lithium-ion batteries offer higher efficiency and longer life but come at a higher cost. Flow batteries are ideal for larger-scale storage but may be complex for DIY setups.
Consider your power requirements and budget when deciding on battery capacity. You'll want to guarantee enough storage to meet your needs during low-wind periods. For most home systems, a 48V configuration is common, achieved by connecting multiple 12V batteries in series. Parallel connections can increase capacity without changing voltage.
Don't forget to factor in depth of discharge (DoD) when sizing your battery bank. Lead-acid batteries typically shouldn't be discharged below 50%, while lithium-ion can handle up to 80% DoD.
Always include a battery management system (BMS) to protect your investment and optimize performance. Proper ventilation and temperature control are vital for battery longevity and safety in your DIY wind power setup.
Safety Considerations and Precautions

While building your own wind turbine can be an exciting project, it's crucial to prioritize safety throughout the process. Always wear protective gear, including safety glasses, gloves, and a hard hat when working on your turbine. Be cautious when handling electrical components and guarantee proper insulation to prevent shocks.
When installing your wind turbine, choose a location away from power lines and buildings. Secure all components tightly to prevent them from becoming projectiles during high winds. Regularly inspect your turbine for signs of wear or damage, and perform maintenance as needed.
Consider these additional safety precautions:
- Install a proper grounding system to protect against lightning strikes
- Use a brake or furling system to prevent over-spinning in strong winds
- Implement an automatic shut-off mechanism for emergencies
Be aware of local regulations and obtain necessary permits before installation. If you're unsure about any aspect of the project, consult a professional.
Permitting and Local Regulations

Local zoning laws and building codes play an essential role in your DIY wind power project. Before you begin construction, research your area's specific regulations regarding residential wind turbines. Many municipalities have height restrictions, setback requirements, and noise limitations that you'll need to comply with.
Contact your local planning department or zoning board to inquire about the necessary permits. You'll likely need to submit detailed plans, including the turbine's location, height, and specifications. Some areas may require environmental impact assessments or neighbor notifications.
Be prepared to face potential resistance from homeowners' associations or neighbors concerned about aesthetics or property values. Address these issues proactively by presenting the benefits of clean energy and showcasing modern, low-profile turbine designs.
Don't forget to check for any state or federal regulations that may apply to your project. Some areas offer incentives for renewable energy installations, which could offset your costs.
Additionally, if you plan to connect your turbine to the grid, you'll need to work with your local utility company to guarantee compliance with their interconnection standards and obtain the necessary agreements.
Installation Steps and Best Practices
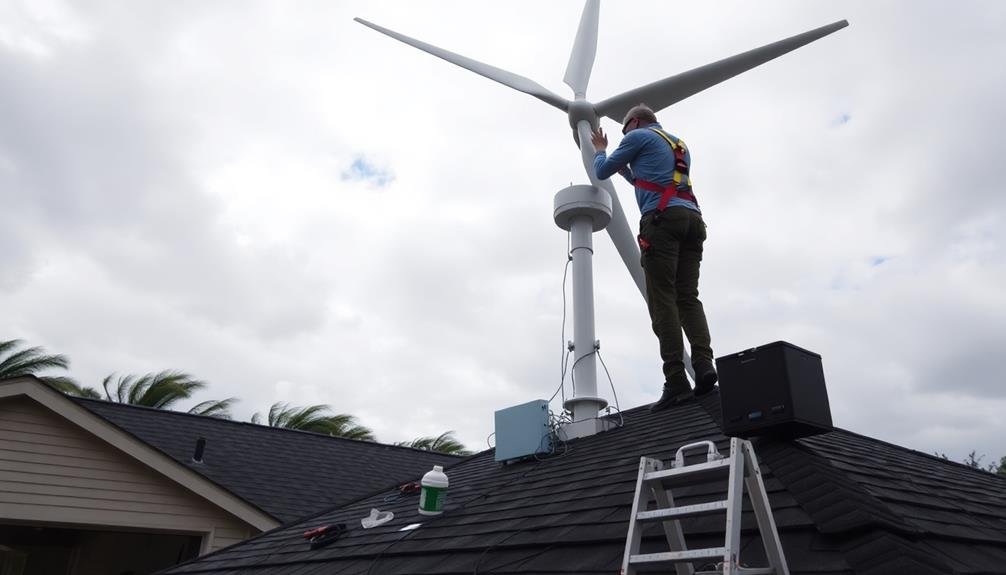
When installing your DIY wind power system, prioritize safety above all else.
You'll need to carefully consider the best placement of your equipment to maximize wind exposure and efficiency.
Make certain you're familiar with proper wiring techniques and connection methods to create a reliable and functional system.
Safety First Approach
Before commencing your DIY wind power project, it's vital to prioritize safety throughout the installation process. Always wear appropriate personal protective equipment (PPE), including a hard hat, safety glasses, gloves, and non-slip footwear.
Make sure you're working with a partner, especially when handling heavy components or working at heights. Familiarize yourself with local building codes and regulations before starting. You'll need to obtain necessary permits and schedule inspections to confirm your installation meets safety standards.
When working with electrical components, turn off the main power supply and use insulated tools to prevent shocks.
Here are important safety measures to implement:
- Conduct a thorough site assessment to identify potential hazards
- Use proper lifting techniques and equipment when handling heavy parts
- Install a lightning protection system to safeguard your wind turbine
Remember to regularly inspect and maintain your wind power system after installation. Check for loose connections, worn parts, or signs of damage.
If you're unsure about any aspect of the installation or maintenance process, don't hesitate to consult a professional. Your safety should always come first when working on DIY energy projects.
Proper Equipment Placement
Proper equipment placement is essential for maximizing your DIY wind power system's efficiency and longevity.
Start by selecting a prime location for your wind turbine. It should be in an open area, free from obstructions like trees or buildings. Ideally, place it at least 30 feet above the ground or 20 feet higher than nearby structures.
When installing the turbine, make certain it's securely mounted on a sturdy tower or pole. Use guy wires for additional stability if necessary. Position the turbine facing the prevailing wind direction to capture the most energy.
Next, focus on your battery bank placement. Install it in a well-ventilated, dry area, protected from extreme temperatures. Keep it close to your main electrical panel to minimize power loss during transmission.
For the inverter, choose a location near your battery bank but in a separate, cool space. This will prevent heat buildup and guarantee peak performance. Mount it securely on a wall, ensuring easy access for maintenance.
Lastly, install your charge controller between the turbine and battery bank. Place it in a dry, accessible location, allowing for proper heat dissipation and easy monitoring of system performance.
Wiring and Connections
With your equipment properly placed, it's time to focus on wiring and connections. This essential step guarantees your DIY wind power system functions efficiently and safely.
Begin by connecting your wind turbine to the charge controller using appropriately sized cables. Make sure to use weather-resistant wiring and connectors to withstand outdoor conditions.
Next, connect the charge controller to your battery bank. Follow the manufacturer's instructions carefully, as improper connections can damage your equipment or create safety hazards. When wiring your batteries, connect them in series or parallel depending on your system's voltage requirements.
Finally, connect your inverter to the battery bank and your home's electrical panel. This step may require professional assistance to guarantee compliance with local electrical codes.
Throughout the wiring process, keep these best practices in mind:
- Use cable sizes appropriate for the current and distance of each connection
- Install proper fuses or circuit breakers to protect your system components
- Label all wires and connections for easy maintenance and troubleshooting
Maintenance and Troubleshooting Tips

Regular maintenance and troubleshooting are essential for keeping your DIY wind power system running smoothly. Inspect your turbine blades monthly for damage or debris, and clean them gently with soap and water. Check all bolts and connections for tightness, especially after storms or high winds. Lubricate moving parts according to the manufacturer's recommendations, typically every six months.
Monitor your system's performance regularly. If you notice a drop in power output, first check for obvious issues like obstructions or loose connections. Listen for unusual noises that might indicate bearing problems or misalignment. Inspect your wiring for signs of wear or damage, and replace any frayed or corroded cables.
If your system isn't producing power, verify that your circuit breakers haven't tripped. Test your batteries' voltage and specific gravity if applicable. For persistent issues, consult your system's manual or seek help from a professional.
Keep a log of maintenance activities and any problems you encounter. This record will help you identify patterns and address recurring issues more effectively. Remember, preventive maintenance is key to maximizing your wind power system's lifespan and efficiency.
Monitoring and Optimizing Performance

Monitoring and optimizing your DIY wind power system's performance goes hand in hand with regular maintenance. By keeping a close eye on your system's output, you'll be able to identify any issues early and maximize its efficiency.
Start by installing a data logging system to track power generation, wind speeds, and battery charge levels. This information will help you understand your system's performance over time and make informed decisions about improvements.
To optimize your wind power setup, consider these key factors:
- Wind turbine placement: Verify your turbine is in an open area with minimal obstructions to maximize wind exposure.
- Blade angle adjustment: Fine-tune the blade pitch to capture the most energy from prevailing wind conditions.
- Battery management: Implement a smart charging system to extend battery life and improve overall system efficiency.
Regularly analyze your collected data to identify trends and potential areas for improvement. If you notice a decline in power generation, investigate possible causes such as worn bearings, loose connections, or blade damage.
Cost Analysis and ROI

A cost-benefit analysis is essential when considering a DIY wind power project. You'll need to factor in the initial investment, ongoing maintenance costs, and potential energy savings to determine your return on investment (ROI).
Start by calculating the total cost of materials, including the turbine, tower, batteries, inverter, and wiring. Don't forget to account for any tools you'll need to purchase or rent.
Next, estimate your annual energy savings based on your location's average wind speeds and your household's energy consumption. You can use online calculators or consult with local wind energy experts to get accurate projections.
Consider any available tax incentives or rebates that may offset your initial costs.
To calculate your ROI, divide your annual energy savings by your total investment. Keep in mind that wind turbines typically last 20-25 years, so your long-term savings can be substantial. However, you'll also need to factor in periodic maintenance costs, such as replacing bearings or blades.
While DIY wind power can lead to significant savings, it's vital to assess whether your location has sufficient wind resources to make the investment worthwhile.
Compare your projected ROI with other renewable energy options to make an informed decision.
Frequently Asked Questions
Can Wind Turbines Be Installed on Apartment Balconies or Rooftops?
You can install small wind turbines on apartment balconies or rooftops, but there are challenges. You'll need to take into account building regulations, noise restrictions, and structural support. Efficiency may be limited in urban areas due to irregular wind patterns.
How Do Wind Turbines Affect Local Wildlife, Especially Birds?
You should know that wind turbines can impact local wildlife, especially birds. They may cause collisions, disrupt migration patterns, and affect habitats. However, modern designs and careful placement help minimize these risks to bird populations.
Are There Any Tax Incentives for Installing Residential Wind Power Systems?
You'll find various tax incentives for residential wind power systems. Check your state and local governments for specific programs. The federal government offers a 30% tax credit through the Residential Renewable Energy Tax Credit. Don't miss out!
Can Excess Energy From Wind Power Be Sold Back to the Grid?
Yes, you can often sell excess wind energy back to the grid through net metering programs. You'll need to check with your local utility company for specific policies and rates. It's a great way to offset your electricity costs.
What Happens to Wind Turbines During Extreme Weather Events Like Hurricanes?
During hurricanes, wind turbines are designed to protect themselves. They'll shut down and lock their blades when wind speeds get too high. You'll find that modern turbines can withstand strong winds, but extreme conditions may cause damage.
In Summary
You've now got the knowledge to harness wind power and store energy at home. By evaluating your property, choosing the right turbine, and setting up a proper storage system, you'll be on your way to sustainable living. Remember to maintain your setup regularly and monitor its performance. While there's an upfront investment, you'll see long-term savings and reduce your carbon footprint. With these DIY wind power skills, you're ready to embrace clean energy independence.


Leave a Reply