To master temperature control in your DIY solar cooker, you'll need to understand its heat dynamics and make strategic adjustments. Position reflectors at ideal angles, readjusting every 15-30 minutes as the sun moves. Use proper insulation techniques, like double-walled construction and reflective materials, to maintain heat. Manage ventilation and moisture with adjustable vents and tight-fitting lids. Choose dark, matte-finished cookware for better heat absorption, and place foods strategically based on their moisture content. Monitor temperatures regularly with a high-heat thermometer, adjusting the cooker's angle as needed. By fine-tuning these elements, you'll access the full potential of your solar cooking experience.
Understanding Solar Cooker Heat Dynamics

When it comes to mastering temperature control in solar cookers, understanding the heat dynamics is vital. Solar cookers harness the sun's energy to heat food, but their effectiveness depends on several factors. The primary heat source is direct sunlight, which is concentrated and trapped within the cooker.
The cooker's design plays an essential role in heat retention. Reflective surfaces direct sunlight onto the cooking vessel, while insulation prevents heat loss. Dark-colored pots absorb more heat, enhancing cooking efficiency. The greenhouse effect occurs as short-wave radiation enters through the transparent top and is converted to long-wave radiation, which can't escape easily.
Temperature fluctuations in solar cookers are influenced by sun angle, cloud cover, and ambient temperature. You'll notice higher temperatures at midday when the sun is directly overhead. Wind can greatly impact heat retention, so sheltering your cooker is important.
To control temperature, you can adjust the cooker's orientation, open or close vents, and modify the reflector angle. Adding or removing insulation also affects heat levels.
Adjusting Reflector Angles
Reflector angles play an essential role in enhancing your solar cooker's performance. By adjusting these angles, you can control the amount and intensity of sunlight directed into your cooking chamber.
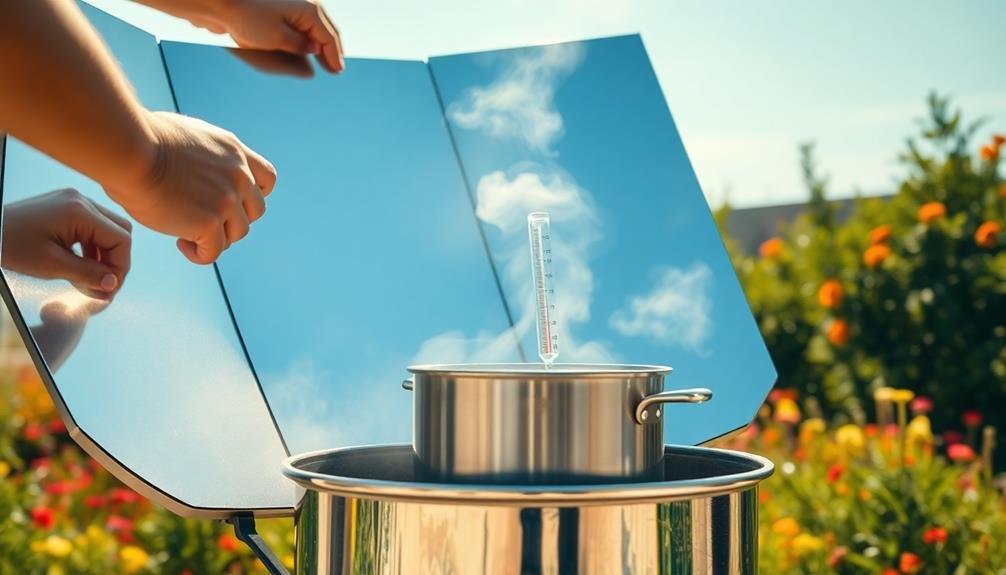
Start by positioning your reflectors at a 45-degree angle to catch the most sunlight. As the sun moves across the sky, you'll need to readjust the angles every 15-30 minutes for maximum efficiency.
For higher temperatures, tilt the reflectors inward to concentrate more sunlight onto your cooking pot. If you're aiming for lower temperatures or slower cooking, angle the reflectors outward to reduce heat intensity.
On cloudier days, you might need to adjust the reflectors more frequently to capture as much available sunlight as possible.
Remember that the best angle will change with the seasons and your geographical location. In summer, when the sun is higher in the sky, you'll want steeper reflector angles. During winter, with a lower sun position, use shallower angles to catch more rays.
Experiment with different configurations to find what works best for your specific solar cooker design and cooking needs.
Insulation Techniques for Temperature Retention

You'll find that proper insulation is essential for maintaining temperature in solar cookers.
To enhance heat retention, consider lining your cooker with reflective materials like aluminum foil or mylar sheets.
Implementing a double-walled construction can greatly improve your cooker's efficiency by creating an insulating air gap between the inner and outer walls.
Reflective Materials for Heat
Effective insulation is essential for maintaining high temperatures in solar cookers. However, to maximize heat generation, you'll need to harness the power of reflective materials. These materials play a vital role in directing sunlight into your cooker, greatly boosting its efficiency.
For best results, use materials with high reflectivity, such as aluminum foil, mylar, or polished metal sheets. Aluminum foil is readily available and easy to work with, making it a popular choice for DIY solar cookers. Simply line the interior of your cooker with foil, ensuring a smooth surface for better reflection.
Mylar, a type of polyester film, offers excellent reflectivity and durability. It's often used in commercial solar cookers due to its superior performance. If you're aiming for a more professional setup, consider investing in mylar sheets.
Polished metal sheets, like stainless steel or chrome-plated surfaces, provide long-lasting reflectivity. While more expensive, they're highly durable and can withstand repeated use.
Remember to keep your reflective surfaces clean and free from scratches to maintain their efficiency. Regularly wipe them down with a soft cloth to remove dust and debris.
Double-Walled Construction Benefits
One of the most effective ways to retain heat in your solar cooker is through double-walled construction. This technique creates an insulating air gap between the inner and outer walls of your cooker, markedly reducing heat loss to the environment.
To implement this, you'll need to construct two separate walls with a space of about 1-2 inches between them. For the inner wall, use materials that conduct heat well, such as aluminum or dark-colored metal. The outer wall should be made of a more insulating material like wood or plastic.
Fill the gap between the walls with insulating materials such as fiberglass, rock wool, or even crumpled newspaper. This layered approach traps air and minimizes heat transfer.
You can further enhance the insulation by adding a reflective layer, like aluminum foil, to the inner side of the outer wall. This will bounce heat back towards the cooking chamber.
Don't forget to insulate the bottom of your cooker as well, as heat can easily escape through the base. By incorporating double-walled construction, you'll markedly improve your solar cooker's efficiency and maintain higher cooking temperatures for longer periods.
Ventilation and Steam Management
You'll need to contemplate ventilation and steam management to maintain ideal cooking conditions in your solar cooker.
Strategically placing adjustable vents allows you to regulate temperature and prevent excessive moisture buildup.
To control humidity levels, you can implement moisture control techniques such as using absorbent materials or creating a slight opening to release excess steam.
Adjustable Vents Placement
Strategic placement of adjustable vents is essential for managing ventilation and steam in solar cookers. You'll want to position vents at both the top and bottom of your cooker to create effective airflow.
Place lower vents near the cooking chamber's base to allow cool air intake, while upper vents should be situated near the top to release hot air and steam.
For ideal control, install adjustable vents on opposite sides of the cooker. This cross-ventilation setup allows you to fine-tune airflow based on cooking conditions.
Consider using sliding or rotating vent covers that you can easily manipulate while cooking. Place these vents away from the reflective surfaces to maintain maximum heat concentration.
In taller solar cookers, add mid-level vents to create a more even temperature distribution. For box-style cookers, position vents on the lid and sides for better circulation.
If you're using a parabolic cooker, focus on vents around the cooking area's perimeter.
Remember to make your vents weather-resistant and easy to clean. Use materials that won't degrade under intense sunlight or high temperatures.
Moisture Control Techniques
Effective moisture control is essential for successful solar cooking. To manage moisture in your solar cooker, you'll need to focus on both ventilation and steam management.
Start by creating small ventilation holes near the top of your cooker to allow excess steam to escape. You can use adjustable flaps or sliding covers to regulate these openings as needed.
For dishes that require moisture retention, use a tight-fitting lid on your cooking pot. This will help trap steam and prevent your food from drying out. Conversely, for crispier results, leave the pot partially uncovered or use a vented lid to release excess moisture.
Consider using a moisture-absorbing material, like a thin layer of rice or cornmeal, at the bottom of your cooker to soak up condensation. This can help prevent soggy food and maintain even cooking temperatures.
When cooking high-moisture foods, like vegetables or stews, place them in the center of your cooker where temperatures are highest. This will help evaporate excess moisture more quickly.
For drier foods, position them towards the edges where temperatures are slightly lower.
Cookware Selection for Heat Distribution

The right cookware can make or break your solar cooking experience. When selecting pots and pans for your solar cooker, focus on materials that conduct heat efficiently and distribute it evenly. Dark-colored, thin-walled metal containers are ideal, as they absorb and retain heat better than light-colored or thick-walled options.
Consider these key factors when choosing your solar cooking cookware:
- Material: Opt for dark, matte-finished metals like anodized aluminum or cast iron. These materials absorb and distribute heat effectively, ensuring your food cooks evenly.
- Size and shape: Use flat-bottomed pots with tight-fitting lids to maximize heat retention. Shallow, wide pans work best for quick-cooking foods, while deeper pots are suitable for stews and soups.
- Capacity: Choose cookware that fits comfortably within your solar cooker, leaving enough space for proper heat circulation. Avoid overcrowding, as it can lead to uneven cooking.
For best results, invest in cookware specifically designed for solar cooking. These specialized pots often feature dark exteriors and reflective interiors, optimizing heat absorption and distribution.
Monitoring and Regulating Cooking Temperatures
Keeping a close eye on your solar cooker's temperature is essential for achieving ideal cooking results. You'll need to monitor the internal temperature regularly using a reliable thermometer designed for high-heat cooking. Insert the thermometer through a small opening in the cooker or use an infrared thermometer for non-contact readings.
To regulate temperatures, adjust the cooker's angle towards the sun. Tilting it more directly at the sun increases heat, while angling it away decreases temperature. You can also use reflectors to concentrate more sunlight or partially cover the cooking area to reduce heat. For fine-tuning, try opening or closing vents if your cooker has them.
Remember that weather conditions greatly affect your cooker's performance. On cloudy days, you might need to extend cooking times or use additional reflectors. Wind can also impact temperature, so consider using a windbreak if necessary.
Keep a log of cooking times and temperatures for different recipes and weather conditions. This data will help you predict and adjust cooking times in the future, allowing for more precise temperature control and better results.
Frequently Asked Questions
Can I Use My Solar Cooker on Cloudy Days?
You can use your solar cooker on cloudy days, but it'll be less effective. You'll experience longer cooking times and lower temperatures. For better results, you might want to wait for clearer skies or use alternative cooking methods.
How Do I Prevent Food From Burning in a Solar Cooker?
To prevent burning in a solar cooker, you'll want to monitor your food closely. Use a thermometer, adjust reflectors, and rotate the cooker as needed. Don't overcook, and consider using a dark pot with a lid.
What's the Maximum Temperature a DIY Solar Cooker Can Reach?
Your DIY solar cooker's maximum temperature depends on its design and materials. You can reach up to 400°F (204°C) with an efficient setup. However, most DIY cookers typically hit 250-350°F (121-177°C). Always monitor closely to avoid overheating.
Are There Safety Concerns When Using a Solar Cooker?
Yes, there are safety concerns when using a solar cooker. You'll need to protect your eyes from glare, avoid burns from hot surfaces, and guarantee food reaches safe temperatures. Don't leave it unattended and keep children away.
Can I Cook Meat Safely in a Solar Cooker?
Yes, you can safely cook meat in a solar cooker. You'll need to guarantee it reaches an internal temperature of 165°F (74°C) to kill harmful bacteria. Use a meat thermometer and follow proper food safety guidelines.
In Summary
You've now got the tools to master temperature control in your DIY solar cooker. Remember, it's all about balancing heat input and retention. Experiment with reflector angles, fine-tune your insulation, and manage steam effectively. Choose the right cookware and keep a close eye on temperatures. With practice, you'll become adept at creating the perfect cooking environment for any dish. Enjoy your eco-friendly culinary adventures and the delicious meals you'll create!
Leave a Reply