
Designing your own geothermal loop field can considerably reduce energy costs while providing eco-friendly heating and cooling for your home. You'll need to assess your site, analyze soil conditions, and choose the right loop configuration based on available space and geology. Calculate your heat exchange requirements to properly size the system. Then, plan trenching, select appropriate pipes, and design a manifold to connect the loops. Don't forget to pressure test for leaks and properly commission the system. With careful planning and execution, you can create an efficient DIY geothermal system. The key to success lies in understanding each step of the process.
Understanding Geothermal Loop Fields

A geothermal loop field is the heart of a ground-source heat pump system. It's a network of pipes buried in the ground that circulates a heat transfer fluid, typically a water-antifreeze mixture. This fluid absorbs heat from the earth in winter and transfers it to your home, while in summer, it removes heat from your home and deposits it back into the ground.
There are two main types of loop fields: horizontal and vertical. Horizontal loops are more common for residential installations and require more land area. They're buried 4-6 feet deep and spread out over a large area.
Vertical loops are ideal for smaller lots or commercial buildings. They're installed in deep boreholes, typically 100-400 feet deep.
The size of your loop field depends on factors like your home's heating and cooling needs, soil composition, and local climate. You'll need to calculate your home's heat load to determine the appropriate loop field size.
It's essential to properly size your system to guarantee efficient operation and avoid costly oversizing or undersizing mistakes.
Site Assessment and Planning
Before you begin your DIY geothermal loop field project, you'll need to assess your site's soil and geological conditions.
You should analyze soil composition, rock layers, and groundwater levels to determine the most suitable loop field design.
Additionally, consider your property's available space and layout, ensuring you have enough area for the loop field installation while avoiding obstacles like utilities and structures.
Soil and Geology Analysis
Proper soil and geology analysis forms the cornerstone of a successful DIY geothermal loop field installation.
You'll need to assess your property's soil composition, thermal conductivity, and underlying geological features to determine the most efficient loop field design.
Start by obtaining a soil sample from your proposed installation site. You can either send it to a lab for professional analysis or conduct basic tests yourself using DIY kits.
Look for soil moisture content, density, and particle size distribution. These factors affect heat transfer rates and excavation difficulty.
Next, research your area's geological characteristics. Check local geological surveys or consult with a geologist to understand the bedrock depth, groundwater levels, and potential underground obstacles.
This information will help you decide between horizontal and vertical loop configurations.
Don't forget to measure your soil's thermal conductivity. This vital property determines how efficiently heat will transfer between the ground and your system.
You can use a thermal response test or estimate based on soil type and moisture content.
Lastly, consider any local regulations or environmental factors that might impact your installation.
Space and Layout Considerations
Careful site assessment and planning are essential for a successful DIY geothermal loop field installation.
You'll need to evaluate your property's available space and determine the most suitable layout for your geothermal loops. Start by measuring the total area you can dedicate to the loop field, considering setbacks from property lines, buildings, and utilities.
Next, assess any obstacles that might interfere with loop installation, such as trees, large rocks, or underground structures.
You'll want to avoid these areas to minimize excavation challenges and potential damage to your property. Consider the location of your home's mechanical room, as this will influence the entry point for the geothermal pipes.
Determine whether you'll use a horizontal or vertical loop configuration based on your available space and soil conditions.
Horizontal loops require more land area but are typically less expensive to install. Vertical loops are ideal for smaller properties but require specialized drilling equipment.
Loop Field Configuration Options
When designing your DIY geothermal system, you'll need to choose the right loop field configuration. There are several options available, each with its own advantages and limitations. The most common configurations include horizontal loops, vertical loops, and pond/lake loops.
Horizontal loops are ideal if you have ample land available. They're installed in trenches about 4-6 feet deep and require the most surface area. This option is often the most cost-effective but may not be suitable for smaller properties.
Vertical loops are perfect for areas with limited space. They're installed in deep boreholes, typically 100-400 feet deep, and require less surface area than horizontal loops. While more expensive to install, they're highly efficient and don't disturb your landscaping as much.
Pond/lake loops can be used if you have access to a water body on your property. These closed-loop systems are submerged in the water, taking advantage of its stable temperature. They're cost-effective and efficient but require a sufficiently sized and deep water source.
Consider factors like your property's size, soil conditions, and local regulations when choosing your configuration. Each option has its merits, so select the one that best suits your specific needs and constraints.
Calculating Heat Exchange Requirements
To accurately size your geothermal loop field, you'll need to start with a thorough heat load assessment of your property.
This vital step determines the amount of heating and cooling your system must provide throughout the year.
You'll also need to take into account soil conductivity factors, as different soil types vary in their ability to transfer heat, which directly impacts the required length and configuration of your loop field.
Heat Load Assessment
A vital step in designing your DIY geothermal loop field is calculating the heat exchange requirements. To do this accurately, you'll need to perform a heat load evaluation for your home. This process involves determining the amount of heating and cooling your house requires throughout the year.
Start by measuring your home's square footage and evaluating its insulation quality. Consider factors like window types, air leakage, and the number of occupants. You'll also need to account for your local climate, including average temperatures and humidity levels across seasons.
Next, calculate your home's heating and cooling loads using industry-standard methods like Manual J or specialized software. These tools help you determine the British Thermal Units (BTUs) needed to maintain comfortable temperatures year-round.
Don't forget to factor in any additional heat sources or sinks, such as appliances, lighting, and solar gain through windows. Also, consider future changes like home additions or increased occupancy.
Once you've compiled this data, you can determine the total heat exchange capacity your geothermal system must provide. This information is essential for sizing your loop field correctly and ensuring peak performance of your DIY geothermal system.
Soil Conductivity Factors
Soil conductivity plays an essential role in determining the size and efficiency of your geothermal loop field. It's a measure of how well heat can transfer through the soil, directly impacting the system's performance. To accurately assess soil conductivity, you'll need to take into account several factors.
First, examine your soil type. Sandy soils typically have lower conductivity than clay-rich soils. Moisture content also notably affects conductivity; wetter soils conduct heat better than dry ones. You'll want to test your soil's moisture levels at various depths and times of the year for a thorough understanding.
Next, evaluate the presence of groundwater. If you're in an area with a high water table, it can enhance heat transfer and improve system efficiency. Rock content and density also play a role, with denser, more consolidated soils generally offering better conductivity.
To get precise measurements, you might need to conduct a thermal response test. This involves circulating fluid through a test borehole and measuring temperature changes. While it's an additional expense, it provides the most accurate data for designing your loop field.
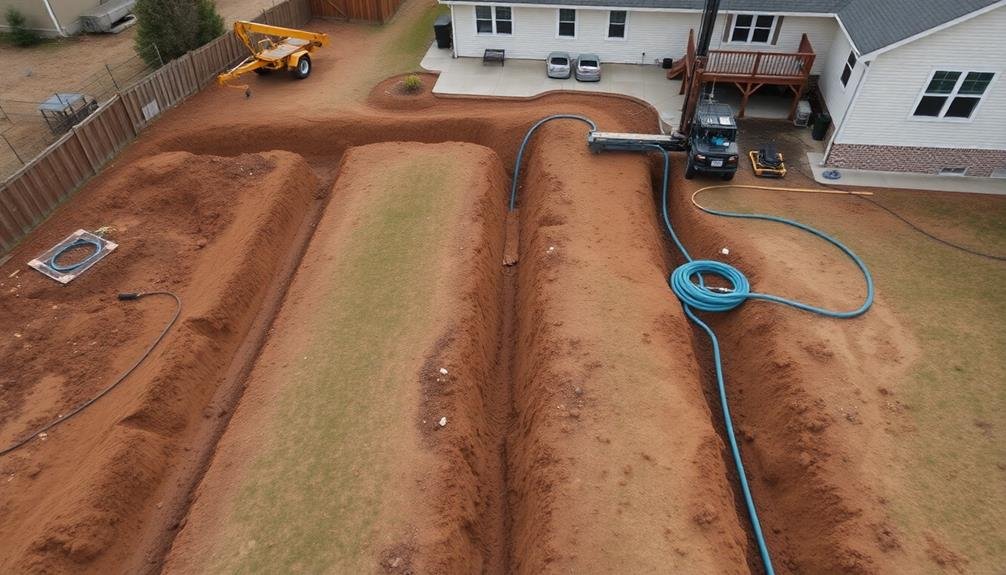
Trenching and Excavation Techniques

Proper trenching and excavation techniques are essential for installing an efficient geothermal loop field. You'll need to carefully plan and execute your excavation to guarantee ideal loop placement and soil contact. Start by marking your trench locations and securing necessary permits.
For horizontal loops, you'll typically dig trenches 4-6 feet deep and 1-2 feet wide. Vertical systems require boreholes 100-400 feet deep. Choose your equipment based on soil type and project scale:
| Equipment | Horizontal Loops | Vertical Loops | Soil Types |
|---|---|---|---|
| Backhoe | Suitable | Not suitable | Most soils |
| Trencher | Excellent | Not suitable | Soft to medium |
| Excavator | Good | Not suitable | All types |
| Drilling rig | Not suitable | Necessary | All types |
Guarantee proper safety measures, including shoring for deep trenches and utility line identification. Maintain consistent depth and width throughout your trenches to maximize heat transfer. When backfilling, use excavated soil or sand to surround the pipes, avoiding large rocks that could damage the loop. Compact the soil carefully to prevent settling and maintain good thermal contact with the ground.
Pipe Selection and Installation
With the trenches excavated, you're ready to focus on selecting and installing the pipes for your geothermal loop field. Choose high-density polyethylene (HDPE) pipes designed specifically for geothermal applications. These pipes are durable, flexible, and resistant to corrosion and temperature fluctuations.
When installing the pipes, make certain they're properly sized for your system's heat load and flow requirements. You'll need to connect the pipes using heat fusion welding, which creates a seamless, leak-proof joint. Carefully lower the pipes into the trenches, making sure they're free from kinks or sharp bends that could restrict flow.
Here are key considerations for pipe selection and installation:
- Calculate the required pipe length based on your heating and cooling needs
- Use pipe diameter that matches your system's flow rate
- Pressure test the pipes before backfilling to check for leaks
- Install tracer wire alongside the pipes for future locating
- Maintain proper spacing between pipes to optimize heat transfer
Once the pipes are in place, flush the system with water to remove any debris. Then, fill the loop with a mixture of water and antifreeze solution to prevent freezing.
Manifold Design and Assembly

The manifold serves as the central hub for your geothermal loop field, connecting individual loops to the main supply and return lines. When designing your manifold, consider the number of loops you'll need and choose a manifold with sufficient ports. Opt for a pre-fabricated manifold or build your own using high-quality materials like copper or HDPE.
For assembly, you'll need to connect each loop to the manifold using appropriate fittings. Confirm all connections are tight and leak-free. Install isolation valves for each loop to allow for individual loop maintenance without shutting down the entire system. Include air vents at the highest points to remove any trapped air.
Don't forget to insulate your manifold to prevent heat loss and condensation. Place it in an accessible location, such as a utility room or buried vault, for easy maintenance. Label each loop connection clearly for future reference.
When connecting the manifold to your heat pump, use flexible connectors to reduce vibration transfer. Install pressure gauges and thermometers on the supply and return lines to monitor system performance.
Pressure Testing and Leak Detection
After assembling your geothermal loop field and manifold, it's time to verify the system's integrity through pressure testing and leak detection. This vital step guarantees your system is free from leaks and can withstand the operating pressures it'll encounter during normal use.
To conduct a pressure test, you'll need to fill the system with water and pressurize it to a level higher than its typical operating pressure. Use a pressure gauge to monitor the system over several hours, watching for any drops in pressure that might indicate a leak.
If you detect a pressure drop, you'll need to locate and repair the leak. Here are some methods for leak detection:
- Visual inspection of all connections and joints
- Ultrasonic leak detectors to identify high-frequency sounds of escaping fluid
- Soap bubble solution applied to suspected leak areas
- Tracer dyes added to the system fluid
- Thermal imaging cameras to detect temperature differences
Once you've identified and repaired any leaks, repeat the pressure test to confirm the system's integrity.
System Commissioning and Maintenance

Once your geothermal loop field passes pressure tests and leak checks, it's time to commission the system and establish a maintenance routine.
Start by flushing the entire system with clean water to remove any debris or air pockets. Then, fill the loops with the appropriate heat transfer fluid, typically a mixture of water and antifreeze.
Next, you'll need to purge air from the system using a high-volume purge pump. Run the pump until you see a steady stream of fluid without bubbles.
Once the system is air-free, balance the flow rates in each loop to guarantee even heat distribution.
Connect your heat pump and run it through all operating modes to verify proper function. Monitor temperatures, pressures, and flow rates to confirm they're within the manufacturer's specifications. You should also check for any unusual noises or vibrations.
For ongoing maintenance, inspect the system annually. Check fluid levels, pH, and antifreeze concentration. Look for signs of leaks or corrosion.
Clean or replace filters as needed. Keep the area around the heat pump clear of debris and vegetation.
Frequently Asked Questions
Can I Install a Geothermal System in an Existing Home?
Yes, you can install a geothermal system in your existing home. It's possible to retrofit your property, though it may require more planning and effort. You'll need to contemplate available space, soil conditions, and your current heating system.
How Long Does a Typical DIY Geothermal Loop Field Installation Take?
You'll typically spend 1-2 weeks installing a DIY geothermal loop field. It depends on your experience, equipment, and soil conditions. You're looking at several days for trenching, pipe laying, and backfilling. Don't forget time for planning and permits.
What Permits Are Required for Installing a Geothermal System?
You'll typically need building permits and environmental permits for your geothermal system. Check with your local government for specific requirements. You may also need water well permits, zoning approvals, and utility clearances. Don't skip this essential step!
Are There Tax Incentives or Rebates for DIY Geothermal Installations?
You'll find various tax incentives and rebates for geothermal installations. Check with your local and state governments, as well as federal programs. Some utilities offer incentives too. However, DIY installations might not qualify for all benefits.
Can I Combine Geothermal With Other Renewable Energy Sources Like Solar?
You can definitely combine geothermal with solar energy. It's a great way to maximize your renewable energy usage. You'll heat and cool your home with geothermal, while solar panels generate electricity for other household needs.
In Summary
You've now gained the knowledge to design your own geothermal loop field. With proper planning, careful calculations, and attention to detail, you can create an efficient and sustainable heating and cooling system for your home. Remember to consult local regulations and consider professional help for complex aspects. Regular maintenance will guarantee your DIY geothermal system operates smoothly for years to come. You're on your way to energy independence and reduced utility costs!


Leave a Reply