Installing your smart thermostat is a straightforward DIY project. Start by gathering tools and turning off power. Remove the old thermostat, carefully labeling wires. Install the new mounting plate, connect wires to the corresponding terminals, and attach the smart thermostat. Restore power and test the device. Set up Wi-Fi connectivity using your smartphone, then program your thermostat for ideal comfort and energy savings. Remember to utilize advanced features like geofencing and remote access. With these steps, you'll be on your way to a smarter, more efficient home. But there's more to explore in maximizing your new smart thermostat's potential.
Gather Necessary Tools and Materials

Prior to beginning your smart thermostat installation, you'll need to gather all the necessary tools and materials. Start by verifying you have a compatible smart thermostat for your HVAC system.
You'll need a Phillips head screwdriver, a flathead screwdriver, and a drill with appropriate bits for creating new holes if needed. Grab wire strippers, needle-nose pliers, and electrical tape to handle wiring tasks safely.
Don't forget a voltage tester to check for live wires and verify your safety throughout the process. You might also need wall anchors and screws if your new thermostat doesn't fit the existing wall plate.
Keep a level handy to verify proper alignment during installation. If your walls are textured, consider having spackle and paint on hand to touch up any imperfections after removing the old thermostat.
Prepare your smartphone or tablet, as you'll likely need it to set up and connect your smart thermostat to your home's Wi-Fi network.
Turn Off Power Supply
Before you begin the installation, it's essential to cut off the power supply to your thermostat.
First, locate your home's main circuit breaker and identify which circuit controls your thermostat's power source.
Once you've found the correct circuit, switch it off and use a voltage tester to confirm there's no electrical current flowing to the thermostat.
Locate Main Circuit Breaker
Safety comes first when installing a smart thermostat. Before you begin, it's essential to locate your home's main circuit breaker. This step guarantees you can cut off power to the entire house, preventing any electrical accidents during installation.
You'll typically find the main circuit breaker panel in your basement, garage, or utility room. It's usually a gray or black metal box mounted on the wall.
To locate and identify your main circuit breaker:
- Look for a large metal box with a door or cover. It may be labeled "Main Electrical Panel" or "Circuit Breaker Box."
- Open the panel door to reveal the circuit breakers inside. You'll see rows of smaller switches and one larger switch at the top.
- The main circuit breaker is the largest switch, often labeled "MAIN" or "200 AMP" (or another amperage rating).
Once you've identified the main circuit breaker, you're ready to proceed with turning off the power.
Identify Thermostat's Power Source
With the main circuit breaker located, it's time to identify your thermostat's power source and turn off its power supply. Most thermostats are powered by low-voltage wires connected to your HVAC system, but some may have separate power sources. Check your thermostat's wiring to determine its power source.
Look for labels on the wires or consult your thermostat's manual to identify the power wires. Common wire colors and their functions include:
| Wire Color | Function | Voltage |
|---|---|---|
| Red | Power | 24V AC |
| White | Heat | 24V AC |
| Green | Fan | 24V AC |
Once you've identified the power source, turn off the corresponding circuit breaker. If you're unsure which breaker controls the thermostat, turn off the main power to your HVAC system. Use a voltage tester to confirm that power is off before proceeding.
For battery-powered thermostats, simply remove the batteries. If your thermostat has a separate power supply, unplug it from the wall outlet. Remember, safety is paramount when working with electrical systems. If you're uncomfortable or unsure about any step, don't hesitate to consult a professional electrician.
Test for Electrical Current
A crucial step in installing your smart thermostat is testing for electrical current after you've turned off the power supply. This guarantees your safety and prevents damage to your new device.
Before you begin, make sure you've located your home's circuit breaker and switched off the power to your heating and cooling system.
To test for electrical current:
- Use a voltage tester or multimeter to check the wires connected to your old thermostat. Touch the probes to the wires, paying attention to any signs of voltage. If the tester doesn't light up or the multimeter reads zero, you're good to proceed.
- Double-check by testing the wires against a known live circuit, like a wall outlet. This confirms your tester is working correctly.
- If you detect any voltage, return to your circuit breaker and verify you've turned off the correct switch. Repeat the testing process until you're certain there's no current flowing.
Remove Old Thermostat

After ensuring the power is off, you'll need to remove your old thermostat carefully.
Start by labeling each wire connected to your existing thermostat, using small adhesive labels or masking tape to mark their corresponding terminals.
Once labeled, gently detach the wires and remove the old thermostat from the wall, being cautious not to damage the wires or wall in the process.
Turn off Power Supply
Safety comes first when removing your old thermostat. Before you start dismantling anything, it's essential to cut off the power supply to your heating and cooling system. This step prevents any potential electrical shocks or damage to your HVAC equipment during the installation process.
To turn off the power supply:
- Locate your home's circuit breaker box, typically found in the basement, garage, or utility room.
- Identify the circuit breaker labeled for your HVAC system, which may be marked as "Furnace," "AC," or "Thermostat."
- Switch off the corresponding breaker by flipping it to the "Off" position.
After turning off the power, double-check that it's truly off by attempting to adjust your current thermostat. If it doesn't respond or the display is blank, you've successfully cut the power.
For added safety, you can also turn off the power switch on your furnace or air handler.
Label Existing Wires
Labeling existing wires is an essential step in removing your old thermostat. Before disconnecting anything, take a clear photo of the current wiring setup for reference.
Then, use small adhesive labels or masking tape to mark each wire according to its terminal letter on the old thermostat. Common labels include 'R' for power, 'W' for heat, 'Y' for cooling, and 'G' for fan.
Don't rely on wire colors alone, as they can vary between systems. If you're unsure about a wire's function, consult your HVAC system's manual or contact a professional.
Once you've labeled all wires, carefully disconnect them from the old thermostat's terminals. Use a small screwdriver to loosen the screws, being cautious not to let the wires fall back into the wall.
As you remove each wire, wrap the label around it to make sure it stays in place. If you encounter any unused wires, label them as "unused" and wrap their ends with electrical tape for safety.
Keep all wires accessible and visible as you prepare to remove the old thermostat's baseplate from the wall. This careful labeling process will make installing your new smart thermostat much easier and prevent potential wiring mistakes.
Detach From Wall
The next step in your smart thermostat installation is removing the old unit from the wall. Before you begin, verify that you've turned off the power to your HVAC system at the circuit breaker. This precaution will prevent any electrical accidents during the removal process.
With the power off, you can safely proceed to detach the old thermostat.
Start by carefully removing the faceplate or cover of your existing thermostat. Most models simply snap off, while others might require gentle prying with a flathead screwdriver. Once the faceplate is off, you'll see the internal components and mounting screws.
Follow these steps to complete the removal:
- Unscrew the mounting screws holding the thermostat base to the wall.
- Gently pull the thermostat base away from the wall, being careful not to yank the wires.
- Hold the base in one hand while you disconnect the wires one by one.
As you remove each wire, make sure the labels you applied earlier remain secure. If any labels come loose, reattach them immediately to avoid confusion.
Once all wires are disconnected, set the old thermostat aside. You're now ready to prepare the wall for your new smart thermostat.
Identify and Label Wires
Wiring identification is an essential step in installing your smart thermostat. Before disconnecting any wires, take a clear photo of your current wiring setup for reference. Next, carefully examine each wire connected to your old thermostat. You'll need to identify and label them correctly to guarantee proper installation of your new smart thermostat.
Most thermostats use a standard color-coding system for wires, but it's important to verify the function of each wire rather than relying solely on colors. Use small adhesive labels or masking tape to mark each wire with its corresponding letter. Common wire designations include:
| Wire Color | Letter | Function |
|---|---|---|
| Red | R | Power |
| White | W | Heat |
| Green | G | Fan |
| Yellow | Y | Cooling |
If you encounter any unusual wire colors or configurations, consult your thermostat's manual or contact the manufacturer for guidance. Once you've labeled all wires, gently unscrew them from the old thermostat's terminal block. Keep the wires separated to avoid tangling or accidental contact. If you have any doubts about the wiring, don't hesitate to seek professional help to guarantee a safe and correct installation.
Install Mounting Plate

With your wires properly labeled, it's time to install the mounting plate for your new smart thermostat. First, remove the old thermostat's base plate if it's still attached to the wall. Clean the surface thoroughly to guarantee proper adhesion for the new mounting plate.
Next, thread the labeled wires through the center opening of the new mounting plate. Hold it against the wall, making sure it's level. Mark the screw holes with a pencil. If you're mounting on drywall, use a drill to create pilot holes and insert wall anchors for added stability.
Now, follow these steps to secure the mounting plate:
- Align the plate with your marked holes
- Insert the provided screws through the plate
- Tighten the screws carefully, guaranteeing the plate is flush against the wall
Be cautious not to overtighten, as this could damage the wall or warp the plate.
Once the mounting plate is secure, you're ready to connect the wires to your new smart thermostat. Double-check that the plate is level and stable before proceeding to the next step in your installation process.
Connect Wires to New Thermostat
When connecting wires to your new smart thermostat, you'll first need to identify the wire connections on your old thermostat.
Match the color codes of these wires to the corresponding terminals on your new device.
Make sure you secure each wire properly, making firm connections to avoid any loose or faulty connections that could affect your thermostat's performance.
Identify Wire Connections
Prior to connecting your new smart thermostat, it's important to correctly identify the wire connections from your existing system. Begin by examining the wires connected to your old thermostat and noting their colors and corresponding terminal labels. Most thermostats use a standard color-coding system, but it's vital to verify each wire's function rather than relying solely on color.
To guarantee accurate identification:
- Take a clear photo of the existing wiring configuration before disconnecting anything. This will serve as a reference if you encounter any issues during installation.
- Use small adhesive labels or masking tape to mark each wire with its corresponding terminal letter as you disconnect it from the old thermostat.
- Consult your new smart thermostat's compatibility guide to match the existing wires with the appropriate terminals on the new device.
If you're unsure about any wire connections, don't hesitate to consult a professional HVAC technician. Proper wire identification is imperative for the safe and effective operation of your new smart thermostat.
Once you've correctly identified all wire connections, you'll be ready to proceed with attaching them to your new device.
Match Color Codes
After correctly identifying your existing wire connections, it's time to match them with the appropriate terminals on your new smart thermostat. Most smart thermostats follow a standard color-coding system, but it's essential to double-check your specific model's instructions.
Typically, you'll find these common wire colors and their corresponding terminals:
- Red (R, Rc, or Rh): Power
- White (W): Heat
- Yellow (Y): Air conditioning
- Green (G): Fan
- Blue or Black (C): Common wire
Carefully connect each wire to its matching terminal on the new thermostat. If you encounter any discrepancies between your existing wires and the new thermostat's terminals, consult the manufacturer's guide or contact their support team.
Some thermostats use labels instead of colors, so pay close attention to both. If you have any unused wires, don't connect them, but do note their presence for future reference.
Make sure each wire is securely fastened to prevent loose connections that could cause malfunctions.
If your old thermostat had a jumper wire between Rc and Rh terminals, your new smart thermostat mightn't need it. Check the instructions to confirm whether you should remove it or leave it in place.
Secure Wires Properly
With your wires matched to the correct terminals, it's time to secure them properly to your new smart thermostat. Begin by straightening each wire and trimming off any frayed ends. This will guarantee a clean connection and prevent short circuits. Carefully insert each wire into its designated terminal, making sure it's fully seated.
To secure the wires effectively:
- Use a small flathead screwdriver to tighten the terminal screws. Don't overtighten, as this could damage the wires or the thermostat.
- Gently tug on each wire to confirm it's securely fastened. If a wire comes loose, reinsert it and tighten the screw again.
- Double-check that each wire is in its correct terminal. Refer to your color-coding notes or photos if needed.
Once all wires are properly secured, tuck any excess wire back into the wall opening. This prevents interference with the thermostat's internal components and guarantees a flush mount.
If your smart thermostat came with a wire clip or retainer, use it to keep the wires organized. Finally, prepare to attach the thermostat to its base plate, but don't snap it in place just yet. You'll need to complete a few more steps before finalizing the installation.
Attach Thermostat to Mounting Plate

Attaching your new smart thermostat to the mounting plate is a crucial step in the installation process. Before you begin, verify that all wires are securely connected to the mounting plate and that it's level on the wall.
Carefully align your smart thermostat with the mounting plate, making sure the pins on the back of the thermostat match up with the corresponding connectors on the plate.
Gently push the thermostat onto the mounting plate until you hear a click or feel it snap into place. Don't force it if there's resistance, as this could damage the pins or connectors. If it doesn't fit easily, double-check the alignment and try again.
Once attached, give the thermostat a slight tug to confirm it's securely fastened. Some models may require you to tighten screws or clips to fully secure the thermostat. Consult your device's manual for specific instructions.
After attaching, check that the display turns on and the thermostat is receiving power. If it doesn't power up, carefully remove it and recheck your wire connections.
With the thermostat properly attached, you're now ready to proceed with the setup and configuration process.
Restore Power and Test
The final two steps in your smart thermostat installation are restoring power and testing the device.
Once you've securely attached your smart thermostat to the mounting plate, it's time to bring your HVAC system back online. Head to your circuit breaker box and flip the switch to restore power to your heating and cooling system.
Return to your thermostat and wait for it to power up. You'll likely see a welcome screen or setup wizard. Follow the on-screen instructions to connect your device to your home's Wi-Fi network and complete any initial configuration steps.
Once set up, it's essential to test your smart thermostat to guarantee it's working correctly:
- Adjust the temperature settings and listen for your HVAC system to respond.
- Test both heating and cooling modes to verify proper function.
- Use the companion app on your smartphone to control the thermostat remotely.
If you encounter any issues during testing, double-check your wiring connections and consult the troubleshooting section of your thermostat's manual.
With power restored and successful testing complete, you're now ready to enjoy the benefits of your newly installed smart thermostat, including improved energy efficiency and convenient temperature control.
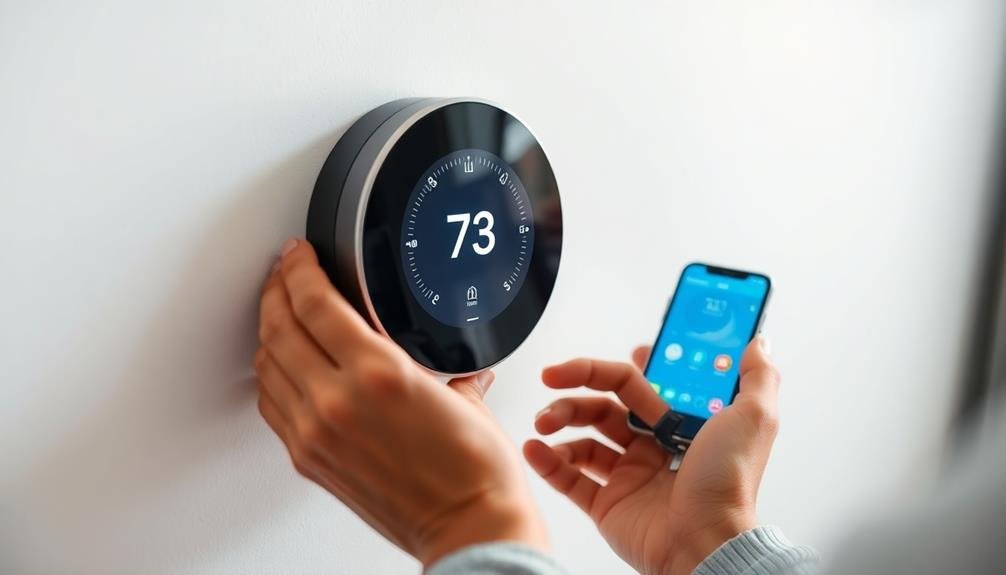
Set Up Wi-Fi Connection

Setting up your smart thermostat's Wi-Fi connection is an essential step that opens up its full potential. To begin, verify your smartphone or tablet is connected to your home's Wi-Fi network.
Then, open the manufacturer's app you've downloaded for your smart thermostat. In the app, look for an option to add a new device or connect a thermostat.
Follow the on-screen prompts, which typically involve selecting your Wi-Fi network and entering your password. Some thermostats may require you to scan a QR code or enter a unique code displayed on the device's screen.
Once you've entered the necessary information, your thermostat will attempt to connect to your Wi-Fi network. This process may take a few minutes. If the connection fails, double-check your Wi-Fi password and verify your router is functioning correctly.
After a successful connection, your app will guide you through the final setup steps. These may include naming your thermostat, setting preferences, and creating a schedule.
Take time to explore the app's features, such as remote control, energy reports, and smart home integrations. With your Wi-Fi connection established, you're now ready to enjoy the full benefits of your smart thermostat.
Program Your Smart Thermostat
Programming your smart thermostat is where you'll truly start to see its benefits. Most smart thermostats offer both manual and automatic programming options. You can set specific temperatures for different times of the day and days of the week, or let the device learn your preferences over time.
To get started, access your thermostat's programming menu through its touchscreen or connected app. Consider your daily routine and energy-saving goals when creating your schedule. Here's a basic approach:
- Set lower temperatures when you're asleep or away from home
- Program higher temperatures when you're active and at home
- Use the thermostat's energy-saving features like geofencing or occupancy sensing
Don't forget to take advantage of your smart thermostat's advanced features. Many devices offer humidity control, air quality monitoring, and integration with other smart home systems.
You can also set up alerts for extreme temperatures or maintenance reminders.
Frequently Asked Questions
Can a Smart Thermostat Be Installed in Homes Without Existing Central Heating Systems?
Yes, you can install a smart thermostat without central heating. You'll need to choose a model compatible with your existing system, whether it's baseboard heaters, mini-splits, or other alternatives. Some smart thermostats are designed for these specific setups.
How Much Energy Can I Expect to Save With a Smart Thermostat?
You can typically save 10-15% on your heating and cooling costs with a smart thermostat. Your actual savings will depend on your usage habits, home insulation, and local climate. You'll see the most benefit through consistent use.
Are Smart Thermostats Compatible With All Types of HVAC Systems?
Smart thermostats aren't compatible with all HVAC systems. You'll need to check your system's compatibility before purchasing. Most work with conventional forced air, heat pumps, and radiant systems, but they may not suit more complex setups.
Do Smart Thermostats Require Regular Maintenance or Battery Replacements?
Most smart thermostats don't need regular maintenance. They're usually hardwired, so you won't need to replace batteries. However, you should occasionally clean the display and check for software updates to guarantee peak performance.
Can Multiple Users Control a Smart Thermostat From Different Devices Simultaneously?
Yes, you can control your smart thermostat from multiple devices simultaneously. Most smart thermostats allow several users to connect through their smartphones or tablets. You'll need to set up individual accounts and grant access to each user.
In Summary
You've successfully installed your new smart thermostat! Now you're ready to enjoy the benefits of energy-efficient temperature control and remote access. Don't forget to explore all the features your device offers, like scheduling, energy reports, and voice control integration. If you encounter any issues, consult the user manual or contact customer support. With your smart thermostat in place, you're on your way to a more comfortable and cost-effective home environment.


Leave a Reply