To master fiberglass batt insulation, start by choosing the right R-value for your climate and specific areas. Always wear proper safety gear, including respirators, goggles, and protective clothing. Measure carefully and cut batts precisely, adding an extra inch for a snug fit. Place vapor barriers correctly, typically facing the living space. When fitting around obstacles like electrical boxes and pipes, cut X-shapes and split batts as needed. Address gaps and avoid compression to maintain insulation effectiveness. In attics, guarantee proper ventilation and seal air leaks before installation. These pro tips will set you on the path to expert-level insulation techniques.
Choosing the Right R-Value

When it comes to choosing the right R-value for your fiberglass batt insulation, you'll need to weigh several factors. The R-value measures thermal resistance, indicating how well the insulation prevents heat transfer. Higher R-values offer better insulation, but they're not always necessary or cost-effective for every situation.
First, consider your climate zone. Colder regions require higher R-values to maintain indoor comfort and energy efficiency. Next, evaluate the area you're insulating. Attics typically need higher R-values than walls or floors.
Don't forget to check local building codes, which often specify minimum R-values for different parts of your home. Your budget also plays a role. While higher R-values generally cost more upfront, they can lead to long-term energy savings. However, there's a point of diminishing returns where additional insulation provides minimal benefit.
For most homes, R-13 to R-15 is suitable for 2×4 walls, while R-19 to R-21 works well for 2×6 walls. Attics often require R-30 to R-60, depending on your location.
Proper Safety Equipment
When working with fiberglass insulation, you'll need to prioritize your safety by using the right protective gear.
Start by focusing on essential equipment, including respiratory protection to prevent inhalation of fibers.
Don't forget to safeguard your eyes and skin from irritation caused by direct contact with the insulation material.
Essential Protective Gear
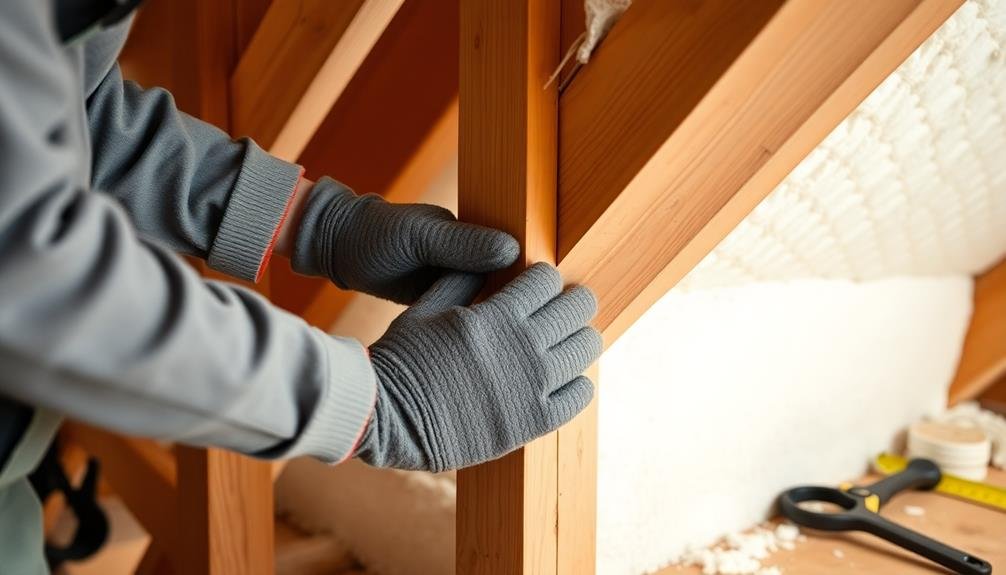
For your safety and comfort, proper protective gear is essential when working with fiberglass batt insulation. Start with a long-sleeved shirt and pants made of tightly woven fabric to minimize skin exposure. Opt for clothing that's loose-fitting to prevent fibers from pressing against your skin. Don't forget to tuck your shirt into your pants and seal openings with tape to create a barrier.
Wear safety goggles to protect your eyes from airborne fibers and debris. A respirator or dust mask rated for fiberglass particles is vital to prevent inhalation of harmful fibers. Choose gloves that are thick enough to resist punctures but flexible enough for dexterity – leather or nitrile-coated gloves work well.
Protect your feet with sturdy, closed-toe shoes or boots. If you're working overhead, a hard hat is necessary to shield against falling objects. Consider using knee pads if you'll be kneeling frequently.
After your work session, remove protective gear carefully to avoid spreading fibers. Remember, proper protective equipment isn't just about comfort – it's vital for preventing long-term health issues associated with fiberglass exposure.
Respiratory Safety Measures
Respiratory protection stands out as a key component of your safety gear when working with fiberglass insulation. You'll need to wear a proper respirator to prevent inhalation of airborne fiberglass particles and dust.
Choose a NIOSH-approved N95 mask or higher-rated respirator for ideal protection. These masks filter out at least 95% of airborne particles, considerably reducing your exposure to harmful fibers.
Ensure your respirator fits snugly against your face, creating a proper seal. If you have facial hair, consider using a full-face respirator or powered air-purifying respirator (PAPR) for better protection.
Don't forget to replace your respirator filters regularly, following the manufacturer's guidelines.
In addition to wearing a respirator, implement other measures to minimize airborne fibers. Use a vacuum with a HEPA filter to clean up debris, and avoid dry sweeping, which can stir up particles.
If possible, work in well-ventilated areas or use exhaust fans to improve air circulation.
Eye and Skin Protection
Safety goggles and protective clothing are essential when working with fiberglass insulation. Protect your eyes with wrap-around safety glasses or goggles that fit snugly against your face, preventing fibers from entering your eyes. Don't rely on regular eyeglasses, as they won't provide adequate protection.
For skin protection, wear long-sleeved shirts, long pants, and gloves. Choose loose-fitting clothes made of tightly woven fabrics to minimize skin exposure. Avoid shorts, tank tops, or any clothing that leaves skin exposed. Opt for leather or thick cotton gloves to shield your hands from fibers and potential cuts.
Tuck your pants into your socks and your shirt into your pants to create a barrier against fibers. If you're working overhead, wear a hat or hood to protect your scalp and neck.
After you've finished working, remove your protective clothing carefully to avoid spreading fibers. Wash your work clothes separately from other laundry to prevent contamination.
Measuring and Cutting Techniques

Precision measuring and accurate cutting are essential skills for installing fiberglass batt insulation effectively. Begin by measuring the cavity width and height, using a tape measure. Always measure in multiple spots, as framing can be inconsistent. For length, add an extra inch to guarantee a snug fit.
When cutting batts, use a sharp utility knife and a straight edge. Place the batt on a sturdy surface, compress it slightly with the straight edge, and cut along it with firm, steady pressure. For oddly shaped areas, measure and mark the batt, then cut to fit. Remember to cut batts slightly oversized, as it's easier to trim excess than to fill gaps.
For electrical boxes and other obstructions, cut an X-shape slightly smaller than the object. This allows you to push the insulation around it, creating a tight seal. When working around pipes or wires, split the batt vertically to fit around them.
To minimize waste, save larger scraps for filling smaller spaces. Always cut batts on a clean surface to prevent contamination.
With practice, you'll develop a feel for efficient measuring and cutting, speeding up your installation process.
Vapor Barrier Placement
Once you've mastered cutting and measuring, it's time to contemplate vapor barrier placement. The vapor barrier is essential for preventing moisture from penetrating your insulation and compromising its effectiveness. In most climates, you'll want to install the vapor barrier facing the living space.
When installing batts with a kraft paper or foil backing, make certain the barrier faces the warm side of the wall. In colder regions, this means facing the interior; in hot, humid climates, it may face the exterior. Always check local building codes for specific requirements.
For areas with high humidity, like bathrooms or kitchens, consider using unfaced batts and installing a separate polyethylene vapor barrier. This allows for better moisture control and easier replacement if needed.
| Climate Type | Vapor Barrier Placement | Additional Considerations |
|---|---|---|
| Cold | Interior-facing | Seal all seams and edges |
| Hot, Dry | Often unnecessary | Focus on air sealing |
| Hot, Humid | Exterior-facing | Use perforated barriers |
| Mixed | Interior-facing | Consider smart barriers |
| Marine | Interior-facing | make certain proper ventilation |
Remember to avoid creating a double vapor barrier, which can trap moisture between layers. If you're adding insulation to an existing wall, remove or perforate any old vapor barriers before installation.
Fitting Around Obstacles

When installing fiberglass batt insulation, you'll often encounter obstacles like electrical boxes, pipes, and wires.
You'll need to cut the insulation carefully to fit around these elements without compressing or damaging it.
Proper fitting guarantees ideal insulation performance and helps maintain the integrity of your home's electrical and plumbing systems.
Cutting for Electrical Boxes
Fitting insulation around electrical boxes requires careful cutting to guarantee a snug fit without compressing the material. To achieve this, you'll need a sharp utility knife and a straightedge.
Begin by measuring the distance from the stud to the edge of the electrical box. Transfer this measurement to your batt insulation, adding an extra inch to confirm complete coverage.
Next, make your cuts. Here's a simple process to follow:
- Cut a vertical slit from the face of the batt to its back, stopping at the depth of the box.
- Make horizontal cuts at the top and bottom of the box, extending from the vertical slit to the edge of the batt.
- Remove the cut piece, creating a notch that will fit around the box.
When installing the batt, tuck the insulation behind the box and along its sides. Don't stuff or compress the material, as this reduces its effectiveness.
For boxes that aren't flush with the wall surface, you may need to make additional cuts to accommodate protruding edges. Always confirm that the insulation fully covers the area around the box without gaps or excessive compression.
Handling Pipes and Wires
Properly insulating around pipes and wires is essential for maintaining your home's energy efficiency. When you encounter these obstacles, split the batt vertically and wrap it around the pipe or wire. For larger pipes, cut the batt into two pieces and fit them snugly on either side. Ascertain there are no gaps or compressed areas, as these can reduce insulation effectiveness.
For electrical wires, gently separate the insulation fibers and allow the wire to pass through. Don't compress the insulation around the wire, as this can create a fire hazard. If you're dealing with multiple wires, consider using unfaced batts to make the process easier.
For plumbing pipes, pay extra attention to areas where cold and hot water lines run close together. Insulate them separately to prevent heat transfer. If you're working in areas prone to freezing, consider using foam pipe insulation in addition to fiberglass batts.
When insulating around ventilation ducts, leave a small air gap to prevent condensation. For recessed lighting fixtures, maintain a 3-inch clearance unless they're rated for direct insulation contact (IC-rated).
Always prioritize safety and follow local building codes when insulating around electrical and plumbing components.
Addressing Gaps and Compression
Perfection in fiberglass batt insulation installation hinges on addressing gaps and compression. To achieve ideal thermal performance, you'll need to guarantee a snug fit without squeezing the insulation. Gaps allow heat to escape, while compression reduces the insulation's effectiveness.
When installing batts, cut them slightly oversized to fill the entire cavity. Use a sharp utility knife to trim excess material, guaranteeing a precise fit. Pay special attention to corners and edges, where gaps are most likely to occur. If you encounter oddly shaped spaces, consider using loose-fill insulation to fill these areas completely.
To avoid compression, follow these guidelines:
- Don't force batts into tight spaces
- Allow insulation to expand fully before securing it
- Use proper depth furring strips to maintain consistent thickness
Remember that compressed insulation loses its R-value, reducing its ability to resist heat flow.
If you're working with faced batts, be careful not to compress them when stapling the facing to framing members. Always use a light touch and avoid over-securing the material.
Attic Insulation Considerations
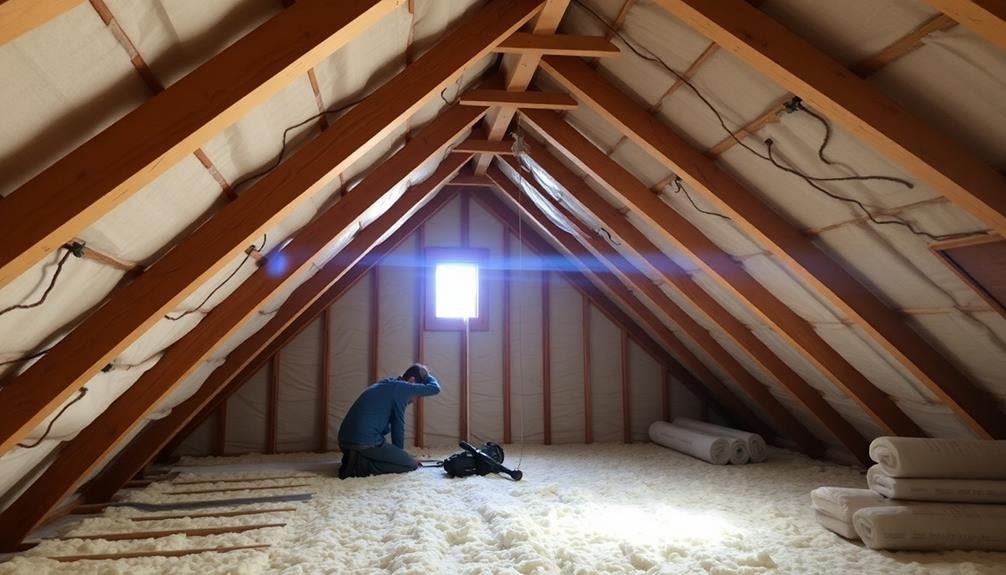
When it comes to attic insulation, there's more to reflect on than just laying down batts. You'll need to take into account ventilation, moisture control, and potential obstructions.
First, verify your attic has proper ventilation to prevent heat buildup and moisture accumulation. Install soffit vents and ridge vents if necessary.
Before insulating, address any air leaks around light fixtures, chimneys, and plumbing stacks. Use foam sealant or caulk to close these gaps. Don't forget to insulate and weatherstrip the attic access hatch.
When installing batts, place them between the joists, making sure not to compress them. For extra efficiency, think about adding a second layer perpendicular to the first. This helps cover the tops of the joists and reduces thermal bridging.
Be cautious around electrical components. Keep insulation at least three inches away from recessed lighting fixtures to prevent fire hazards. Use insulation baffles near the eaves to maintain proper airflow from soffit vents.
If your attic has a floor, contemplate removing it to achieve better insulation coverage. Alternatively, add insulation above the existing floor.
Maintaining Ventilation During Installation
Maintaining proper airflow is essential when installing fiberglass batt insulation. Adequate ventilation prevents moisture buildup, reduces the risk of mold growth, and helps regulate temperature in your attic space. As you install insulation, be careful not to block soffit vents, ridge vents, or any other ventilation points in your attic.
To guarantee proper ventilation during installation:
- Install soffit baffles before placing insulation. These plastic or cardboard channels create a clear path for air to flow from the soffit vents to the attic space.
- Leave a gap between the insulation and the roof decking. This space allows air to circulate freely and prevents heat buildup.
- Don't cover attic vents with insulation. Keep all vents, including gable, ridge, and soffit vents, clear and unobstructed.
When working with fiberglass batts, cut them to fit around obstacles rather than compressing them. Compressed insulation loses its effectiveness and can interfere with airflow.
If you're adding a second layer of insulation, install it perpendicular to the first layer to minimize gaps and maintain consistent coverage.
Frequently Asked Questions
Can Fiberglass Insulation Be Reused or Recycled?
You can reuse fiberglass insulation if it's in good condition and free from moisture or mold. However, recycling options are limited. It's best to check with local recycling facilities, as some may accept clean, dry fiberglass for processing.
How Often Should Fiberglass Batt Insulation Be Replaced?
You don't need to replace fiberglass batt insulation regularly if it's properly installed and maintained. It can last 20-30 years or more. However, you should replace it if it's damaged, compressed, or shows signs of mold or moisture.
Is Fiberglass Insulation Effective for Soundproofing?
While fiberglass insulation can help reduce noise, it's not the most effective for soundproofing. You'll get better results using specialized acoustic materials. If you're aiming for significant sound reduction, consider combining fiberglass with other soundproofing techniques.
Can Fiberglass Insulation Be Installed Over Existing Insulation?
You can install fiberglass insulation over existing insulation, but it's not always recommended. You'll need to guarantee the existing insulation is dry, free of mold, and properly compressed. Consider consulting a professional for the best results.
Does Fiberglass Insulation Lose Effectiveness if It Gets Wet?
Yes, fiberglass insulation loses effectiveness when wet. It compresses, reducing its R-value and insulating properties. You'll also risk mold growth. If your insulation gets wet, it's best to remove and replace it as soon as possible.
In Summary
You've now got the knowledge to tackle fiberglass batt insulation like a pro. Remember to choose the right R-value, use proper safety gear, and master cutting techniques. Don't forget about vapor barriers and fitting around obstacles. Pay attention to gaps, compression, and attic-specific considerations. Always maintain proper ventilation. With these tips and techniques, you'll be well-equipped to improve your home's energy efficiency and comfort. Get insulating!


Leave a Reply