You can purify rainwater for safe drinking using various DIY methods. Try solar distillation, which mimics nature's water cycle, or set up a slow sand filtration system for effective contaminant removal. Boiling and cooling is a simple yet reliable technique, while activated charcoal filtration targets organic compounds and odors. UV light disinfection offers a chemical-free approach, and bio-sand filtration creates a natural purification process. Chlorination and SODIS (Solar Water Disinfection) provide chemical and sun-powered options, respectively. For basic filtration, use cloth and coffee filters to strain out debris. These methods range from low-tech to more advanced, offering solutions for different needs and resources.
Solar Distillation Method

With a solar distillation system, you can harness the sun's power to purify rainwater effectively. This method mimics nature's water cycle, using solar energy to evaporate water and collect the condensed, clean vapor.
To build a simple solar still, you'll need a large, shallow container, a smaller collection container, and a clear plastic sheet.
Place the large container on the ground and fill it with rainwater. Position the smaller container in the center, ensuring it doesn't float. Stretch the plastic sheet tightly over the large container, securing it with weights or tape. Place a small stone in the center of the plastic, directly above the collection container, creating a gentle slope.
As sunlight heats the water, it evaporates and condenses on the plastic's underside. The slope directs the purified water droplets into the collection container. This process removes most contaminants, including bacteria and heavy metals.
However, it's slow, producing only small amounts of water daily. For best results, place your solar still in a sunny area and regularly clean the components to maintain efficiency.
While not suitable for large-scale purification, solar distillation is an excellent off-grid solution for emergency situations or small-scale use.
Slow Sand Filtration System
You'll find slow sand filtration to be an effective, low-tech method for purifying rainwater.
To build your system, you'll need a large container filled with layers of sand and gravel, which trap contaminants as water passes through.
Regular cleaning of the top sand layer and occasional replacement of filter materials will keep your system running efficiently for years.
How It Works
A slow sand filtration system's beauty lies in its simplicity and effectiveness. You'll create layers of sand and gravel in a container, allowing water to slowly percolate through. As it passes, contaminants are trapped, and beneficial microorganisms form a biofilm called the "schmutzdecke" on the top layer.
This living filter removes pathogens and improves water quality. You'll need to maintain a constant water level above the sand to keep the biofilm alive. The system works best with a flow rate of 0.1-0.3 meters per hour, giving ample time for purification.
Here's a breakdown of the layers in a typical slow sand filter:
| Layer | Material | Depth (cm) | Function |
|---|---|---|---|
| Top | Fine Sand | 60-100 | Main filtration |
| Middle | Coarse Sand | 5-10 | Support |
| Bottom | Gravel | 10-15 | Drainage |
| Outlet | Pipe | N/A | Water collection |
You'll need to clean the top layer periodically by scraping off the schmutzdecke when flow rates decrease. With proper maintenance, your slow sand filter can provide safe drinking water for years.
Building Your System
Ready to build your own slow sand filtration system? You'll need a large container, like a 55-gallon drum, and several smaller containers for the filtration layers.
Start by cleaning your containers thoroughly and drilling holes in the bottom of the main container for water drainage.
Layer your system from bottom to top: gravel, coarse sand, and fine sand. Each layer should be about 8-12 inches deep.
Add a layer of activated charcoal between the coarse and fine sand for additional purification. Install a diffuser plate at the top to distribute incoming water evenly.
Allow your system to run for a few weeks before use, as this helps develop the beneficial bacteria in the schmutzdecke layer.
Monitor the flow rate and adjust the sand layers if needed. Clean the top layer periodically by gently scraping off the surface.
Remember to pre-filter your rainwater before it enters the slow sand filter to remove larger debris.
You can use a simple mesh screen or first-flush diverter for this purpose. Test your filtered water regularly to guarantee it meets safety standards for drinking.
Maintenance and Efficiency
Once you've built your slow sand filtration system, proper maintenance is key to ensuring its efficiency and longevity.
Regularly check the water level above the sand layer, maintaining it at about 4-6 inches. This depth helps prevent the sand from drying out and keeps the biological layer active.
Monitor the flow rate through your filter. If it slows considerably, it's time to clean the system. To do this, carefully scrape off the top inch of sand and organic matter. This process, known as "harrowing," rejuvenates the filter without disturbing the deeper, biologically active layers.
Clean your collection container weekly to prevent bacterial growth.
Inspect all components of your system monthly, looking for leaks, cracks, or signs of wear. Replace any damaged parts promptly.
To maximize efficiency, protect your system from direct sunlight to reduce algae growth.
Consider adding a pre-filter to remove larger particles, which can extend the time between cleanings.
Boiling and Cooling Technique

The boiling and cooling technique stands as one of the simplest and most effective methods for purifying rainwater. To implement this method, you'll need a clean pot, a heat source, and a storage container.
Start by filtering the collected rainwater through a fine cloth to remove visible debris. Then, pour the water into the pot and bring it to a rolling boil. Let it boil for at least one minute at sea level, or three minutes at higher altitudes, to guarantee all harmful microorganisms are destroyed.
After boiling, allow the water to cool naturally. Don't add ice, as it may reintroduce contaminants. Once cooled, transfer the water to a clean, sanitized container for storage.
It's vital to use clean utensils and containers throughout this process to prevent recontamination. While boiling effectively kills pathogens, it doesn't remove chemical contaminants. If you suspect chemical pollution in your rainwater, consider additional purification methods.
Activated Charcoal Filtration
Activated charcoal filtration frequently serves as an effective DIY method for purifying rainwater. You'll find this technique particularly useful for removing organic compounds, chlorine, and unpleasant odors from collected rainwater.
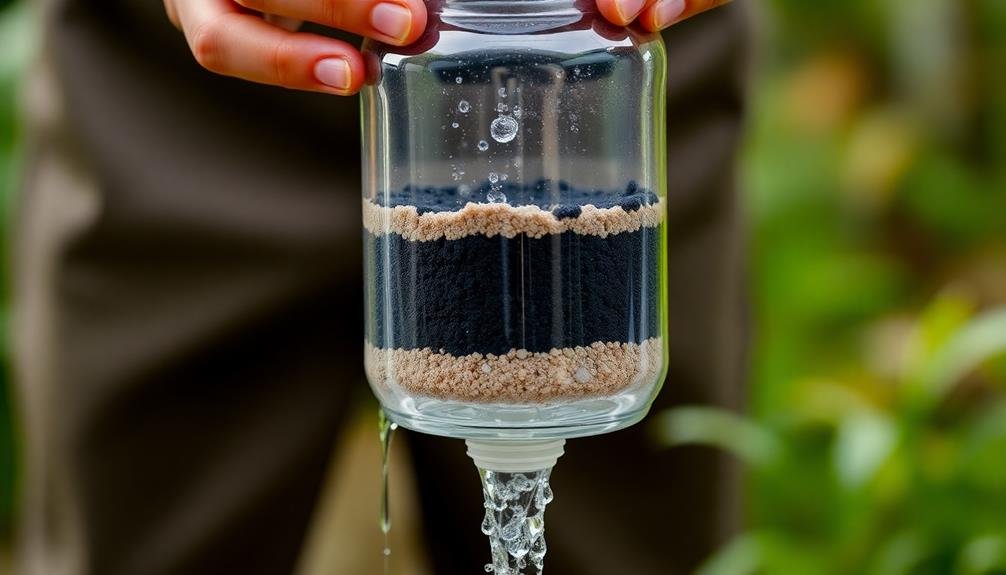
To create your own activated charcoal filter, you'll need a clean container, activated charcoal, fine mesh or cloth, and gravel or sand.
Start by layering your container with gravel at the bottom, followed by a layer of activated charcoal, and then a layer of fine sand on top. Cover the layers with a fine mesh or cloth to prevent the materials from mixing.
When you're ready to filter your rainwater, simply pour it through the top of your homemade filter. The activated charcoal works by adsorbing impurities as the water passes through.
It's essential to recognize that while this method is effective for many contaminants, it may not remove all harmful bacteria or viruses. For added safety, you should consider combining activated charcoal filtration with other purification methods like boiling or UV treatment.
Remember to replace the activated charcoal regularly, as it can become saturated over time and lose its effectiveness.
With proper maintenance, your DIY activated charcoal filter can greatly improve the quality of your collected rainwater.
UV Light Disinfection

Ultraviolet light disinfection offers a powerful and chemical-free method for purifying rainwater. UV-C light, with wavelengths between 200-280 nanometers, effectively inactivates harmful microorganisms by damaging their DNA. To implement this method, you'll need a UV lamp specifically designed for water treatment.
Install the UV lamp in a clear tube or chamber where the collected rainwater will flow through. Confirm the water's exposure time is sufficient for thorough disinfection. The effectiveness of UV treatment depends on the water's clarity, so pre-filtering is essential to remove suspended particles.
Here's a quick guide to UV disinfection:
| Step | Action | Note |
|---|---|---|
| 1 | Pre-filter water | Remove debris and particles |
| 2 | Install UV lamp | Use food-grade materials |
| 3 | Monitor flow rate | Confirm proper exposure time |
While UV disinfection is highly effective against bacteria and viruses, it doesn't remove chemical contaminants or improve taste. You'll need to combine it with other filtration methods for all-encompassing purification. Remember to replace the UV lamp annually and regularly clean the quartz sleeve to maintain peak performance. With proper setup and maintenance, UV disinfection can provide you with safe, potable rainwater for years to come.
Ceramic Pot Filtration
Ceramic pot filtration uses porous clay vessels to remove contaminants from rainwater as it passes through.
You'll find this method effective at eliminating bacteria and protozoa, but it won't remove viruses or chemical pollutants.
While ceramic filters are relatively low-cost and easy to maintain, they've a slow flow rate and require regular cleaning to prevent clogging.
How It Works
This simple yet effective method relies on the porous nature of ceramic material to filter water. When you pour rainwater into the ceramic pot, it slowly seeps through the tiny pores in the material. These microscopic openings are large enough to allow water molecules to pass through but small enough to trap contaminants like bacteria, protozoa, and sediment.
As the water moves through the ceramic, it's also exposed to colloidal silver, which is typically embedded in the pot. This silver acts as a powerful antimicrobial agent, killing or inactivating any remaining pathogens that might've slipped through the pores. The filtered water then collects in a clean container below.
You'll find that ceramic pot filtration is particularly effective at removing turbidity, improving the water's clarity and taste. It can eliminate up to 99.99% of waterborne bacteria and protozoa.
However, it's essential to recognize that while this method is highly efficient for biological contaminants, it may not be as effective against chemical pollutants or viruses. Regular cleaning and maintenance of your ceramic filter are vital to guarantee its continued effectiveness and longevity.
Effectiveness and Limitations
Despite its simplicity, ceramic pot filtration boasts impressive effectiveness in purifying rainwater. You can expect it to remove up to 99.99% of bacteria and protozoa, considerably reducing the risk of waterborne diseases. It's particularly effective against E. coli, cholera, and giardia. The filtration process also improves water clarity by removing sediments and other visible particles.
However, ceramic pot filtration has its limitations. It won't remove chemical contaminants or dissolved solids, so if your rainwater contains these, you'll need additional treatment methods. Viruses, which are smaller than bacteria, can sometimes pass through the ceramic pores.
The filtration rate is relatively slow, typically producing 1-3 liters per hour, which may not be sufficient for large households. You'll need to maintain the filter regularly by cleaning it to prevent clogging and guarantee peak performance.
The ceramic pot's fragility is another concern; if it cracks or breaks, it'll compromise the filtration effectiveness. Finally, while it's a cost-effective solution in the long run, the initial investment might be higher compared to some other DIY methods.
Bio-sand Filtration Process

How can you harness the power of nature to purify rainwater? The bio-sand filtration process offers an effective, low-cost solution. This method mimics nature's own water purification system, using layers of sand and gravel to remove contaminants.
To create your own bio-sand filter, you'll need a container, preferably concrete or plastic, filled with specific layers of materials. From bottom to top, these layers include:
| Layer | Material | Depth |
|---|---|---|
| 1 | Coarse gravel | 5 cm |
| 2 | Fine gravel | 5 cm |
| 3 | Coarse sand | 40-50 cm |
The top layer of fine sand hosts beneficial microorganisms that form a biofilm, which actively removes pathogens from the water. As you pour rainwater through the filter, it'll slowly percolate through these layers, emerging cleaner and safer to drink.
Maintain your bio-sand filter by adding water daily to keep the biofilm alive. Clean the top layer periodically by stirring it gently and removing any debris. With proper care, your filter can last for years, providing a sustainable source of clean water from rainwater harvesting.
Chlorination Purification Method
You'll find chlorination to be an effective method for purifying rainwater. This process involves adding chlorine to kill harmful microorganisms, and you'll need chlorine tablets or bleach, a clean container, and a stirring utensil.
To purify your rainwater using chlorination, you'll follow a simple step-by-step process that guarantees proper disinfection and safe drinking water.
How Chlorination Works
Ever wondered why chlorination is so effective in purifying water? It's all about the chemical reaction that occurs when chlorine is added to water. Chlorine acts as a powerful disinfectant, killing harmful microorganisms that can cause waterborne diseases.
When you add chlorine to water, it forms hypochlorous acid and hypochlorite ions. These compounds penetrate the cell walls of bacteria, viruses, and other pathogens, disrupting their cellular processes and ultimately killing them.
The effectiveness of chlorination depends on several factors:
- Concentration: The amount of chlorine added must be sufficient to kill pathogens but not excessive to avoid taste and odor issues.
- Contact time: Chlorine needs time to react with and eliminate microorganisms.
- pH level: Chlorination works best in slightly acidic water (pH 6.5-7.5).
- Water temperature: Warmer water increases the reaction rate, making chlorination more effective.
To guarantee proper chlorination, you'll need to carefully measure the chlorine dose and allow enough contact time before using the treated water.
It's also important to test the residual chlorine levels to confirm that the water remains safe to drink.
Required Materials
Just five essential materials are needed for the chlorination purification method. You'll need chlorine bleach, a large clean container, a measuring spoon, a stirring utensil, and a timer. It's vital to use regular, unscented chlorine bleach with 5.25% to 8.25% sodium hypochlorite as the only active ingredient.
For the container, choose a food-grade plastic or glass vessel that can hold at least 5 gallons of water. A measuring spoon, preferably plastic, will help you add the correct amount of bleach. Use a long-handled spoon or stick for stirring, and any timer will do.
Here's a quick reference table for the bleach-to-water ratio:
| Water Volume | Clear Water | Cloudy Water |
|---|---|---|
| 1 quart | 2 drops | 4 drops |
| 1 gallon | 8 drops | 16 drops |
| 5 gallons | 1/2 tsp | 1 tsp |
Step-By-Step Purification Process
Let's plunge into the step-by-step process for chlorinating rainwater. First, you'll need to calculate the volume of water you're treating. A general rule of thumb is to use 1/8 teaspoon (about 0.75 mL) of unscented household bleach per gallon of water. Add the bleach to your container and stir thoroughly. Allow the treated water to sit for at least 30 minutes before use.
For larger volumes, follow these guidelines:
- 5 gallons: Use 1/2 teaspoon (2.5 mL) of bleach
- 10 gallons: Use 1 teaspoon (5 mL) of bleach
- 50 gallons: Use 5 teaspoons (25 mL) of bleach
- 100 gallons: Use 10 teaspoons (50 mL) of bleach
After treatment, test the water's chlorine levels using a pool test kit. Aim for a residual chlorine concentration of 0.5-1 mg/L. If the levels are too low, add more bleach and retest. If they're too high, let the water sit uncovered to allow excess chlorine to dissipate.
Remember to store your purified water in clean, sealed containers away from direct sunlight. It's essential to regularly maintain and clean your rainwater collection system to guarantee ideal purification results.
SODIS Water Treatment

Have you heard of SODIS? This simple, low-cost water treatment method uses solar energy to purify water. SODIS stands for Solar Water Disinfection, and it's an effective way to make rainwater safe for drinking.
To use SODIS, you'll need clear plastic bottles made of PET (polyethylene terephthalate). Fill the bottles with rainwater, making sure they're not cloudy or heavily contaminated. Seal the bottles tightly and place them horizontally on a reflective surface, like a corrugated metal roof or a sheet of aluminum foil.
Leave the bottles in direct sunlight for at least six hours on a sunny day or two consecutive days if it's cloudy. The sun's UV-A radiation and heat will work together to kill harmful pathogens in the water. For best results, use bottles no larger than 2 liters and avoid using scratched or old bottles.
SODIS is particularly useful in areas with limited resources or during emergencies. It's crucial to recognize that while SODIS effectively eliminates most harmful microorganisms, it doesn't remove chemical contaminants.
Always verify your rainwater source is free from chemical pollution before using this method.
Cloth and Coffee Filter Straining
While SODIS is an excellent method for disinfecting water, it doesn't remove larger particles or sediment.
That's where cloth and coffee filter straining come in handy. This simple technique can greatly improve the clarity of your rainwater before further purification.
To strain your collected rainwater effectively, you'll need:
- Clean, tightly woven cloth (like a cotton t-shirt)
- Paper coffee filters
- A large container for the strained water
- A funnel (optional, but helpful)
Start by pouring your rainwater through the cloth into a clean container. This will catch larger debris and insects.
Next, use a coffee filter to strain the water again, removing finer particles. You can layer multiple filters for better results.
If you're dealing with particularly murky water, repeat the process until it runs clear.
Frequently Asked Questions
How Long Can Purified Rainwater Be Safely Stored?
You can safely store purified rainwater for up to six months if it's kept in a clean, airtight container away from sunlight. However, it's best to use it within a month for ideal freshness and quality.
Are There Legal Restrictions on Collecting Rainwater in Certain Areas?
Yes, you'll find legal restrictions on rainwater collection in some areas. Check your local laws, as regulations vary widely. Some places encourage it, while others limit or prohibit collection due to water rights concerns.
What Contaminants Are Most Common in Rainwater?
You'll find that rainwater often contains pollutants like dust, pollen, and bacteria. It can also pick up chemicals from air pollution, including nitrogen oxides and sulfur dioxide. In urban areas, heavy metals are a common contaminant.
Can Rainwater Purification Systems Be Integrated Into Existing Plumbing?
Yes, you can integrate rainwater purification systems into your existing plumbing. You'll need to install a collection system, filters, and a pump. It's best to consult a professional for proper setup and to guarantee compliance with local regulations.
How Does the Mineral Content of Purified Rainwater Compare to Tap Water?
You'll find purified rainwater typically has lower mineral content than tap water. It's naturally "soft" and lacks calcium and magnesium. You might need to add minerals back in for taste and health benefits after purification.
In Summary
You've now got 10 DIY methods to purify rainwater for safe drinking. Whether you choose solar distillation, sand filtration, or UV disinfection, you're taking control of your water supply. Remember, these techniques aren't just for emergencies—they're practical skills for everyday life. By implementing these methods, you're not only ensuring your family's health but also reducing your reliance on traditional water sources. Keep experimenting and refining your chosen techniques for the best results.


Leave a Reply