Effective vapor barrier methods are essential for proper insulation installation. You'll find various options to suit your needs, including polyethylene sheets, kraft-faced fiberglass batts, and spray foam insulation. Foil-faced rigid foam boards offer versatility, while smart vapor retarders adapt to humidity levels. Paint-on products provide seamless coverage, and sealed air barriers create an airtight layer. Radiant barrier foils help reduce attic temperatures, and vapor barrier tapes guarantee tight seals. Double-sided systems offer superior moisture control. Remember to check local building codes for compliance. By exploring these methods, you'll discover the best solution for your specific insulation project.
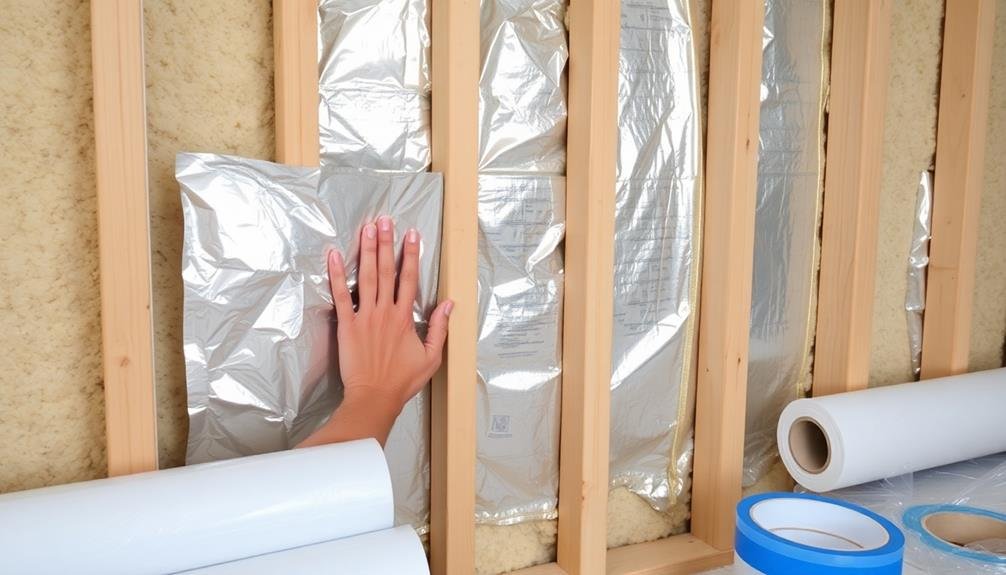
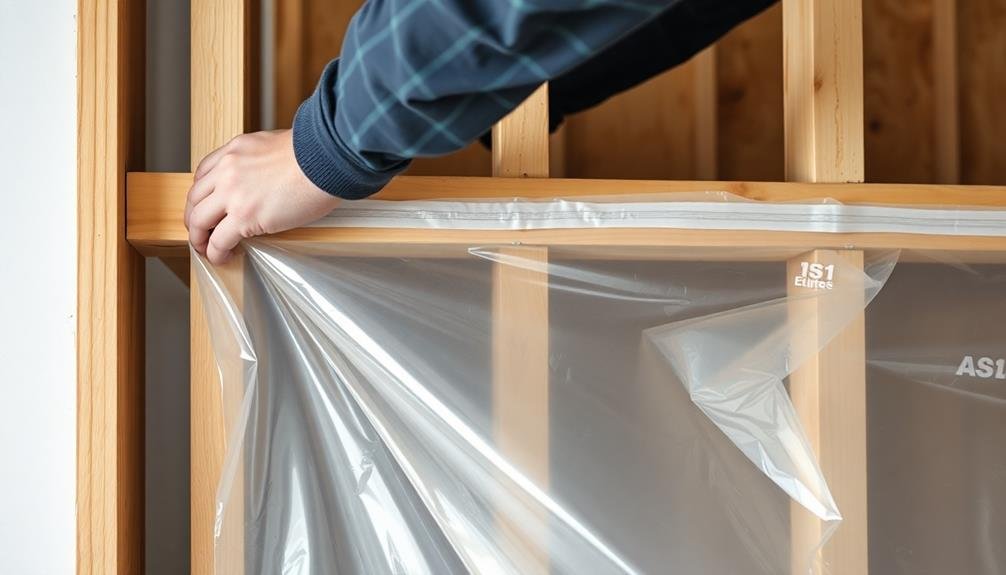
Polyethylene Sheet Installation

Most vapor barrier installations use polyethylene sheets as the primary material. You'll find these sheets available in various thicknesses, typically ranging from 4 to 6 mil.
When installing polyethylene sheets, start by measuring and cutting the material to fit your wall or ceiling dimensions, allowing for a slight overlap at the edges.
Begin the installation at one corner of the room, stapling the sheet to the studs or joists. Work your way across, pulling the material taut as you go. Verify you're creating a continuous barrier by overlapping seams by at least 6 inches and sealing them with vapor barrier tape.
Pay special attention to areas around windows, doors, and electrical outlets, cutting the sheet to fit snugly around these openings.
For added protection, consider using acoustic sealant along the edges where the polyethylene meets the floor, ceiling, or adjacent walls. This helps create an airtight seal.
When installing insulation, be careful not to puncture or tear the vapor barrier. If damage occurs, repair it immediately with vapor barrier tape to maintain the integrity of the barrier.
Kraft-Faced Fiberglass Batts
Frequently, homeowners opt for kraft-faced fiberglass batts as a convenient all-in-one insulation and vapor barrier solution. These batts come with a kraft paper facing that acts as a vapor retarder, eliminating the need for separate vapor barrier installation.
To install kraft-faced batts, you'll need to place them between wall studs or ceiling joists, with the kraft paper facing the living space. Guarantee a snug fit without compressing the insulation, as this reduces its effectiveness. Use a utility knife to cut batts to size, leaving a 1/4-inch gap around electrical boxes.
When installing multiple layers, only use kraft-faced batts for the first layer. Subsequent layers should be unfaced to prevent trapping moisture between vapor barriers. Here's a quick comparison of kraft-faced batts with other insulation options:
| Feature | Kraft-Faced Batts | Unfaced Batts | Spray Foam |
|---|---|---|---|
| Built-in vapor barrier | Yes | No | Yes |
| Easy DIY installation | Yes | Yes | No |
| Custom fit for odd spaces | Moderate | Moderate | Excellent |
| Cost | Moderate | Low | High |
Remember to seal all edges and seams with foil tape to guarantee a continuous vapor barrier. While kraft-faced batts offer convenience, they're not suitable for areas with high moisture exposure like bathrooms or basements.
Spray Foam Insulation Application

You'll find spray foam insulation application to be a unique process that requires specialized equipment and techniques.
It offers excellent air sealing and insulation properties, but can be more expensive and difficult to install correctly compared to other methods.
There are two main types of spray foam insulation: open-cell and closed-cell, each with its own set of characteristics and ideal applications.
Application Process and Techniques
The application of spray foam insulation requires precision and specialized equipment. You'll need to wear protective gear, including a full-body suit, gloves, and a respirator, to guarantee your safety during the process.
Before starting, prepare the area by removing any debris and sealing off adjacent spaces to prevent overspray.
Begin by setting up your spray foam equipment, which includes a spray gun, hoses, and a proportioner. Adjust the temperature and pressure settings according to the manufacturer's instructions.
As you spray, maintain a consistent distance from the surface, typically 18-24 inches, and use a smooth, steady motion to apply an even layer.
For open-cell foam, you'll apply it in a single pass, while closed-cell foam requires multiple thin layers to achieve the desired thickness.
Be mindful of the expansion rate of the foam, as it can increase in volume by up to 100 times its liquid state. Allow each layer to cure before applying the next one, and trim any excess foam after it has fully cured to guarantee a smooth finish.
Benefits and Drawbacks
Spray foam insulation offers a range of benefits and drawbacks that you should consider before deciding on this application method. Its primary advantage is its superior air-sealing capability, which can greatly improve your home's energy efficiency.
You'll also benefit from its ability to fill gaps and irregular spaces, providing a seamless barrier against moisture and air infiltration.
However, spray foam insulation isn't without its drawbacks. It's generally more expensive than traditional insulation methods, and the installation process requires specialized equipment and trained professionals.
There's also a potential for off-gassing during and after installation, which may cause temporary health concerns for sensitive individuals.
When weighing the pros and cons, consider these key factors:
- Energy efficiency and cost savings
- Moisture control and mold prevention
- Indoor air quality and potential health impacts
- Initial installation costs versus long-term benefits
Ultimately, the decision to use spray foam insulation depends on your specific needs, budget, and priorities.
While it offers excellent insulation properties and air-sealing capabilities, you'll need to carefully evaluate whether the benefits outweigh the potential drawbacks for your particular situation.
Consider consulting with a professional insulation contractor to determine the best solution for your home.
Types of Spray Foam
Generally, two main types of spray foam insulation are available for residential applications: open-cell and closed-cell foam.
Open-cell foam is less dense and more flexible, allowing it to expand and fill gaps effectively. It's excellent for sound dampening and is typically less expensive than closed-cell foam. However, it's not as effective at preventing moisture infiltration and has a lower R-value per inch.
Closed-cell foam, on the other hand, is denser and more rigid. It provides superior insulation properties with a higher R-value per inch, making it ideal for areas where space is limited. It also acts as an effective vapor barrier, helping to prevent moisture issues. Due to its density, closed-cell foam can add structural strength to walls and roofs.
When choosing between these types, consider factors like your climate, budget, and specific insulation needs. In areas prone to moisture or flooding, closed-cell foam might be the better choice. For attics or interior walls where moisture is less of a concern, open-cell foam could suffice.
Foil-Faced Rigid Foam Boards
Among the various vapor barrier options, foil-faced rigid foam boards stand out for their versatility and effectiveness. These boards combine insulation and vapor barrier properties in one product, making them an efficient choice for many applications. You'll find them particularly useful in basements, crawl spaces, and attics where moisture control is essential.
When installing foil-faced rigid foam boards, make certain the foil side faces the warm-in-winter side of the wall. This placement allows the foil to reflect radiant heat back into the living space, enhancing energy efficiency. The boards' rigid structure makes them easy to cut and fit snugly between studs or joists.
For peak performance, consider these key benefits:
- Excellent moisture resistance
- High R-value per inch of thickness
- Improved air sealing capabilities
- Long-lasting durability
You can further enhance the boards' effectiveness by taping the seams with foil tape. This creates a continuous vapor barrier, preventing moisture from penetrating the insulation.
Remember to check local building codes, as some areas may require additional fire barriers when using foam insulation products. With proper installation, foil-faced rigid foam boards provide an effective vapor barrier solution for your insulation needs.
Smart Vapor Retarders

Smart vapor retarders represent a cutting-edge solution in moisture management for insulation installations. These innovative materials adapt their permeability based on the surrounding humidity levels, allowing moisture to pass through when conditions are damp and sealing tight when it's dry.
You'll find smart vapor retarders particularly useful in climates with varying seasonal humidity. They're typically made of polyamide film and can be installed on the warm side of your insulation. During winter, when indoor air is drier, they'll restrict vapor movement. In summer, when humidity rises, they'll become more permeable, allowing trapped moisture to escape.
To install smart vapor retarders, you'll need to carefully follow manufacturer guidelines. Ascertain you create a continuous barrier, sealing all seams and edges with appropriate tape. Pay special attention to areas around windows, doors, and other penetrations.
While more expensive than traditional vapor barriers, smart vapor retarders offer superior performance and can help prevent moisture-related issues like mold growth and insulation degradation.
They're especially beneficial in renovations where you're unsure about existing moisture conditions. By using smart vapor retarders, you're investing in a dynamic solution that adjusts to your home's changing needs.
Paint-On Vapor Barrier Products
Paint-on vapor barrier products offer unique advantages for insulation projects.
You'll find these liquid-applied barriers easy to use, with seamless coverage and adaptability to irregular surfaces.
When applying, guarantee proper surface preparation, maintain consistent thickness, and allow adequate drying time for peak performance.
Benefits of Paint-On Barriers
When it comes to vapor barrier installation, paint-on products have stepped up to offer a range of benefits. You'll find these innovative solutions provide a seamless and efficient way to protect your insulation from moisture damage.
Unlike traditional sheet barriers, paint-on options allow for easy application on irregular surfaces, ensuring complete coverage without gaps or seams.
One of the most significant advantages is the time-saving aspect. You can quickly apply the product using a roller or sprayer, covering large areas in less time than it takes to install sheet barriers.
Paint-on barriers also offer superior adhesion to various substrates, creating a more durable and long-lasting moisture barrier.
Here are four key benefits you'll enjoy with paint-on vapor barriers:
- Seamless coverage on irregular surfaces
- Faster application compared to sheet barriers
- Excellent adhesion to multiple substrates
- Reduced risk of installation errors
You'll appreciate the versatility of paint-on barriers, as they can be used in both new construction and renovation projects.
They're particularly useful in retrofitting existing structures, where installing traditional sheet barriers might be impractical or impossible.
With paint-on products, you can effectively create a moisture-resistant barrier without the need for extensive demolition or reconstruction.
Application Techniques and Tips
To achieve ideal results with paint-on vapor barrier products, mastering the proper application techniques is vital. Start by thoroughly cleaning and drying the surface to guarantee proper adhesion. Use a high-quality roller or sprayer for even coverage, and apply the product in thin, uniform coats. Don't rush the process; allow each coat to dry completely before applying the next.
When working with paint-on barriers, pay special attention to corners, joints, and penetrations. Use a brush to carefully seal these areas, assuring continuous coverage. It's essential to maintain the recommended thickness specified by the manufacturer for peak performance.
Here's a quick reference guide to common application issues:
| Issue | Cause | Solution |
|---|---|---|
| Bubbling | Trapped air | Pierce and reapply |
| Peeling | Poor surface prep | Clean and reapply |
| Uneven coverage | Improper technique | Use consistent pressure |
Remember to work in a well-ventilated area and wear appropriate protective gear, including a respirator and gloves. By following these techniques and tips, you'll maximize the effectiveness of your paint-on vapor barrier, guaranteeing a high-quality insulation installation that stands the test of time.
Sealed Air Barriers
Sealed air barriers form an essential line of defense against moisture infiltration in your home's insulation system. They work by creating a continuous, airtight layer that prevents warm, moist air from penetrating your walls, ceilings, and floors.
When installing sealed air barriers, you'll need to pay close attention to seams, joints, and penetrations to guarantee a complete seal.
To create an effective sealed air barrier, you'll need to:
- Choose the right material: Options include polyethylene sheets, specialized membranes, or spray foam insulation
- Seal all seams and joints: Use compatible tapes or adhesives to connect barrier sections
- Address penetrations: Properly seal around electrical outlets, plumbing pipes, and other openings
- Integrate with other building components: Ensure the air barrier connects seamlessly with windows, doors, and foundation
Radiant Barrier Foil Installation
After addressing sealed air barriers, it's important to contemplate radiant barrier foil installation as another effective method for enhancing your home's insulation.
Radiant barriers consist of highly reflective material, typically aluminum foil, that reflects radiant heat rather than absorbing it. You'll find this particularly useful in hot climates where solar radiation can considerably increase attic temperatures.
To install a radiant barrier, you'll need to decide between two primary methods. The first involves stapling foil-faced sheets directly to the underside of your roof rafters. This method works well for new construction or during a roof replacement.
Alternatively, you can lay the foil over existing attic insulation, which is easier for retrofitting. Make sure you leave an air gap between the foil and roof decking to maximize effectiveness.
When installing, take care to avoid compressing existing insulation, as this can reduce its R-value. Also, be mindful of potential moisture issues; radiant barriers shouldn't be used as vapor barriers in cold climates.
For best results, combine radiant barriers with proper ventilation and traditional insulation. This multi-faceted approach will considerably improve your home's energy efficiency and comfort levels.
Vapor Barrier Tapes

You'll find various types of vapor barrier tapes designed for different insulation applications, including foil-faced, butyl, and acrylic options.
To apply these tapes effectively, make certain the surface is clean and dry, then press firmly along the entire length to create a strong seal.
The durability and effectiveness of your chosen tape will depend on factors like temperature resistance, adhesive strength, and compatibility with the vapor barrier material you're using.
Types of Barrier Tapes
When selecting vapor barrier tapes for insulation installation, you'll find several types available on the market. Each type has its own strengths and is designed for specific applications. The most common types include aluminum foil tapes, polyethylene tapes, and butyl tapes.
Aluminum foil tapes are durable and offer excellent moisture resistance. They're ideal for sealing seams in metal ductwork and can withstand high temperatures.
Polyethylene tapes are flexible and easy to apply, making them suitable for sealing vapor barriers in walls and attics.
Butyl tapes provide a strong, long-lasting seal and are often used for outdoor applications due to their weather resistance.
When choosing a vapor barrier tape, consider these key factors:
- Adhesive strength
- Temperature range
- Moisture resistance
- UV stability
It's vital to select a tape that's compatible with your vapor barrier material and can withstand the environmental conditions it'll be exposed to.
For example, if you're working in an attic space that experiences extreme temperature fluctuations, opt for a tape with a wide temperature range.
Always follow the manufacturer's recommendations for application and verify the surface is clean and dry before applying the tape.
Application Techniques
Proper application of vapor barrier tapes is essential for guaranteeing an effective moisture barrier. To start, clean and dry the surface thoroughly before applying the tape. Remove any dust, dirt, or debris that could compromise adhesion. For best results, apply the tape when the temperature is above 40°F (4°C).
Begin by cutting the tape to the required length, leaving a few extra inches for overlap. Peel back the release paper and carefully align the tape along the seam or edge you're sealing. Press the tape firmly into place, working from the center outward to eliminate air bubbles.
When joining two pieces of vapor barrier, overlap them by at least 6 inches and apply tape over the entire seam. For corners and other tricky areas, use patches or specialized corner pieces for a secure seal. Always smooth out wrinkles and guarantee full contact between the tape and the surface.
If you're working with a large area, consider using a roller to apply pressure evenly across the tape. This helps activate the adhesive and guarantees a strong bond.
Durability and Effectiveness
The durability and effectiveness of vapor barrier tapes can vary widely depending on the quality of the product and its application. You'll want to choose a high-quality tape that's specifically designed for vapor barrier use, as these tapes are formulated to maintain their adhesive properties over time and resist moisture penetration.
When selecting and applying vapor barrier tape, consider the following factors to guarantee maximum durability and effectiveness:
- Temperature range: Choose a tape that can withstand the temperature fluctuations in your climate.
- Substrate compatibility: Confirm the tape adheres well to both the vapor barrier material and any adjacent surfaces.
- UV resistance: If the tape will be exposed to sunlight, opt for a UV-resistant product.
- Width: Use wider tape for better coverage and reduced risk of failure.
Apply the tape carefully, ensuring a smooth, wrinkle-free surface and adequate overlap at seams. Press firmly to activate the adhesive and eliminate air bubbles.
Regularly inspect the tape for signs of peeling, lifting, or damage, and replace as needed to maintain the integrity of your vapor barrier system. By selecting the right tape and applying it correctly, you'll greatly improve the longevity and performance of your insulation installation.
Double-Sided Vapor Barrier Systems
Some insulation projects call for a double-sided vapor barrier system, which can be a powerful tool in controlling moisture. You'll find this method particularly useful in areas with extreme temperature fluctuations or high humidity. By placing vapor barriers on both sides of the insulation, you're creating a sealed environment that effectively manages moisture movement in both directions.
When considering a double-sided system, you'll need to carefully select materials that complement each other. Here's a comparison of common options:
| Material | Permeability | Durability | Cost |
|---|---|---|---|
| Polyethylene | Low | Moderate | Low |
| Aluminum Foil | Very Low | High | Moderate |
| Smart Membranes | Variable | High | High |
| Kraft Paper | Moderate | Low | Low |
To install a double-sided vapor barrier system, start by applying the interior barrier directly to the wall or ceiling surface. Next, install your insulation, ensuring a snug fit. Finally, add the exterior barrier, overlapping seams and sealing edges with appropriate tape. Remember, proper ventilation is essential when using this method to prevent trapped moisture. Always consult local building codes, as requirements for double-sided systems may vary depending on your climate and construction type.
Frequently Asked Questions
How Do Vapor Barriers Affect Indoor Air Quality?
Vapor barriers can impact your indoor air quality by preventing moisture from entering your living space. They'll reduce mold growth and allergens, but if installed incorrectly, they may trap moisture inside, leading to air quality issues.
Can Vapor Barriers Contribute to Mold Growth if Installed Incorrectly?
Yes, if you install vapor barriers incorrectly, they can trap moisture, leading to mold growth. You'll risk this if you place them on the wrong side of insulation or create gaps that allow condensation to form behind the barrier.
Are Vapor Barriers Necessary in All Climate Zones?
No, you don't need vapor barriers in all climate zones. They're essential in cold climates to prevent moisture buildup, but unnecessary in hot, dry areas. In mixed climates, you'll want to consult local building codes for guidance.
How Often Should Vapor Barriers Be Inspected and Replaced?
You should inspect your vapor barriers annually for damage or wear. Replace them if you notice tears, holes, or deterioration. They don't need routine replacement if they're in good condition, but it's wise to check during home maintenance.
Do Vapor Barriers Impact the Effectiveness of HVAC Systems?
Yes, vapor barriers can impact your HVAC system's effectiveness. They help maintain proper indoor humidity levels, prevent moisture-related issues, and improve energy efficiency. You'll notice better temperature control and reduced strain on your heating and cooling equipment.
In Summary
You've now explored ten effective vapor barrier methods for insulation. Whether you're using polyethylene sheets, spray foam, or smart vapor retarders, you're on the right track to creating an energy-efficient home. Remember, proper installation is key to maximizing these barriers' effectiveness. Don't hesitate to consult professionals if you're unsure about the best approach for your specific situation. With the right vapor barrier, you'll enjoy improved comfort and energy savings for years to come.
Leave a Reply