You can easily detect window air leaks in your home using seven effective DIY methods. Start with a visual inspection, looking for gaps and cracks. Try the candle flame test to spot drafts, or use the dollar bill technique to check seal tightness. An infrared thermometer can reveal cold spots, while a smoke pencil visualizes air movement. For a thorough assessment, consider a blower door test. Finally, the foam board and flashlight approach helps identify light penetration around edges. These simple techniques will help you pinpoint problem areas and improve your home's energy efficiency. Discover how to implement each method for best results.
Visual Inspection Method

The eagle-eyed homeowner can start their air leak detection journey with a simple visual inspection.
Begin by examining the window frames and sashes for any visible gaps, cracks, or separations. Look closely at the areas where the window meets the wall, as these are common spots for air leaks. Check the weatherstripping around the window for signs of wear, damage, or missing sections.
Don't forget to inspect the caulking both inside and outside the window; if it's cracked, peeling, or missing, it's likely allowing air to pass through.
Pay attention to any signs of moisture or condensation between the window panes, as this can indicate a broken seal. Examine the window's operation; if it doesn't close properly or feels loose, it may be letting air in.
Look for daylight coming through around the window's edges when it's closed. If you can see light, air can certainly pass through.
Finally, check for any warping or rot in wooden window frames, which can create gaps and compromise the window's seal.
Candle Flame Test
The candle flame test is a simple yet effective method to detect air leaks around your windows.
You'll need a lit candle and a dark room to observe the flame's movement near potential leak areas.
How It Works
While simple in concept, the candle flame test is an effective method for detecting air leaks around windows. You'll need a lit candle and a dark room to perform this test. Hold the candle near the window's edges, moving it slowly along the frame and sill. Watch the flame closely as you do this. If there's an air leak, the flame will flicker or bend towards the window, indicating the direction of the draft.
The candle flame test works by exploiting the sensitivity of fire to air movement. Even small drafts can cause noticeable changes in the flame's behavior.
This method is particularly useful for:
- Identifying specific leak locations
- Detecting subtle air movements
- Evaluating the severity of leaks
- Pinpointing areas that need immediate attention
- Confirming the effectiveness of previous sealing efforts
As you conduct the test, pay attention to common problem areas such as corners, where the window meets the frame, and along weatherstripping.
Remember to be cautious with the open flame and keep flammable materials away. This method allows you to quickly and easily locate air leaks, helping you prioritize which areas need sealing to improve your home's energy efficiency.
Step-By-Step Guide
Now that you understand how the candle flame test works, let's walk through the process step-by-step.
- Close all windows and doors in your home to minimize air circulation.
- Turn off any fans, heating, or cooling systems that might create drafts.
- Light a candle and allow it to burn steadily for a few minutes.
- Hold the lit candle about 2-3 inches away from the window frame, starting at one corner.
- Slowly move the candle along the entire perimeter of the window, paying close attention to the flame's behavior.
- Watch for any flickering or sudden movements in the flame, which indicate air leaks.
- Mark the spots where you notice flame disturbances using masking tape or a sticky note.
- Repeat the process for all sides of the window, including the corners and where the window meets the frame.
- Once you've completed the test, examine the marked areas closely for visible gaps or cracks.
- Take note of all identified leak points for future sealing or repairs.
Remember to exercise caution when working with an open flame and keep flammable materials away from the candle.
If you're uncomfortable using a candle, consider alternative methods like the dollar bill test or using an infrared thermometer.
Dollar Bill Technique

In accordance with its name, the Dollar Bill Technique uses a simple dollar bill to detect air leaks around your windows. This method is quick, easy, and doesn't require any special tools or expertise.
To perform this test, close your window completely and place a dollar bill between the window sash and the frame. Try to pull the bill out; if it slides out easily, you've likely got an air leak.
Repeat this process around the entire perimeter of the window, testing multiple spots. Pay special attention to corners and areas where different materials meet, as these are common leak points. If you find areas where the dollar bill slides out easily, mark them for later sealing.
Here are some key benefits of the Dollar Bill Technique:
- Inexpensive and readily available materials
- No special skills or tools required
- Can be performed quickly on multiple windows
- Helps identify specific leak locations
- Allows for targeted repairs and weatherstripping
Once you've identified leak-prone areas, you can take appropriate measures to seal them, such as applying weatherstripping, caulk, or foam sealant.
This simple test can help you greatly improve your home's energy efficiency and comfort.
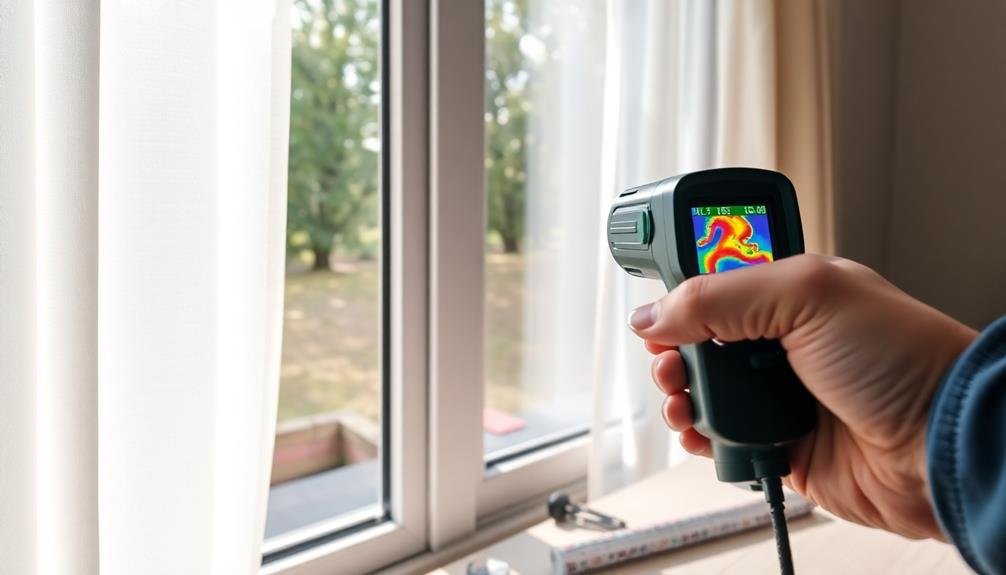
Infrared Thermometer Scan
For a more high-tech approach to detecting window air leaks, consider using an infrared thermometer. This handheld device measures surface temperatures, allowing you to identify cold spots around your windows that may indicate air leaks.
To use an infrared thermometer, start by closing all windows and doors in your home. Turn on your heating system to create a temperature difference between the inside and outside.
Begin scanning the perimeter of each window, paying close attention to corners and edges. You'll want to look for significant temperature variations, which often suggest air infiltration.
As you scan, move the thermometer slowly and steadily, keeping it about 6 inches away from the surface. Note any areas where the temperature drops suddenly. These cold spots are likely where air is seeping in.
For best results, perform this scan on a cold day to maximize the temperature difference.
Once you've identified potential leak areas, you can use other methods like the smoke test or visual inspection to confirm your findings.
Smoke Pencil Detection

Employing a smoke pencil offers a visual and precise method for detecting window air leaks. This handheld device emits a steady stream of smoke that you can use to pinpoint drafts around your windows.
To use a smoke pencil effectively, close all doors and windows in the room you're testing. Turn off any fans or heating/cooling systems to minimize air movement.
Hold the smoke pencil near the window frame, slowly moving it along the edges. Watch closely for any disturbances in the smoke's path. If you notice the smoke being pulled or pushed away from the window, you've found a leak. Pay special attention to corners and joints, as these are common problem areas.
When using a smoke pencil, keep these tips in mind:
- Work in a well-ventilated area
- Avoid inhaling the smoke directly
- Test on a calm day for best results
- Mark leak locations with painter's tape
- Retest after making repairs to verify effectiveness
Once you've identified the leaks, you can address them with appropriate sealing methods. Smoke pencils are inexpensive and readily available at hardware stores, making them an excellent tool for DIY home energy audits.
Blower Door Test
While smoke pencils offer a simple, DIY approach to leak detection, a blower door test provides a more thorough assessment of your home's air tightness. To perform this test, you'll need to rent or purchase a blower door kit, which includes a powerful fan, a mounting system, and pressure gauges.
Start by closing all windows and exterior doors, and turning off combustion appliances. Mount the blower door frame in an exterior doorway and attach the fan. As the fan depressurizes your home, it creates a pressure difference between the inside and outside. This difference forces air to rush in through any existing leaks.
Walk around your house with a smoke pencil or infrared camera to pinpoint leak locations. Pay special attention to window frames, sills, and weatherstripping. You'll notice drafts more easily due to the increased air pressure difference.
The blower door test also measures your home's overall air leakage rate. This information helps you determine if your house meets energy efficiency standards and identifies areas needing improvement.
While more complex than other DIY methods, a blower door test offers exhaustive results for those serious about improving their home's energy efficiency.
Foam Board and Flashlight Approach

Grab a foam board and a flashlight for this simple yet effective window leak detection method. Cut the foam board to fit snugly against your window frame, leaving a small gap for the flashlight. Wait until dark, then turn off all lights in the room. Have someone shine the flashlight around the edges of the foam board from outside while you observe from inside.
This technique helps you pinpoint air leaks by revealing light penetration through gaps. As you inspect, pay attention to:
- Corners and edges of the window frame
- Areas where the window meets the sill
- Spots around window locks or handles
- Seams between window panes
- Weatherstripping along movable parts
If you see light coming through, you've found a leak. Mark these spots with tape or a pencil for future sealing.
This method works best on windows that aren't obstructed by screens or storm windows. It's an inexpensive and easy way to identify problem areas without specialized equipment.
Once you've detected leaks, you can address them with caulk, weatherstripping, or other appropriate sealing methods to improve your home's energy efficiency and comfort.
Frequently Asked Questions
How Often Should I Check for Window Air Leaks?
You should check for window air leaks at least once a year, ideally before winter. If you've recently experienced extreme weather or noticed changes in your energy bills, it's wise to inspect more frequently. Don't forget to check after renovations.
Can Weather Conditions Affect the Accuracy of Air Leak Detection Methods?
Yes, weather conditions can affect air leak detection accuracy. You'll get better results on windy days, as leaks become more noticeable. Extreme temperatures can also impact your findings. It's best to test in various conditions for thoroughness.
Are There Specific Times of Year Best for Detecting Window Leaks?
You'll find fall and winter are ideal for detecting window leaks. During colder months, temperature differences make drafts more noticeable. You're also likely to see condensation or frost around leak areas when it's chilly outside.
What Tools Are Needed for Basic DIY Air Leak Detection?
You'll need a few basic tools for DIY air leak detection. Get a flashlight, candle or incense stick, and a thin piece of paper. Don't forget a ladder if you're checking high windows. These simple items will help you identify drafts.
How Much Money Can I Save by Fixing Window Air Leaks?
You can save a significant amount on your energy bills by fixing window air leaks. You'll reduce heating and cooling costs by up to 15% annually. That's potentially hundreds of dollars, depending on your home's size and energy usage.
In Summary
You've now got seven effective DIY methods to detect window air leaks. Whether you've chosen the simple visual inspection or opted for the more advanced blower door test, you're well-equipped to identify drafts in your home. Don't hesitate to combine these techniques for a thorough assessment. By addressing these leaks, you'll improve your home's energy efficiency, reduce utility bills, and enhance overall comfort. Take action today to seal those pesky air leaks!


Leave a Reply