To insulate your attic ductwork, start by evaluating its condition and cleaning it thoroughly. Gather necessary tools and materials, including protective gear and insulation. Seal any leaks with mastic sealant or foil tape before insulating. Choose insulation with an appropriate R-value for your climate, typically R-6 to R-8. Measure and cut the insulation to fit snugly around ducts, wrapping carefully and securing with foil tape. Pay special attention to joints and connections, ensuring complete coverage. Finally, conduct a thorough inspection and maintain your insulation regularly. By following these steps, you'll boost your home's energy efficiency and comfort. Dive deeper to master each stage of the process.
Assessing Your Attic Ductwork

Before you begin insulating your attic ductwork, a thorough assessment is essential.
Start by inspecting the overall condition of your ducts. Look for any visible damage, such as holes, tears, or disconnected sections. These issues should be addressed before insulation.
Next, check the existing insulation, if any. Note its type, thickness, and condition. If it's damaged or inadequate, you'll need to remove or supplement it.
Measure the total length and diameter of your ductwork to calculate the amount of insulation needed.
Evaluate the accessibility of your ducts. Some areas may be challenging to reach, requiring special tools or techniques. Identify potential obstacles like electrical wiring, plumbing, or structural elements that could complicate the insulation process.
Assess the airflow and temperature in different rooms of your house. Uneven temperatures or weak airflow could indicate ductwork issues that need addressing before insulation.
Gathering Necessary Tools and Materials
Preparation is key when insulating attic ductwork. Before you begin, gather all the necessary tools and materials to guarantee a smooth, efficient process. You'll need:
- Protective gear: Safety goggles, dust mask, work gloves, and knee pads
- Measuring tape
- Utility knife
- Staple gun and staples
- Duct tape
- Foil tape
- Insulation: Fiberglass batts or rolls (R-6 to R-8 recommended)
- Wire mesh (if using loose-fill insulation)
- Flashlight or headlamp
- Ladder or step stool
For the insulation, choose a product specifically designed for ductwork. Fiberglass batts are easy to work with and provide excellent coverage. If you're using loose-fill insulation, you'll need additional materials like wire mesh to secure it in place.
Don't forget to check your existing ductwork for leaks before insulating. You may need duct mastic or metal tape to seal any gaps or joints.
Having all these materials on hand will save you time and prevent interruptions during the insulation process. Remember to measure your ductwork accurately to purchase the correct amount of insulation, allowing for some overlap and waste.
Cleaning and Preparing Ductwork

With a clean slate, you'll achieve better insulation results. Begin by thoroughly inspecting your attic ductwork for any visible damage, leaks, or loose connections. Use a flashlight to examine hard-to-see areas. If you spot any issues, address them before proceeding with insulation.
Next, remove dust and debris from the ductwork's surface using a vacuum cleaner with a brush attachment. For stubborn dirt, wipe the ducts with a damp cloth. Allow the surface to dry completely before moving on.
Check for any existing insulation that may be damaged or moldy. Remove and dispose of it properly. If you encounter asbestos, stop immediately and contact a professional for safe removal.
Seal any gaps or leaks in the ductwork using mastic sealant or metal tape. Don't use duct tape, as it degrades over time. Pay special attention to joints and connections.
Sealing Duct Leaks
Sealing duct leaks is a key step in optimizing your attic's energy efficiency. Before insulating, you'll need to identify and seal any leaks in your ductwork. Use a smoke pencil or incense stick to detect air leaks by observing the smoke's movement around joints and seams.
Once you've located the leaks, it's time to seal them. For small gaps and seams, apply mastic sealant using a brush or your gloved hand. This paste-like substance creates an airtight seal as it dries. For larger gaps, use foil-backed tape specifically designed for ductwork. Avoid using standard duct tape, as it degrades quickly in high temperatures.
When sealing duct leaks, pay special attention to these areas:
- Joints where duct sections connect
- Connections between the main trunk lines and branch ducts
- Points where ducts attach to vents or registers
After sealing, allow the mastic to dry completely before proceeding with insulation. This typically takes 24 to 48 hours, depending on humidity levels.
Once dry, test the ductwork again using the smoke pencil to verify all leaks have been successfully sealed. If you find any remaining leaks, address them before moving on to the insulation phase.
Choosing the Right Insulation

When choosing insulation for your attic ductwork, you'll need to assess different types of materials and their R-values.
Fiberglass, foam board, and spray foam are common options, each with unique properties and installation methods.
Your choice should factor in the local climate, existing insulation, and your budget to guarantee peak energy efficiency.
Types of Insulation Materials
Choosing the right insulation material for your attic ductwork is vital for maximizing energy efficiency and comfort in your home. There are several types of insulation materials available, each with its own benefits and drawbacks.
Fiberglass is a popular choice due to its affordability and effectiveness. It comes in batts or rolls and can be easily installed around ductwork.
Mineral wool, also known as rock wool, offers excellent fire resistance and sound dampening properties. It's slightly more expensive than fiberglass but provides better insulation.
For those seeking an eco-friendly option, cellulose insulation made from recycled paper products is a great choice. It's treated with fire retardants and can be blown into tight spaces around ductwork.
Spray foam insulation, while more expensive, offers superior air sealing properties and can be applied directly to ductwork surfaces.
When selecting insulation material, consider these factors:
- R-value: The higher the R-value, the better the insulation performance
- Moisture resistance: Choose materials that won't absorb water or promote mold growth
- Fire resistance: Opt for materials with good fire-resistant properties
Remember to check local building codes and manufacturer recommendations before making your final decision.
Proper installation is essential for ideal performance, so consider hiring a professional if you're unsure about tackling the project yourself.
R-Value Considerations
Understanding R-value is essential when selecting insulation for your attic ductwork. R-value measures insulation's thermal resistance, with higher values indicating better insulation performance. For attic ductwork, you'll typically want an R-value between R-6 and R-11, depending on your climate and energy efficiency goals.
Consider your local building codes and energy efficiency standards when choosing insulation. Colder climates generally require higher R-values to maintain comfortable temperatures and reduce energy costs.
Don't forget to factor in the existing insulation around your ducts, as you may need to add less if there's already some protection in place.
Keep in mind that different insulation materials have varying R-values per inch of thickness. Fiberglass, for example, typically has an R-value of 2.2 to 2.7 per inch, while spray foam can reach up to R-6 per inch. This means you'll need less thickness with spray foam to achieve the same insulation level as fiberglass.
When calculating the necessary R-value, also consider the ductwork's location and exposure to temperature extremes. Ducts in unconditioned attic spaces may require higher R-values than those in partially conditioned areas.
Measuring and Cutting Insulation
Precise measurements and clean cuts are essential for effective ductwork insulation. Before you begin, gather your tools: a tape measure, utility knife, and straightedge. Measure each section of ductwork carefully, accounting for bends and joints. Add an extra inch to your measurements to guarantee complete coverage.
When cutting the insulation, use a sharp utility knife and a straightedge for clean, straight cuts. Place the insulation on a flat surface and mark your measurements. Cut through the facing and insulation in one smooth motion. For circular ducts, wrap a piece of paper around the duct to create a template, then transfer this to your insulation for cutting.
Remember these key points when measuring and cutting:
- Always wear protective gear, including gloves and a dust mask
- Cut on a safe, stable surface to avoid accidents
- Keep your utility knife sharp for cleaner cuts
For oddly shaped sections or obstacles, you may need to cut the insulation into smaller pieces. Take your time with these areas to guarantee a snug fit.
Wrapping Ducts With Insulation

When wrapping ducts with insulation, you'll need to choose the right materials for the job.
You'll want to select insulation with an appropriate R-value and vapor barrier to protect against moisture.
As you begin wrapping, guarantee you're using proper techniques to cover the ducts completely and secure the insulation in place.
Choosing Insulation Materials
Selecting the right insulation material for wrapping your attic ductwork is crucial for maximizing energy efficiency. The most common options include fiberglass, foam board, and reflective insulation. Each material has its own set of advantages and considerations.
Fiberglass insulation is widely available and cost-effective. It comes in rolls or batts and is easy to install around ductwork.
Foam board insulation offers a higher R-value per inch, making it ideal for tight spaces. It's rigid and can be cut to fit snugly around ducts.
Reflective insulation, made of foil-faced materials, works well in hot climates by reflecting radiant heat.
When choosing your insulation material, consider these factors:
- R-value: Higher values indicate better insulation performance
- Moisture resistance: Opt for materials that won't absorb water or promote mold growth
- Fire resistance: Confirm the insulation meets local building codes for fire safety
Don't forget to measure your ductwork carefully before purchasing insulation. You'll need enough material to cover the entire surface area without gaps.
If you're unsure about which insulation type is best for your attic, consult with a professional or your local home improvement store for guidance tailored to your specific needs and climate.
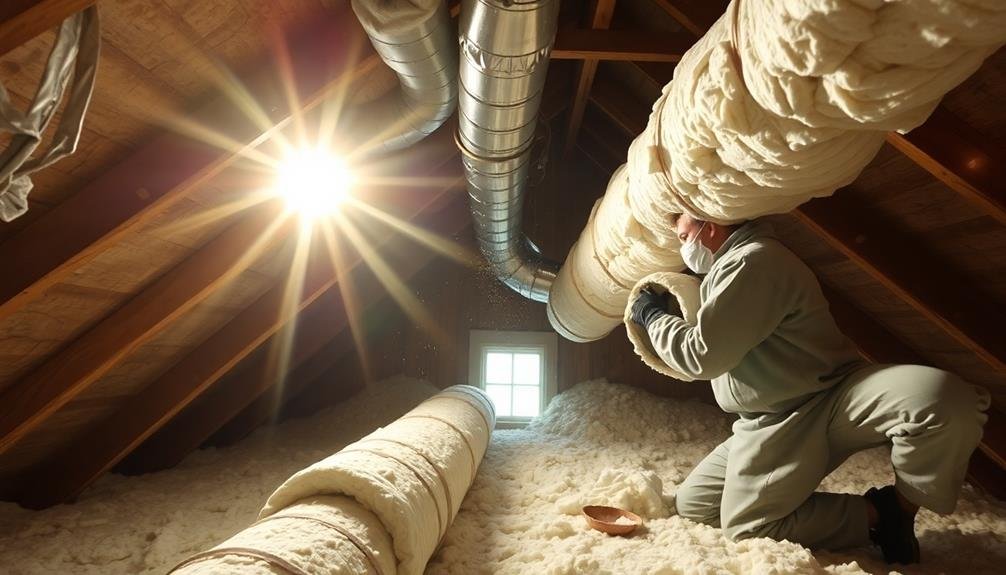
Proper Wrapping Techniques
Now that you've chosen the right insulation material, it's time to focus on proper wrapping techniques. Begin by measuring the circumference of your ductwork and cut the insulation to size, allowing for a 2-inch overlap. Start at a seam or joint, and wrap the insulation around the duct, guaranteeing a snug fit without compressing it. Secure the insulation with foil tape every 12 inches along the seam.
For round ducts, wrap the insulation in a spiral pattern, overlapping each turn by 2 inches. For rectangular ducts, cover the bottom and sides first, then the top. At corners, cut and fold the insulation to create a neat, tight fit.
Don't forget to insulate elbows and joints, cutting smaller pieces to fit these irregular shapes. Seal all seams and joints with foil tape to prevent air leaks and guarantee maximum efficiency. Pay special attention to areas where ducts connect to vents or registers.
Securing Insulation in Place
After wrapping your attic ductwork with insulation, you'll need to secure it properly to guarantee long-lasting effectiveness. Use foil tape or duct mastic to seal any seams or joints in the insulation, ensuring a continuous barrier against heat transfer.
Don't rely on standard duct tape, as it can deteriorate over time and lose its adhesive properties.
To further secure the insulation, use wire or plastic zip ties at regular intervals along the ductwork. Space them about 18 inches apart, being careful not to compress the insulation excessively. This will help prevent sagging or shifting over time.
For ideal insulation performance, consider these additional steps:
- Install insulation supports between joists to prevent the insulation from touching the attic floor
- Use insulation hangers for large or irregularly shaped ducts
- Apply adhesive-backed pins to metal ducts before wrapping to help hold the insulation in place
Insulating Duct Joints and Connections

Duct joints and connections call for special attention when insulating your attic ductwork. These areas are prone to air leaks and heat loss, so proper insulation is essential. Start by inspecting all joints and connections for gaps or loose fittings. Use mastic sealant or metal tape to seal any leaks you find before insulating.
For insulating joints, cut small pieces of insulation to fit snugly around the connection points. Wrap these pieces carefully, ensuring there are no gaps. Secure them with tape or wire ties.
For larger connections, such as where ducts meet registers or plenums, use pre-formed insulation sleeves or custom-cut pieces of rigid foam board.
Don't forget to insulate around duct supports and hangers. These metal components can create thermal bridges, allowing heat to escape. Wrap insulation around the supports, making sure it's continuous with the rest of the duct insulation.
Pay special attention to flex ducts. Their corrugated surface can make insulation tricky. Use a specialized flex duct insulation sleeve or carefully wrap batts around the entire length, securing them with tape every few feet to prevent sagging.
Final Inspection and Maintenance Tips
Completion of your attic ductwork insulation project calls for a thorough final inspection. Check for any gaps, tears, or areas where insulation might be compressed or missing. Confirm all joints and connections are properly sealed and insulated.
Pay special attention to areas around vents, registers, and where ducts meet walls or floors.
After inspection, it's essential to maintain your newly insulated ductwork. Regularly check for:
- Moisture or condensation, which can lead to mold growth
- Pest intrusions that may damage insulation
- Shifting or sagging of insulation materials
Schedule annual inspections to catch any issues early. If you notice a decrease in your HVAC system's efficiency or uneven heating and cooling, it may indicate a problem with your duct insulation.
Keep your attic well-ventilated to prevent moisture buildup, which can compromise insulation effectiveness.
If you're planning any renovations or modifications in your attic, be careful not to damage the insulated ductwork. Consider marking the locations of ducts to avoid accidental damage during future projects.
Frequently Asked Questions
Can I Insulate Attic Ductwork in Summer, or Should I Wait for Cooler Weather?
You can insulate attic ductwork in summer, but it's more comfortable in cooler weather. If you choose to do it in summer, start early in the morning, take frequent breaks, and stay hydrated to avoid heat-related issues.
How Often Should Attic Ductwork Insulation Be Replaced or Upgraded?
You should inspect your attic ductwork insulation annually. Replace or upgrade it every 15-20 years, or sooner if you notice damage, wear, or reduced efficiency. Don't wait for problems; proactive maintenance guarantees peak performance and energy savings.
Will Insulating Attic Ductwork Help Reduce Noise From My HVAC System?
Yes, insulating your attic ductwork can help reduce HVAC noise. You'll notice less vibration and sound transmission through the ducts. It's an effective way to quieten your system and improve overall comfort in your home.
Is It Necessary to Hire a Professional for Attic Ductwork Insulation?
You don't necessarily need to hire a professional for attic ductwork insulation. If you're handy and comfortable working in tight spaces, you can tackle this project yourself. However, if you're unsure, it's best to consult an expert.
Can Insulating Attic Ductwork Help Improve Indoor Air Quality?
Yes, insulating your attic ductwork can improve indoor air quality. It prevents dust and allergens from entering your ducts, reduces condensation that can lead to mold growth, and helps maintain consistent temperatures throughout your home, enhancing overall air quality.
In Summary
You've successfully insulated your attic ductwork! By following these steps, you've improved your home's energy efficiency and comfort. Remember to periodically check your insulation for signs of wear or damage. Don't forget to maintain proper attic ventilation to prevent moisture buildup. If you're unsure about any part of the process, it's always best to consult a professional. Your efforts will pay off in lower energy bills and a more comfortable home year-round.


Leave a Reply