Installing recycled denim insulation is a straightforward DIY project you can tackle with basic tools and know-how. You'll need denim insulation batts, a utility knife, measuring tape, and safety gear like gloves and a dust mask. Start by preparing your work area, then measure and cut the insulation to fit between studs. Install the batts snugly, ensuring full coverage and trimming around obstacles. Seal any gaps with caulk or foam to maximize efficiency. Remember to prioritize safety by wearing protective gear and maintaining good ventilation throughout the process. With these steps in mind, you're well on your way to a more eco-friendly and energy-efficient home.
Gathering Tools and Materials

Assembling the right tools and materials is essential for a successful denim insulation installation. You'll need:
- Recycled denim insulation batts
- Utility knife
- Measuring tape
- Straight edge or T-square
- Safety glasses
- Dust mask
- Work gloves
- Staple gun and staples
- Stepladder
- Flashlight
Ensure you've purchased enough denim insulation to cover your project area. Measure the space carefully and add 10% extra for waste. The insulation should come in pre-cut batts, but you may need to trim them to fit specific areas.
For safety, don't forget protective gear. Wear safety glasses to shield your eyes from dust and debris. A dust mask will prevent you from inhaling small fibers, while work gloves protect your hands during installation.
Your utility knife should be sharp for clean cuts. A straight edge or T-square will help you make precise measurements and cuts. The staple gun is vital for securing the insulation in place, so check that it's loaded with the correct staple size.
Lastly, a stepladder will help you reach higher areas, and a flashlight can illuminate dark corners during installation.
Preparing the Installation Area
Before you begin installing recycled denim insulation, you'll need to prepare the area properly.
Start by clearing out the space and thoroughly cleaning the walls and floor to remove any dust or debris.
Next, carefully measure the walls and mark the studs, ensuring you have accurate dimensions for cutting and fitting the insulation.
Clear and Clean Space
Three key steps are essential when preparing your installation area for recycled denim insulation.
First, you'll need to clear the space completely. Remove any furniture, stored items, or debris from the area where you'll be installing the insulation. This includes taking down curtains, removing outlet covers, and relocating any obstacles that might hinder your work.
Next, thoroughly clean the area. Vacuum or sweep the floor to remove dust and debris. Wipe down walls and surfaces with a damp cloth to guarantee a clean working environment. Pay special attention to corners and crevices where dirt tends to accumulate.
Lastly, inspect the space for any potential issues that could affect the insulation's performance:
- Check for moisture problems or leaks
- Look for signs of pest infestation
- Identify and repair any damaged areas in walls or ceilings
Address these issues before proceeding with the installation. A clean, dry, and structurally sound space will guarantee maximum performance of your recycled denim insulation.
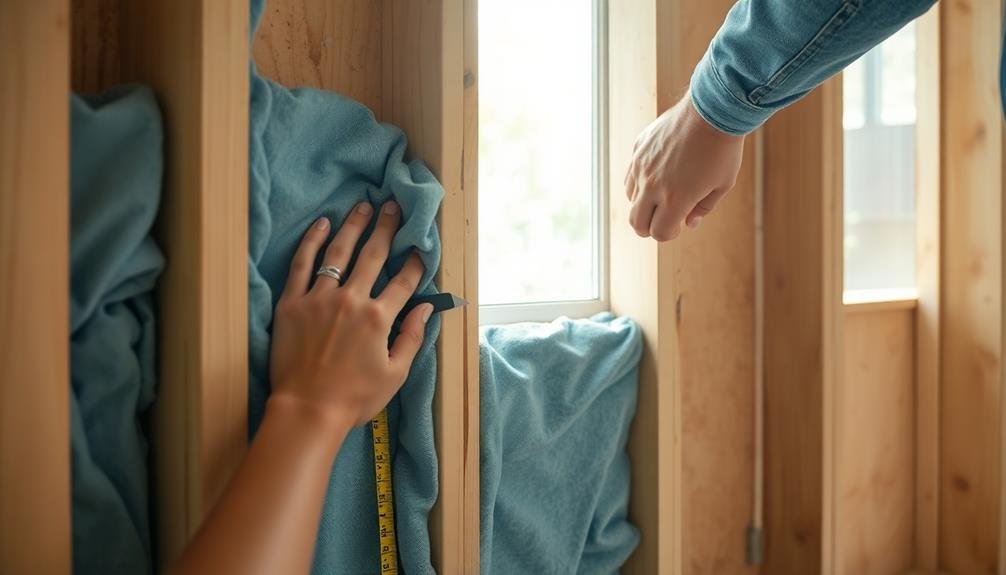
Measure and Mark Walls
After you've cleared and cleaned the space, it's time to measure and mark your walls for the recycled denim insulation. Start by measuring the height and width of each wall section between studs. Use a tape measure and note these dimensions on a piece of paper. You'll need these measurements to cut your insulation panels accurately.
Next, locate and mark the studs on your walls. Use a stud finder to identify their positions, typically 16 or 24 inches apart. Mark each stud's center with a pencil or chalk line. This will guide you when installing the insulation and make certain it's properly secured.
If you have any electrical outlets, switches, or other obstacles, measure and mark their locations as well. You'll need to cut around these when fitting the insulation.
Don't forget to measure and mark areas around windows and doors.
Measuring and Cutting Denim Insulation

Measuring and cutting denim insulation accurately is essential for a successful installation. Before you begin, verify you have a sharp utility knife, a straightedge, and a measuring tape. Wear protective gear, including gloves, goggles, and a dust mask, as recycled denim can release fibers during cutting.
To measure and cut your denim insulation:
- Measure the height of the wall cavity and add 1 inch for a snug fit.
- Transfer this measurement to the insulation, using a straightedge to mark a straight line.
- Score the insulation along the marked line with your utility knife, then fold it back and cut through completely.
When cutting around obstacles like electrical boxes, measure their dimensions and location within the cavity. Mark these measurements on the insulation and cut out the appropriate shapes. For pipes or wires, create slits in the insulation to accommodate them.
Remember to cut the insulation slightly wider than the cavity to guarantee a tight fit. This prevents gaps and maximizes insulation effectiveness.
If you're working with batts, you may need to cut them lengthwise to fit narrower spaces. Always cut on a clean, flat surface to maintain accuracy and safety throughout the process.
Installing Insulation Between Studs
Begin the installation process by ensuring your work area is clean and free from debris. Put on protective gear, including gloves, a dust mask, and safety glasses.
Start at one end of the wall and work your way across, fitting the pre-cut insulation pieces between the studs. Gently press the insulation into place, making sure it fills the entire cavity without being compressed.
For a snug fit, you'll want the insulation to be slightly wider than the stud spacing. If necessary, use a utility knife to trim excess material. Pay special attention to areas around electrical outlets, pipes, and other obstructions. Cut small slits in the insulation to accommodate these features, ensuring a tight seal around them.
As you install each piece, check for any gaps or voids. Fill these with smaller pieces of insulation to maintain consistent coverage. Don't leave any areas exposed, as this can reduce the overall effectiveness of your insulation.
Once you've filled all the cavities between studs, step back and visually inspect your work. Make any necessary adjustments before moving on to the next step in your insulation project.
Sealing Gaps and Edges

With the insulation snugly fitted between the studs, it's time to focus on sealing gaps and edges. This vital step guarantees maximum energy efficiency and prevents air leakage. Use a combination of caulk and spray foam to seal any remaining openings around electrical boxes, plumbing pipes, and where the insulation meets the framing.
Start by inspecting the entire insulated area for gaps. Pay close attention to corners, joints, and areas where different building materials meet. Once you've identified the gaps, follow these steps:
- For small cracks and seams, apply a bead of caulk using a caulking gun.
- Use low-expansion spray foam for larger gaps, especially around windows and doors.
- Seal the edges where the insulation meets the top and bottom plates of the wall.
Don't forget to address any penetrations through the wall, such as vents or cables. These areas are common sources of air leakage. Use appropriate sealants that are compatible with the materials you're working with.
Safety Precautions and Tips
When installing recycled denim insulation, you'll need to prioritize safety with essential protective gear and proper handling techniques.
You should wear a dust mask, safety goggles, and gloves to shield yourself from potential irritants.
Don't forget to maintain proper ventilation in your work area and clean up thoroughly after installation to minimize exposure to loose fibers.
Protective Gear Essentials
Safety should always come first when working with insulation materials. When installing recycled denim insulation, you'll need to protect yourself from potential irritants and debris.
Start by wearing a properly fitted respirator mask to prevent inhalation of small fibers. Choose safety goggles that seal around your eyes to keep out dust and particles. Don't forget to put on work gloves to shield your hands from cuts and irritation.
Long-sleeved shirts and pants are essential to cover your skin fully. Opt for tight-woven fabrics that won't allow fibers to penetrate easily. Tuck your pants into your socks and your shirt into your pants to create a barrier against stray fibers. Consider using disposable coveralls for added protection.
To verify you're fully prepared, here's a quick checklist of protective gear essentials:
- Respirator mask
- Safety goggles
- Work gloves
Remember to work in a well-ventilated area and take breaks as needed.
After finishing the installation, remove your protective gear carefully to avoid spreading fibers. Wash your hands thoroughly and shower to remove any remaining particles from your skin and hair.
Proper Handling Techniques
Now that you're geared up for safety, it's time to focus on proper handling techniques for recycled denim insulation. Always handle the insulation gently to prevent releasing fibers into the air. When cutting, use sharp utility knives or scissors to make clean cuts, reducing fiber dispersion.
Work in a well-ventilated area and avoid creating dust. If you need to trim the insulation, do so outside or in a designated space away from living areas. Don't compress the insulation more than necessary, as this can reduce its effectiveness. When fitting pieces, cut them slightly oversized and allow them to expand into place.
Keep the insulation dry during installation and storage. Moisture can lead to mold growth and reduce insulating properties. If you encounter damp insulation, replace it immediately. Don't stack heavy objects on the insulation, as this can damage its structure.
Take frequent breaks to minimize exposure and drink plenty of water to stay hydrated. After handling the insulation, wash your hands thoroughly with soap and water.
Vacuum the work area using a HEPA filter vacuum to capture any loose fibers. By following these techniques, you'll guarantee a safer and more effective installation process.
Ventilation and Cleanup
Throughout the installation process, proper ventilation and thorough cleanup are essential for your safety and the project's success.
When working with recycled denim insulation, guarantee you're in a well-ventilated area. Open windows and doors, or use fans to circulate air. This helps reduce dust and fiber particles in the air, making breathing easier and preventing potential respiratory irritation.
Wear a dust mask and safety goggles to protect yourself from airborne particles. As you work, regularly vacuum the area to minimize dust accumulation.
Once you've finished installing the insulation, conduct a thorough cleanup. Use a HEPA filter vacuum to remove any loose fibers or dust from surfaces, including walls, floors, and nearby furniture.
For effective cleanup and safety, follow these key steps:
- Dispose of insulation scraps and packaging in sealed bags
- Wipe down all surfaces with a damp cloth to catch any remaining particles
- Wash your work clothes separately from other laundry
Remember to shower after completing the installation to remove any fibers that may have clung to your skin or hair.
Frequently Asked Questions
How Does Recycled Denim Insulation Compare to Fiberglass in Terms of Effectiveness?
You'll find recycled denim insulation performs comparably to fiberglass regarding effectiveness. It's got similar R-values, meaning it insulates just as well. Plus, it's eco-friendly and doesn't irritate your skin like fiberglass can.
Can Recycled Denim Insulation Be Used in Both Walls and Ceilings?
Yes, you can use recycled denim insulation in both walls and ceilings. It's versatile and easy to install in various spaces. You'll find it works well for soundproofing and thermal insulation throughout your home, offering flexibility in application.
Is Recycled Denim Insulation Resistant to Mold and Pests?
You'll be pleased to know that recycled denim insulation is naturally resistant to mold and pests. It's treated with borate, which deters insects and rodents. However, it's still important to keep your insulation dry to prevent any potential issues.
How Long Does Recycled Denim Insulation Typically Last Before Needing Replacement?
You'll be pleased to know that recycled denim insulation can last up to 50 years with proper installation. It's durable and won't settle or lose its insulating properties over time. You won't need to replace it for decades.
Are There Any Specific Building Codes or Regulations for Using Denim Insulation?
You'll need to check local building codes for specific regulations on denim insulation. While it's generally accepted, some areas may have requirements for fire resistance or moisture control. Always consult your local building department before installation.
In Summary
You've successfully installed recycled denim insulation in your home! By following these steps, you've created a more energy-efficient space while using an eco-friendly material. Remember to clean up any scraps and dispose of them properly. Don't forget to wear protective gear during future maintenance. With your newly insulated walls, you'll enjoy improved temperature control and reduced energy bills. Great job on completing this DIY project and making your home more sustainable!


Leave a Reply