
To seal your basement rim joists, start by gathering necessary tools and materials, including rigid foam insulation, spray foam, and a caulk gun. Clear the work area and inspect for moisture or pest issues. Measure and cut the insulation to fit snugly in each joist cavity, then secure it with adhesive sealant and fasteners. Use expanding foam or caulk to seal any remaining gaps and cracks around pipes or wires. Finally, conduct a thorough inspection and establish a maintenance routine. By following these steps, you'll improve your home's energy efficiency and prevent moisture problems. There's more to learn about this vital home improvement project.
Understanding Basement Rim Joists
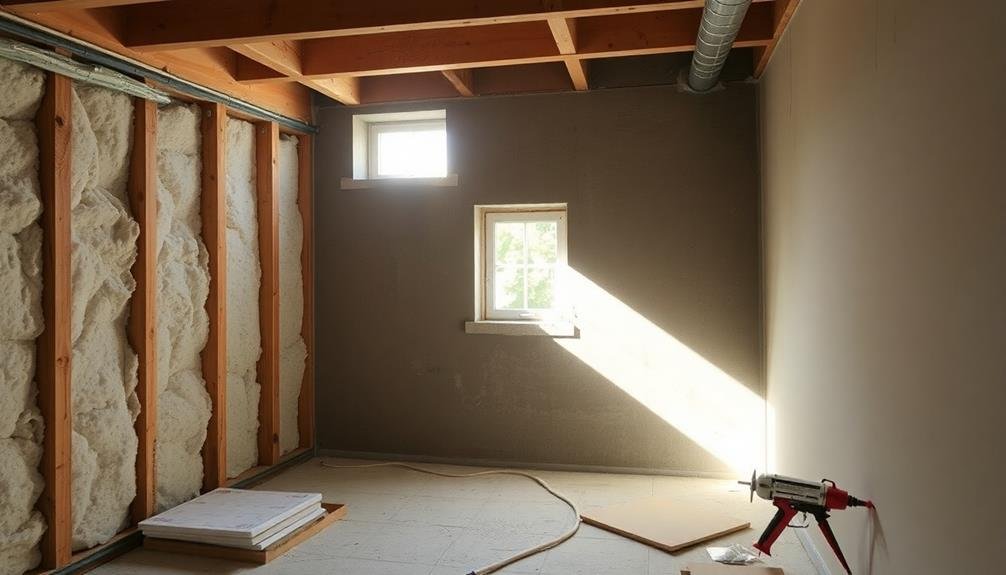
Basement rim joists are vital structural components that connect your home's foundation to its floor system. These horizontal wooden beams run along the perimeter of your basement, sitting atop the foundation wall and supporting the floor joists above. They're essential for transferring loads from the upper floors to the foundation and maintaining your home's structural integrity.
You'll find rim joists in the area between your basement ceiling and first floor, often exposed in unfinished basements. They're typically made of lumber matching the dimensions of your floor joists.
Due to their location, rim joists are vulnerable to air leaks, moisture intrusion, and heat loss, making them prime candidates for insulation and air sealing.
Properly insulating and sealing your rim joists can greatly improve your home's energy efficiency, reduce drafts, and prevent moisture-related issues like mold growth.
It's important to inspect your rim joists regularly for signs of damage, rot, or pest infestation. When planning to insulate, verify the area is clean, dry, and free from any existing moisture problems.
Addressing these issues beforehand will maximize the effectiveness of your insulation efforts and protect your home's structural integrity.
Necessary Tools and Materials
For sealing basement rim joists effectively, you'll need to gather the right tools and materials. Start by collecting safety equipment, including safety glasses, a dust mask, and work gloves.
You'll also need a utility knife, measuring tape, and a caulk gun for precise application.
The primary materials for this project are rigid foam insulation boards, spray foam insulation, and caulk. Choose rigid foam boards with an R-value suitable for your climate zone, typically 2-inch thick boards.
Spray foam insulation will help fill gaps and create an airtight seal. Select a high-quality caulk designed for use on concrete and wood surfaces.
Additional items you might need include:
- A straightedge or T-square for cutting foam boards
- A shop vacuum for cleanup
- A stepladder for reaching higher areas
Before beginning, verify you have enough materials to cover all rim joists in your basement. Measure the total linear feet of rim joists and calculate the square footage to determine how much insulation you'll need.
It's always better to have a bit extra than to run short mid-project. With these tools and materials on hand, you'll be well-prepared to tackle your rim joist insulation project efficiently.
Preparing the Work Area

With your tools and materials ready, it's time to prepare the work area. Start by clearing the space around your basement's rim joists. Remove any stored items, furniture, or obstructions that might hinder your access. Confirm you have adequate lighting to see clearly into the joist cavities.
Next, inspect the rim joists for any signs of moisture, mold, or pest infestation. Address these issues before proceeding with insulation. If you spot any electrical wiring or plumbing, make note of their locations to avoid damaging them during the sealing process.
Use a shop vacuum to clean out debris, cobwebs, and dust from the rim joist cavities. This will confirm better adhesion of the insulation and sealant materials.
| Safety Checklist | Tools Setup | Area Preparation |
|---|---|---|
| Wear protective gear | Organize tools nearby | Clear obstructions |
| Confirm proper ventilation | Check tool functionality | Clean joist cavities |
| Have a first aid kit ready | Prepare cutting station | Mark utility locations |
Measuring and Cutting Insulation
Accurate measurements are essential for a snug fit when insulating rim joists. Start by measuring the height and width of each joist cavity, accounting for any obstructions like pipes or wires. You'll want to cut the insulation slightly larger than these measurements to guarantee a tight fit.
When cutting the insulation, use a sharp utility knife and a straight edge for clean, precise cuts. Always wear protective gear, including gloves and a dust mask, as insulation fibers can irritate your skin and lungs. If you're using foam board insulation, you might need a fine-toothed saw for smoother cuts.
Remember to:
- Measure twice, cut once to avoid wasting material
- Cut on a flat, stable surface to guarantee accuracy
- Label each piece of insulation with its corresponding joist cavity location
As you cut, lay out the pieces in order, matching them to their designated spaces. This organization will streamline the installation process and help you spot any measurement errors before you begin fitting the insulation.
If you encounter oddly shaped areas, don't hesitate to cut custom pieces to guarantee complete coverage.
Installing Rigid Foam Boards

To install rigid foam boards, you'll first need to measure and cut them to fit snugly between the floor joists.
Next, apply a continuous bead of adhesive sealant around the perimeter of each board before pressing it into place.
Measure and Cut Boards
Before diving into the installation process, you'll need to measure and cut the rigid foam boards to fit snugly between your basement's rim joists. Start by measuring the width and height of each joist cavity, as dimensions can vary slightly. Use a tape measure for accuracy and note down the measurements for each space.
When cutting the foam boards, always wear safety glasses and work gloves. Use a straight edge and a utility knife to score the board along your measured lines. After scoring, you can snap the board along the cut line for a clean break.
For more precise cuts, especially around obstacles like pipes or wires, you may need to use a saw or a hot wire foam cutter.
Remember to cut the boards slightly smaller than the measured space to allow for easy insertion and a proper fit. A gap of about 1/4 inch on each side is typically sufficient. This will guarantee you can apply spray foam around the edges to create an airtight seal.
- Cut boards 1/4 inch smaller than measured dimensions
- Score deeply with multiple passes for cleaner cuts
- Use appropriate tools for different cutting needs (utility knife, saw, hot wire cutter)
Apply Adhesive Sealant
With your foam boards cut to size, it's time to apply adhesive sealant. Choose a high-quality, expandable foam sealant specifically designed for insulation projects. Put on protective gloves and safety glasses before you begin.
Start by shaking the sealant can vigorously for about 30 seconds. Attach the application nozzle and invert the can. Apply a continuous bead of sealant around the perimeter of the rim joist cavity, about 1 inch from the edge. Create a zigzag pattern across the center of the cavity to guarantee proper adhesion.
Work quickly, as the foam will begin to expand immediately. Press the foam board firmly into place, pushing it against the rim joist. Hold it steady for about 30 seconds to allow the adhesive to set. If you notice any gaps between the foam board and the surrounding wood, fill them with additional sealant.
Repeat this process for each rim joist cavity, working methodically around your basement. Allow the sealant to cure completely according to the manufacturer's instructions before proceeding to the next step. This typically takes about 1 hour.
Secure With Fasteners
While the adhesive sealant provides a strong bond, securing your foam boards with fasteners guarantees they'll stay in place for years to come. Use compatible fasteners like plastic cap nails or washered screws designed for insulation boards.
Start at one corner and work your way across, placing fasteners every 12 to 16 inches along the edges and in the center of each board.
When fastening, verify you're driving the fasteners through the foam and into the wooden rim joist behind it. Be careful not to overtighten, as this can compress the foam and reduce its insulating properties. If you encounter any obstacles like pipes or wires, work around them carefully, cutting the foam to fit snugly.
For added efficiency and effectiveness:
- Pre-drill pilot holes to prevent splitting the wood
- Use a depth stop on your drill to avoid crushing the foam
- Apply additional sealant around any penetrations you create
Once all boards are securely fastened, inspect your work. Look for any gaps or areas where the foam isn't flush against the rim joist.
Address these issues by adding more adhesive or adjusting the boards as needed. This attention to detail will verify maximum insulation performance and energy savings in your basement.
Sealing Gaps and Cracks
To effectively seal gaps and cracks in your basement rim joists, you'll need to start by carefully inspecting the area to identify all problem spots.
Once you've located the gaps, select appropriate sealant materials like caulk or spray foam, depending on the size and location of the openings.
Apply the sealant meticulously, ensuring complete coverage and allowing sufficient time for it to cure properly.
Identify Problem Areas
The most critical step in sealing basement rim joists is identifying all the problem areas. You'll need to thoroughly inspect the entire perimeter of your basement, paying close attention to the area where the foundation wall meets the wooden frame of your house.
Look for gaps, cracks, or any visible openings that could allow air, moisture, or pests to enter. Use a flashlight to illuminate dark corners and crevices.
You may find problem areas around:
- Pipe and wire penetrations through the rim joist
- Corners where two rim joists meet
- The intersection of the rim joist and sill plate
Don't overlook small cracks or gaps, as even tiny openings can lead to significant energy loss and moisture issues. Feel for drafts with your hand or use a smoke pencil to detect air movement.
If you're unsure about identifying problem areas, consider hiring a professional energy auditor to perform a thorough inspection. They can use specialized tools like infrared cameras to detect hidden air leaks and insulation gaps.
Once you've identified all the problem areas, you'll be ready to move on to the sealing process.
Choose Sealant Materials
Selecting the right sealant materials is essential for effectively sealing basement rim joists. You'll need to choose products that can effectively fill gaps and create an airtight seal. For most rim joist applications, foam sealants are the go-to choice.
Opt for expanding spray foam in a can for larger gaps and cracks. This type of foam expands to fill spaces and hardens to create a durable seal. For smaller gaps and cracks, use a non-expanding foam sealant or caulk. Silicone-based caulks are ideal for areas prone to moisture, while latex caulks work well for drier spots.
Don't forget about weatherstripping for any windows in your rim joist area. Choose self-adhesive foam tape or rubber gaskets for a tight seal around window frames.
For sealing around pipes or wires that penetrate the rim joist, use specialized rubber gaskets or foam sealant designed for these applications.
When purchasing materials, consider the temperature range in your basement and choose products that can withstand those conditions.
Also, make certain you have enough sealant to cover all the identified problem areas in your rim joist space.
Apply Sealant Properly
Once you've gathered your sealant materials, it's time to apply them properly to guarantee an effective seal.
Start by cleaning the rim joist area thoroughly, removing any dust, debris, or old insulation. Use a vacuum and a stiff brush to make certain a clean surface for the sealant to adhere to.
Next, load your caulking gun with the chosen sealant and cut the nozzle at a 45-degree angle.
Begin applying the sealant to all gaps and cracks, focusing on:
- Joints between the rim joist and the sill plate
- Seams between the rim joist and subfloor
- Any holes or penetrations for wires, pipes, or vents
Apply steady pressure as you move the caulking gun along the gaps, creating a continuous bead of sealant.
For larger gaps, you may need to apply multiple layers, allowing each layer to dry before adding the next. Use a putty knife or your finger to smooth out the sealant and make certain complete coverage.
Don't forget to seal around windows and doors in the rim joist area.
Take your time and be thorough, as proper application is essential for creating an effective air and moisture barrier in your basement.
Final Inspection and Maintenance

After completing the sealing process, it's crucial to perform a thorough final inspection and establish a maintenance routine. Check every sealed area for gaps, cracks, or missed spots. Use a flashlight to illuminate dark corners and crevices. If you find any imperfections, address them immediately with additional sealant or insulation.
Inspect the entire rim joist area for signs of moisture, mold, or pest intrusion. These issues can compromise the effectiveness of your sealing work. If you notice any problems, take appropriate action to resolve them before they worsen.
Establish a regular maintenance schedule to guarantee the longevity of your sealed rim joists. At least twice a year, visually inspect the sealed areas for any signs of wear, damage, or separation. Pay close attention to areas around pipes, vents, and other penetrations, as these are prone to movement and settling.
Keep the basement area clean and dry to prevent moisture buildup. Use a dehumidifier if necessary to maintain ideal humidity levels.
If you notice any changes in your home's energy efficiency or comfort levels, it may indicate a problem with the rim joist sealing. In such cases, conduct a thorough inspection and address any issues promptly.
Frequently Asked Questions
Can I Insulate Rim Joists if My Basement Is Already Finished?
You can insulate rim joists in a finished basement, but it's more challenging. You'll need to access the joists by removing sections of drywall or paneling. Consider hiring a professional if you're unsure about the process.
How Often Should I Replace or Inspect Rim Joist Insulation?
You should inspect your rim joist insulation annually for signs of moisture, damage, or settling. Replace it if you notice any issues. If it's in good condition, you typically won't need to replace it for 15-20 years.
Is It Necessary to Remove Old Insulation Before Installing New Materials?
You should remove old insulation before installing new materials. It's necessary to guarantee a clean surface for proper adhesion and effectiveness. If the old insulation is moldy or damaged, it's especially important to remove it completely.
Will Insulating Rim Joists Help Reduce Pest Infestations in My Basement?
Yes, insulating rim joists can help reduce pest infestations in your basement. You'll create a barrier that deters insects and rodents from entering. It's an effective way to seal gaps and cracks that pests often use as entry points.
Can I Insulate Rim Joists in a Crawl Space Using the Same Method?
Yes, you can insulate rim joists in a crawl space using the same method. It's an effective way to improve energy efficiency and reduce moisture issues. You'll need to guarantee proper ventilation and address any existing moisture problems first.
In Summary
You've now successfully sealed your basement rim joists, creating a more energy-efficient home. Remember to periodically check the insulation for any signs of moisture or damage. If you notice any issues, address them promptly to maintain the effectiveness of your work. By taking these steps, you've improved your home's comfort and potentially reduced energy costs. Don't forget to dispose of any leftover materials properly and clean up your work area.


Leave a Reply